When developing new products its hard to put time frames on it. The issue is that this seat has to be built in prototype form, then sent out to some test pilots for there feed back, then most likely changes will be made, then look at how to produce this seat to a affordable price. Once all that is done, maybe 3 months away at the earliest. Any input is welcome, send me a drawing, just remember, my priority is a freeride surf seat , not a long distant cruiser seat for the girlfriend to sit on as well.
You are using an out of date browser. It may not display this or other websites correctly.
You should upgrade or use an alternative browser.
You should upgrade or use an alternative browser.
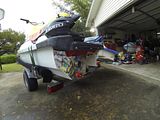
My 701 Surf Rocker made it here
- Thread starter cegpcola
- Start date
- Location
- Pensacola FL
Finished up the transom on my ski today. Installed the 701 Transom plate, Rear exhaust, Surf Wedge and surf plugs. I like the way it turned out.
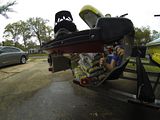
I started by removing the factory drain plugs then held the plate up and put installed the surf plugs loose to hold the plate. Once I got the plate centered up I tightened up the surf plugs and drilled the holes for the plate using a 5/32 drill bit then screwed in the screws. Once the plate was up there I took a 2 1/8 hole saw without the centering bit and drilled the hole for the exhaust. The transom plate actually works to center the hole saw. Then removed the original exhaust outlet and slid the exhaust in and trimmed the hose to fit. Then I drilled the mounting holes for the exhaust and tightened it down. At this point everything is pre-fitted. I pull everything back apart and use a nice bead of 5200 all over the back of the plate and around each hole and screw it back up making sure to clean off the excess. Then I pulled the protective cover and install the surf plugs running a light bead of 5200 around the main hole and again cleaning up and excess. Before putting on the exhaust, remove the screws from the rear bond rail trim and slide the wedge up in place making sure it is slid all the way in. using the 5/32 bit, drill holes through the existing holes in the rail into the wedge and then screw the supplied screws through and tighten up. ( Note the shorter screw goes through the center hole.) Now using 5200 around the hole for the exhaust slide the exhaust in and tighten down evenly. Now you can plug the original exhaust hole with the supplied plate. The 701 kit actually has self tapping screws and also 3 nuts that can be used. If you have the pump out, use the self tappers and seal up with 5200, or if you have a spare hand and the pump in, you can use the bolts you pull out of the factory exhaust exit and the supplied nuts to hold the plate in place.
It goes without saying that the products look great together, and clearly each serves a functional purpose. Can't wait to get some time on it back in the water once I rebuild the pump.
Kurtis
- Location
- Pensacola FL
OK, parts are ordered to fix my driveshaft and mid shaft issues so hopefully soon I can get the pump back in and the ski in the water. Thanks Jetmaniac!
- Location
- Pensacola FL
Big thanks to JetManiac for getting the parts to me so fast. Should have the pump and all put back together tonight.
- Location
- Panama City, Florida
thanks for posting the instructions and pictures, I picked up a used rocker but couldn't find any instructions and it really helped. now I just need to get some screws and put it on.I purchased this a few weeks back and unfortunately our wonderful Postal Service here in the states lost it right out of customs. It finally found my door step today. I will post up some installation pics later, but for now here are my first impressions after unwrapping.
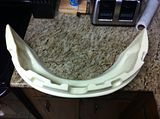
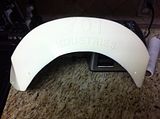
Let me start by saying that my expectations for this product was high after having a few and being around other 701 Industries products. I originally pictured in my mind that the Surf Rocker would be hollow molded much like the factory sponsons on say a Waiveraider, so when I picked the package up I was really shocked at the weight of the package. Not overly heavy by any means, but certainly heavier than a hollow molded part that I was expecting. Upon unwrapping, the weight made much more sense as the product is solid and strong, Now the weight is not enough that I feel it will overly weigh down or add too much weight to the bow of the ski, but enough to make for a solid product that will last. The mold is fantastic and well thought out as it actually has recesses molded in for the bolts that run through the bond rail to hold the front bumper on the ski. The spots for the screws are molded in as well and will make it easy to mark and drill the holes for screws to the bow. Overall, I am very pleased with my first hands on with the product and can certainly see the benefits that will outweigh the added weight and I can not wait to get it on the ski and in the water to test a little, if we ever get some surf around here. The one downside that I have is the off white color, however to be honest I knew when I ordered that the color was not going to match and thus not really a negative to the product. At the time I felt that it was my best option for the direction I was going. Just know that the white is not going to match perfect, but I feel that most will more than likely opt for one of the colored options or the black.
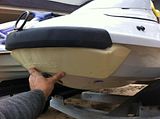
Also if you plan on installing one of these make sure that you have any parts that you pan to add or replace from in that area such as Bow Eye, and/or a Tow loop. Especially if you use your bow eye, as the bottom of the bow eye is no longer accessible. I will be installing a Hot Products Tow Loop to use in my case as well as Cold Fusion Bow eye.
As I said, I will post more pictures later as well as give another review after some riding, but I can't wait to see how it does in most riding conditions.