Freestyle Operation stryker

well I've been building skis for a while now and I figure its about time I do a build thread. About 2 years ago I decided I wanted to design and build my own hull. After a lot of testing and modding my hulls to see exactly how each of the mods effects the ride of a hull I came up with what I thought would be a great all around hull that is also a very capable freestyle ski. I only ride lakes, I am mostly a flat water freestyle and boat chaser so that is what I designed the hull to do, and it does so quite well. I have taken a lot of pics along the way so we will start at the beginning.

I started with a 1990 square nose superjet hull and split the decks because I only wanted to use the bottom deck. I started modding the bottom deck by cutting out the pump box and intake area, I knew I wanted the pump intake to be bigger for better hook up so I made it 2" wider and 1.5" longer and then glassed it back together. Another thing that always bothered me was how little room there is to work on the pump with a stock superjet hull so I made it 2" wider just so that it would be easier to work on. Next I cut it down the center length wise and spaced it apart 1.5" and then glassed it back together. the next step was to cut the hull in half width wise and remove a 6" section from the center then glass it back together.

epic 1.jpgepic 2.jpgepic 3.jpg
 
Ok so the next step after I got the pump inlet enlarged to where I wanted it was to glass it back into the hull, but I moved it back 3" from the stock location. To make sure it was strait I mounted a pump in and Centered the drive shaft in the hole in the stock bulkhead
 

Attachments

  • 2011-12-04_14-30-56_229.jpg
    2011-12-04_14-30-56_229.jpg
    37.7 KB · Views: 336
  • 2011-12-06_16-06-15_749.jpg
    2011-12-06_16-06-15_749.jpg
    44.9 KB · Views: 349
The next thing I dod was ad front rocker, but I don't have any pics of it. It was done by cutting 8 vertical slits in the side of thehull then heated up the bottom of the hull of the hull using a propane space heater till the smc got soft enough that I could pull the nose up using a ratchet strap, then I glassed it back together to hold the added rocker witch is about 2 inches higher in the nose than stock. The last mod I did was chop the rear of the ski 6". Now its time to start the finish work. For the finish work I used 2 part foam with bondo over then sand and repeat
 

Attachments

  • 2011-12-15_17-20-07_400.jpg
    2011-12-15_17-20-07_400.jpg
    42.6 KB · Views: 368
  • 2011-12-15_17-20-18_879.jpg
    2011-12-15_17-20-18_879.jpg
    28.5 KB · Views: 334
  • 2011-12-15_17-20-28_571.jpg
    2011-12-15_17-20-28_571.jpg
    33.4 KB · Views: 362
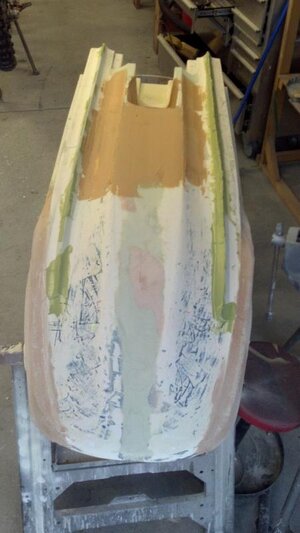
In this pic you can see where I added the built in tubbies and also how I made the strakes nice and deep like an sxr to allow the ski to carve better. The tubbies are 1" wider per side making the width of the ski in the front 3.5" wider than a stock sj bottom when you add in the 1.5" I added to the center of the ski. The strakes were just built up and shaped using a bondo and are about 1/2" taller than the standard sj strakes. The tubbies were make using 2 part foam, then rough sanded to the shape I wanted and then covered with bondo and smoothed

2011-12-15_17-20-07_400.jpg
 
Here's some pics of the finish sanding, I also added a slight concave infront of the pump tunnel like a sxr/sxi pro
 

Attachments

  • 2011-12-18_14-10-08_276.jpg
    2011-12-18_14-10-08_276.jpg
    27.5 KB · Views: 329
  • 2011-12-18_14-10-41_589.jpg
    2011-12-18_14-10-41_589.jpg
    24.7 KB · Views: 294
  • 2011-12-18_14-10-48_264.jpg
    2011-12-18_14-10-48_264.jpg
    29.3 KB · Views: 308
Ok here we have a pic of the bottom deck compared to a stock sn hull, the hulls are lined up at the tail to show how much shorter the stryker is than a stock sn. The next pic shows how I narrowed the sides of the hull in the rear by 1" on each side to get the pump inlet to sit lower in the water for better hook up,so the hull is 1/2" wider than stock in the rear, 1.5" wider in the center area before the tubbies and where the tubbies are it is 3.5" wider than a stock hull
 

Attachments

  • 2011-12-26_10-41-59_326.jpg
    2011-12-26_10-41-59_326.jpg
    32.1 KB · Views: 340
  • 2011-12-28_16-51-41_255.jpg
    2011-12-28_16-51-41_255.jpg
    36.2 KB · Views: 331
And more finish work pics, the next thing I have to do was make sure that both sides were symmetrical, to do this u maked the hull in 1" incerments and used a profile gage to check each side, this took a great deal of patience and attention to detail.
 

Attachments

  • 2011-12-28_16-51-51_112.jpg
    2011-12-28_16-51-51_112.jpg
    38 KB · Views: 291
  • 2011-12-28_16-52-01_585.jpg
    2011-12-28_16-52-01_585.jpg
    33.5 KB · Views: 272
  • 2011-12-28_16-52-10_942.jpg
    2011-12-28_16-52-10_942.jpg
    32.9 KB · Views: 283
  • 2011-12-28_16-52-25_436.jpg
    2011-12-28_16-52-25_436.jpg
    40.3 KB · Views: 268
Next I attached the deck to a some wood to make a nice big flange around it so I would have a good area to seal a vacuum Bag. At this point I also created the wider bond flange area for greater stability
 

Attachments

  • 2012-02-07_16-17-59_61.jpg
    2012-02-07_16-17-59_61.jpg
    33.4 KB · Views: 321
  • 2012-02-07_16-18-13_152.jpg
    2012-02-07_16-18-13_152.jpg
    29.9 KB · Views: 322
Here are pics of the plug after prime, wetsanding and paint
 

Attachments

  • 2012-03-24_16-03-39_642.jpg
    2012-03-24_16-03-39_642.jpg
    35.2 KB · Views: 340
  • 2012-03-24_16-03-50_57.jpg
    2012-03-24_16-03-50_57.jpg
    30.1 KB · Views: 329
  • 2012-03-24_16-03-56_478.jpg
    2012-03-24_16-03-56_478.jpg
    28.4 KB · Views: 301
  • 2012-03-24_16-04-05_784.jpg
    2012-03-24_16-04-05_784.jpg
    25.2 KB · Views: 334
Here a recap on the hull specs that started as a stock sn bottom
-7 in the rear
-6 from the center (length)
2" of rocker in the nose
1.5 wider down the center of the hull
3.5" wider where the tubbies are
.5" wider in the rear where the "negative tubbies" are
enlarged pump box area for better access to pump
Pump inlet make longer and wider
pump inlet moved back 3"
wider bond flange for stability
concave in front of pump tunnel to feed the pump better
deeper strakes to make the hull ride more precise in turns
 
Sorry guys, it looks like I don't have any pics of the mold layup, but once I had the plug done I covered it with wax then pva and layed up a mold. Here's some pics of the mold after it was popped, trimmed and prepped to lay up the first hull. The green stuff is the pva and the white is a vinyl ester gel coat
 

Attachments

  • 2012-06-16_13-35-11_685.jpg
    2012-06-16_13-35-11_685.jpg
    25.6 KB · Views: 361
  • 2012-06-17_10-35-04_85.jpg
    2012-06-17_10-35-04_85.jpg
    25.6 KB · Views: 340
the top deck will be full custom for the most part, but I will start with parts of the top deck from a 650sx.... I know it sounds funky, but I think you guys will like it
 
Top Bottom