Frosty's 95 SJ project

Frosty

New York Crew
Location
Western New York
Frosty's 95 SuperJet project

Well, I bought this hull last fall and spent the winter working the hell out of it. I stripped it completely, and while removing the old, what look to be home made, footholds, I discovered the foam was soaked. So, yada yada yada... I had to cut the tray apart and do a lot more work than I expected. I also had to rebuild much of the front part of the bond line, the usual square nose break off. As well as re-epoxy the entire bottom, since there were a ton of gouges. So, I figured, hell, why not do a hood mod while I was at it.

Here is where I'm at now:

hull -
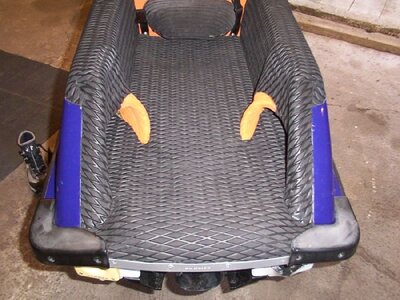
twin one way valves, finished off flush with the hull
24:7 2003 universal binding footholds - modified
Ground ribs and reinforced
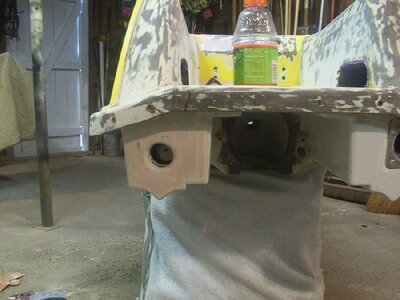
re-build nose
modified hood
Pete Jacob's conversion handle pole bracket
Stock round nose pole cut -3"

motor - much of the motor and electronics came to me through Jason (VomitSpot) and Donnie (JetskiMobile1) - Thanks a ton guys.
std bore 701cc 62t ported cylinder
62t cases
64x trued and welded crank
ADA head w/37cc domes (left over domes from my round nose upgrade)
twin 44mm mikuni carbs (red topped)
V-Force CF reeds w/boyeson reed stuffers
R&D intake manifold and Riva spacer
FP - Type 4 dry pipe (wanted a wet pipe, but this was available to me.

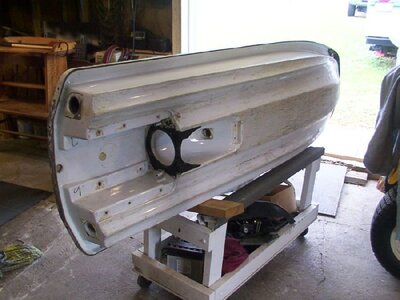
Just finished painting it... and since this was my first paint job ever, I decided to stay simple - white. Going to put some graphics on it later.

Here some of the pics... more to follow...
 

Attachments

  • 95sjb1.JPG
    95sjb1.JPG
    50.7 KB · Views: 111
  • 95sjb5.JPG
    95sjb5.JPG
    66.6 KB · Views: 120
  • 95sjc3.JPG
    95sjc3.JPG
    61.1 KB · Views: 113
  • 95sjc6.JPG
    95sjc6.JPG
    54.3 KB · Views: 169
  • 95sja8.JPG
    95sja8.JPG
    95.9 KB · Views: 105
Last edited:

Frosty

New York Crew
Location
Western New York
more...
 

Attachments

  • 95sje1.JPG
    95sje1.JPG
    46.9 KB · Views: 162
  • 95sje4.JPG
    95sje4.JPG
    55.6 KB · Views: 133
  • 95sjf3.JPG
    95sjf3.JPG
    61 KB · Views: 115
  • 95sjp2.JPG
    95sjp2.JPG
    49.9 KB · Views: 99
  • 95sjp4.JPG
    95sjp4.JPG
    82.1 KB · Views: 124

Frosty

New York Crew
Location
Western New York
a few more for now...
 

Attachments

  • 95sjp6.JPG
    95sjp6.JPG
    68.3 KB · Views: 90
  • 95sjp8.JPG
    95sjp8.JPG
    71.1 KB · Views: 93
  • 95sjp7.JPG
    95sjp7.JPG
    53.4 KB · Views: 107
  • 95sjengine.JPG
    95sjengine.JPG
    86.5 KB · Views: 128
  • 95sjengine1.JPG
    95sjengine1.JPG
    77 KB · Views: 138
F

Freestyleriverrat

Guest
Sweet man......bring that thing to Lanier :arms: Look like you have been working you butt off. Major props to ya :biggthumpup:
 

Frosty

New York Crew
Location
Western New York
Freestyleriverrat said:
Sweet man......bring that thing to Lanier :arms: Look like you have been working you butt off. Major props to ya :biggthumpup:

Thanks bro... Yeah, pretty much all winter long. I took a month off from it to upgrade my round nose... Jr. Magoo porting, 35cc domes, shortened my AC pole, modified my footholds and new turf, added a 13/17 3mm cut back Solas, shortened bracket, and a few other things too... :biggrin:

Plus had to do a few other foothold jobs for some friends. Now, it's back to work on this one... here's a few of the round nose...
 

Attachments

  • 01sj9d.JPG
    01sj9d.JPG
    93.1 KB · Views: 126
  • 01sj9c.JPG
    01sj9c.JPG
    102.7 KB · Views: 137
  • 01sj9a.JPG
    01sj9a.JPG
    92.1 KB · Views: 146
  • 01sj03.JPG
    01sj03.JPG
    63 KB · Views: 117
  • shop1.JPG
    shop1.JPG
    72.6 KB · Views: 138
Last edited:
F

Freestyleriverrat

Guest
Yeah I remember seeing those pics on anouther thread. Nice hold mods, that looks good.
 

Proformance1

Liquid Insanity
Site Supporter
Vendor Account
Location
New York Crew
Lookin' good man! :biggrin: Keep up the good work, I can not wait to see it this weekend when I drop off that hand pole mount! Sorry we all ate up so much of your time with footholds on all our heavy arse SXR's. We probably wont be able to get them out of the water anyway. LOL Hey buy the way you can't ride two SJ at the same time, and it looks lighter than my Kawi, so I was thinking........
 

Frosty

New York Crew
Location
Western New York
Proformance1 said:
Lookin' good man! :biggrin: Keep up the good work, I can not wait to see it this weekend when I drop off that hand pole mount! Sorry we all ate up so much of your time with footholds on all our heavy arse SXR's. We probably wont be able to get them out of the water anyway. LOL Hey buy the way you can't ride two SJ at the same time, and it looks lighter than my Kawi, so I was thinking........

Right on bro... ya'll can ride the square any time.
 

Frosty

New York Crew
Location
Western New York
Mouthfulloflake said:
Looks really good.

Got any more pics of the hood mod? or a run down?
I need to do both of mine.

I'll take some more pics when I get home. Basically, I used an air chizzel to get the stock liner out. I then filled in the top air vents with glass, epoxy/resin etc. and didn't worry about the outside finish to much until I completed the rest of the hood mod.

Then I used cardboard, like many other peeps have, to make a template. However, here I dropped the back part of my template more radically to the center hump area of the hood, then ran it flat toward the front of the hood, then drop the last few inches right to the very top of the hood. Then I cut my cloth to fit (two layers of 8oz I think I used). Except in a 6" wide strip across the center (from one side of the hood to the other) where I plan to drill holes for the hoses I am uses. For the hoses, I bought 2.25" reinforced pool hose from the home depot. I think a 10 ft length cost me like $15. And I used about 3.5 ft of that to install a breather in my round nose aluminum handle pole. Anyway, after that I taped the hood liner template in with duct tape to make it lay at tight to the hood as I could, so I would get a better fit once done. Mixed up my resin etc, layed it all in, then let it set up. A few days later I pulled it all out and removed the cardboard backing. Then used panel fusor, or a two part epoxy, to glue it in.

In the front of the hood I filled the air vent holes and the hood hook holes (since I needed to place mine in a different spot to accomadate the Pete Jacob's conversion bracket). Then reinforeced that area with more glass.

I then drilled 2.5" diameter holes in the back of the hood for air vents, as well at 2 - 1" holes under the back bottom of the hood for water drainage.

The hoses I will install will go up into the hood liner about 2"-3" to help keep any water that does make into the liner from getting down into the hull.

I hope this set up works. Here are a few shots, although it's not a full step by step photo log, you get the idea.
 

Attachments

  • 95sje4.JPG
    95sje4.JPG
    55.7 KB · Views: 97
  • 95sje5.JPG
    95sje5.JPG
    45.4 KB · Views: 115
  • 95sje6.JPG
    95sje6.JPG
    51.3 KB · Views: 136
  • 95sje3.JPG
    95sje3.JPG
    64.2 KB · Views: 99
  • 95sjf2.JPG
    95sjf2.JPG
    92.7 KB · Views: 159
Last edited:

Frosty

New York Crew
Location
Western New York
Here are a few more... Still need to put the HT on, and drop the motor in. I put the pole and hood on to get some alignment issues cleaned up... as going to the P.J.'s conversion bracket meant having to change the hood hook location. Still need to drop the motor in... next week...
 

Attachments

  • 95sjq1.JPG
    95sjq1.JPG
    57.6 KB · Views: 125
  • 95sjq2.JPG
    95sjq2.JPG
    62.8 KB · Views: 103
  • 95sjq3.JPG
    95sjq3.JPG
    66.6 KB · Views: 127
F

Freestyleriverrat

Guest
Nice and clean work. Breathing new life into an old sea bird :cheer:
 

Frosty

New York Crew
Location
Western New York
Mouthfulloflake said:
so, did you fiberglass OVER the cardboard?

thanks for the info!

yup. But once the resin drys, then rip the cardboard away and just epoxy in the glass liner. The cardboard is just a template. And, since I made mine the way I did, it really seams to add a lot of structual support... not only in the liner epoxied to the sides, front and back of the hood, but also to the center hump area, which ties it all together. So it's very light and strong.
 

Frosty

New York Crew
Location
Western New York
TXJFrosty said:
yup. But once the resin drys, then rip the cardboard away and just epoxy in the glass liner. The cardboard is just a template. And, since I made mine the way I did, it really seams to add a lot of structual support... not only in the liner epoxied to the sides, front and back of the hood, but also to the center hump area, which ties it all together. So it's very light and strong.

One more thing on the hood liner. I not only epoxied it in, using panel fusor from McMaster, but once that set up, I used 2.5" wide strips of fiber glass cloth around the edge (the seam between the liner and the hood). That way it was really sealed up and strong.
 
P

PancakePete

Guest
Phil,
Skis look great, you did alot of work this winter :biggthumpup: .
See you soon to Rip em'
 
Top Bottom