First Custom Build

Location
New York
I started my first custom build in January of this year. I have a bunch of pictures of the build so I figured I would start a build thread and get some feedback. I'll post a few pictures a day until I'm caught up. So here it goes...

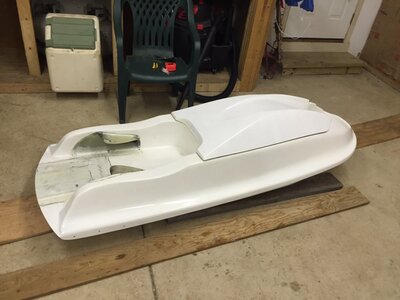
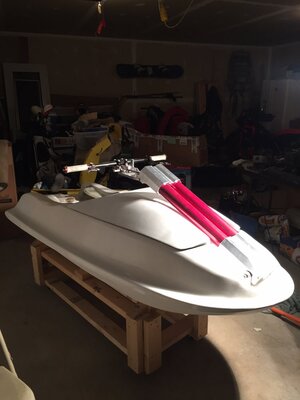
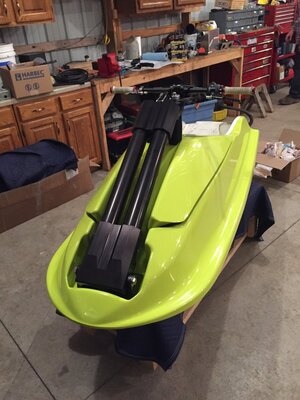
A friend of mine designed and built 3 custom hulls a few years ago. One of the hulls was never built so I stripped my '01 Superjet, sold the SJ hull & pole, and bought the custom hull from my friend.

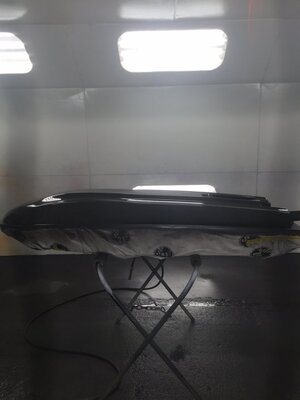
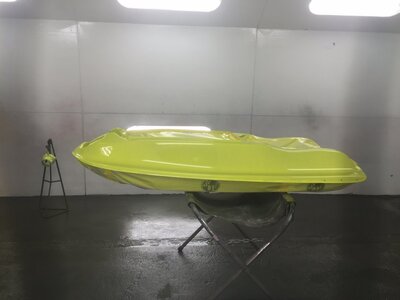
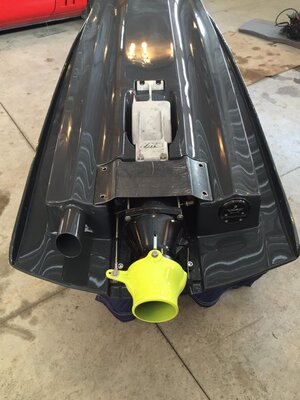
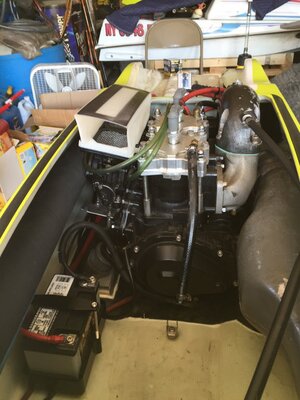
The Idea was to take the guts from my SJ and build the hull up with those. I was hoping to build a flatwater ski that I could learn to get inverted on.

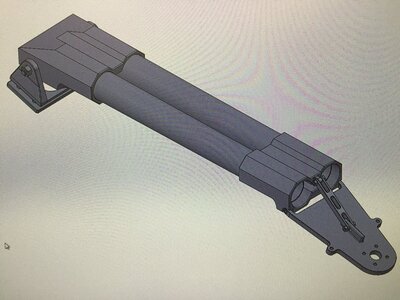
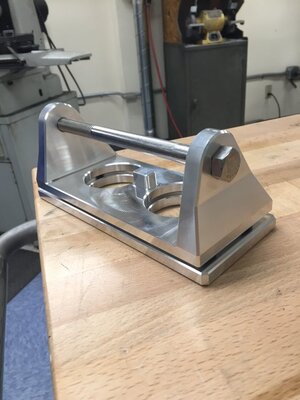
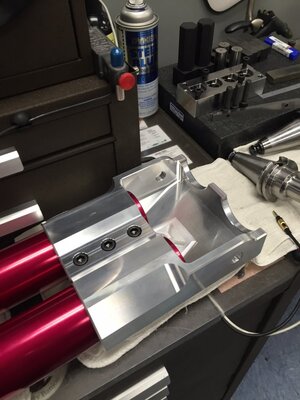
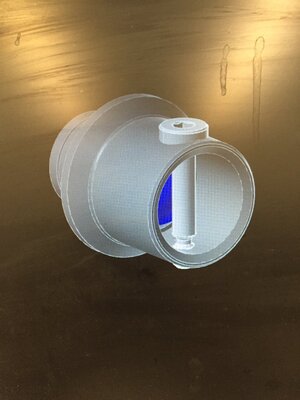
The only thing I didn't have was a pole. This is when I got the idea to design and built my own custom pole. I work as a Toolmaker at a local shop, and they don't mind if we use their machines off the clock for home projects, so I started to design a custom pole. I did most of the design in Solidworks. I used my imagination and combined a few features from various poles on the market. It took me the better part of my lunch breaks for a few weeks to come up with a design that I liked.

Below are some pictures of the hull the day I picked it up, and a few of the Solidworks pole design.
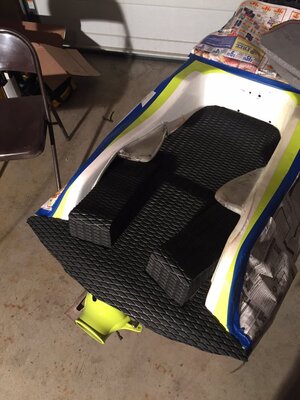
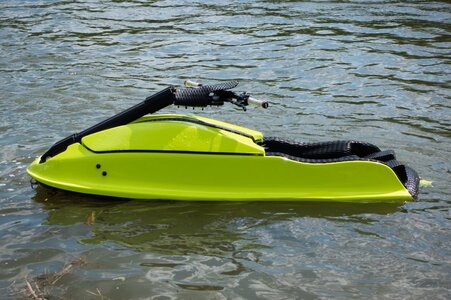
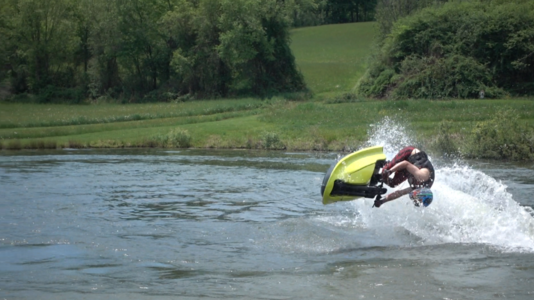
 

Attachments

  • 5.JPG
    5.JPG
    97.1 KB · Views: 430
  • 18.JPG
    18.JPG
    95 KB · Views: 423
  • 6.JPG
    6.JPG
    172.5 KB · Views: 422
  • 19.JPG
    19.JPG
    160.8 KB · Views: 415

Ducky

Back in the game!
Location
Charlotte, NC
Sweet, Ive seen the other two of those hulls down here in NC when they made the trip down with some other NY dudes. Good luck!
 
Location
New York
After I was confident that my pole design would be sufficient I began machining the larger components. I planned on machining everything between the hull and turn plate, except for the tubes which I bought used. Over the course of 2 months I machined 15 components for the pole, which ended up taking about 50 hours in the shop after hours. The material was some scrap pieces of 6061 Aluminum that my boss sold me. When I couldn't work on the pole I would spend time sanding the hull and fitting the pump and other components. Below are some pictures of the pole machining and mock-up. After the last mock-up the pole seemed to work perfectly, so I dissembled the pole and sent all of the machined components to a local plater to be anodized.
 

Attachments

  • 9.JPG
    9.JPG
    67.4 KB · Views: 386
  • 4.JPG
    4.JPG
    101.6 KB · Views: 394
  • 3.JPG
    3.JPG
    116.1 KB · Views: 400
  • 7.JPG
    7.JPG
    74.2 KB · Views: 404
Location
New York
Once I got all the pole parts to the plater I finished the paint preparation on the hull. A buddy of mine shot the paint, a dull black on the bottom and safety green on top. He had the hull for about a week, and I wouldn't have my pole parts back for a few days, so I started to design and machine a battery box in my spare time. I love my job when I'm working for myself.
 

Attachments

  • 20.JPG
    20.JPG
    61.6 KB · Views: 360
  • 8.JPG
    8.JPG
    64.1 KB · Views: 359
  • 21.jpg
    21.jpg
    63.3 KB · Views: 368
Location
New York
I got the hull and all my components back the first Friday in April. A friend and I started to assemble the ski that night. We put the pump and mid-shaft in, then the motor, and then some time around midnight we started to mount the pole to the hull. When we finally got the pole mounted I couldn't believe how good it looked. It made me feel like I actually knew what I was doing all along. It seemed like the build was getting close, all that was left was to glue in the hull inserts and finish assembling. Of course it didn't end up being that easy...
 

Attachments

  • 2.JPG
    2.JPG
    131.9 KB · Views: 368
  • 15.JPG
    15.JPG
    131.7 KB · Views: 364
  • 13.JPG
    13.JPG
    119.1 KB · Views: 359
Location
New York
The following week I was able to get the remainder of the components installed. I glued some custom stainless hull inserts in and mounted my tank, waterbox and freshly anodized custom battery box. I mounted the ebox, and eventually ran the water and fuel lines. By the end of that week I had the ski running on the stand. The only major issue I had run into was that due to the hood sitting so low on the ski, there was no chance I could run the stock air intake from my SJ. My initial thought was to pick up some short tornado filters, But I decided against it as I heard they can cause more problems then they solve. I decided I would design and machine my own air intake cover that would mount directly to the stock dual 38's adapter. I spent the better part of a week after work, measuring and designing an intake that would fit. The picture below shows my first design which was grown on a 3D printer to test fit and function before machining. Due to a mathematical error, that design still ended up a half inch too tall. After a couple beers and a few minutes thinking, I figured it was time to hack and wack. I was able to chop up the prototype enough to make it fit for now, figuring I would fix it later. The hood was on and the ski was running, all that was left was turf...

(I'm aware in these pictures the ADA head is on backwards. This has been fixed)
 

Attachments

  • 10.JPG
    10.JPG
    100.4 KB · Views: 321
  • 16.JPG
    16.JPG
    129.6 KB · Views: 328
  • 11.JPG
    11.JPG
    109.9 KB · Views: 325

x2mafia

Maximum effort
Location
WA
Hey man your head is on backwards..... Lol nice work man I'm supprised you didn't machine your own version of the head. All those parts look bitchin
 
Location
New York
Hey man your head is on backwards..... Lol nice work man I'm supprised you didn't machine your own version of the head. All those parts look bitchin

Trust me haha I already looked at making my own version of the head. There's a lot of things that I think would be fun to machine, any one have anything they want to see made?
 

x2mafia

Maximum effort
Location
WA
Maybe bow eyes and tow loops. Not the threaded round style one that all skis have. Pissers? Just the small bling accent type stuff. I really want one of those battery boxes lol I run a ext9 also
 
Location
New York
I would love to make some of those battery boxes for people eventually and I think you guys will really dig this air intake cover. I'll drop a sneak peak of the design later today. The problem with making small things like pissers is there's no point in taking hours to design and machine something that costs $10 to buy. I like to build things different from the others. Things that aren't around yet.
 
Last edited:
Location
New York
Alright we're almost caught up on the build. I spent about 3 weeks turfing my ski. I had never done any turf before so I took my time to make sure I didn't mess anything up too badly. I started by turfing internal things like the water box, tank and battery box. Once I had a better feel for it I started to lay padding in the tray and shape it. I put 25mm underpadding on the bottom of the tray and around the top and bottom of the footholds. I built some 3" tall wedges and turfed them individually. I kept putting on my riding shoes and testing the fit before I applied the turf. Once I was happy with the fit I laid the turf on the bottom of the tray, then the sides, and lastly I glued in the wedges. Luckily I have a very patient girlfriend who didn't mind holding turf while I tried to figure out what I was doing. Overall the tray came out pretty good, functionally it works great but there are a few areas that lack cosmetic perfection. I managed to wrap up the turf the Friday before memorial day. Barring a few small tweaks, she was ready for the water.
 

Attachments

  • 14.JPG
    14.JPG
    105.9 KB · Views: 265
  • 12.JPG
    12.JPG
    138.2 KB · Views: 268
  • 17.JPG
    17.JPG
    116.4 KB · Views: 276

x2mafia

Maximum effort
Location
WA
I would love to make some of those battery boxes for people eventually and I think you guys will really dig this air intake cover. I'll drop a sneak peak of the design later today. The problem with making small things like pissers is there's no point in taking hours to design and machine something that costs $10 to buy. I like to build things different from the others. Things that aren't around yet.

I meant build them for yourself not for consumers, so YOU have something different that no one has. That turf looks KILLLER dude!
 
Location
New York
Memorial day weekend I took the ski down to my dad's property in the southern tier and threw her in the pond. The ski ran great, I was stoked. I came in once for a celebratory beer, and then went back out with a helmet on to try my first roll on it. I gave it a 2 or 3 weak efforts before I heard something rattling in the hull. Turns out the hull inserts for the battery box had come unglued, I would have to take it home and re-glue them. I found a few other small things, like the b-pipe adjustment screw wearing into the hood, and some water getting into the tray through some small holes on the bond line. Overall I was pumped. it handled like a dream and I couldn't wait to get everything fixed up and get back on the water.
 

Attachments

  • Reg Pic.jpg
    Reg Pic.jpg
    166 KB · Views: 248
  • Untitled.png
    Untitled.png
    911.4 KB · Views: 250
  • hood.JPG
    hood.JPG
    105.1 KB · Views: 249
Location
New York
Alright here's my latest design for my air-box cover. The idea is a 2 piece cover that bolts directly to the factory Yamaha adapter. The air is sucked in between the two pieces, coming in only from the bottom. This means the cover is protected from water infiltration on 5 sides, water can only come in from the bottom and up between the walls of the two pieces. The cover only stands 1.875" off the adapter, meaning its super short. I think it would be a great product for anyone who has clearance issues and would still like to run stock F/A. Starving the carbs of air shouldn't be a problem, the stock Yamaha cover has about 8.3 cubic inches of air openings, where my design has about 8.9 CI. Cover is done and the lower piece is in the mill now. I should have it done in time to test it Saturday.
 

Attachments

  • 24.jpg
    24.jpg
    25.3 KB · Views: 227
  • 23.jpg
    23.jpg
    36.7 KB · Views: 227
  • 25.JPG
    25.JPG
    109.8 KB · Views: 228
  • 26.JPG
    26.JPG
    111.7 KB · Views: 235
Location
New York
A little update on my progress. I was able to get my custom air box finished up a few weeks ago but the first day I was able to try it out I began have spark issues. It took me a week or so to have the time to monkey with the ski and it ended up being broken spark plug wires. I was able to cut back the wires and reattach the plug fittings onto the end, thus fixing the problem. With that done I was able to spend the majority of this last weekend on the water. The ski ran great, never had any water infiltration in the carbs even after numerous failed backflip and roll attempts. I'm super happy with how the ski is running and handling. The only existing issue is that water is continuing to slowly find its way inside the tray through the bond line holes and area where my VIN# is attached. I did some research and saw that some people running AM hulls are running mini one-way drains on their trays. I wanted to design something that I could use as either a drain plug or a scupper, so I designed a mini scupper that can be easily changed into a drain plug. There are pictures of the design below, as well as some pictures of the finished airbox. I am hoping to make a few scuppers and try them out in the next week or so.
 

Attachments

  • 30.JPG
    30.JPG
    129.5 KB · Views: 174
  • 27.JPG
    27.JPG
    125.5 KB · Views: 168
  • 29.JPG
    29.JPG
    92.3 KB · Views: 160
  • 28.JPG
    28.JPG
    101 KB · Views: 164
Top Bottom