Vumad
Super Hero, with a cape!
- Location
- St. Pete, FL
My starter finally gave out despite my efforts to prolong its life. I went the route of buying a clean, used, freshwater OEM starter. The seller sent me pictures and a video of that starter working. It arrived, and I installed it, but my ski had no life. This began the frustrating experience of diagnosing and correcting the problem. Instead of focusing strictly on the negative, I decided to write this off as a learning experience, snap some pictures, and share in the hopes of possibly helping someone else out in the future...
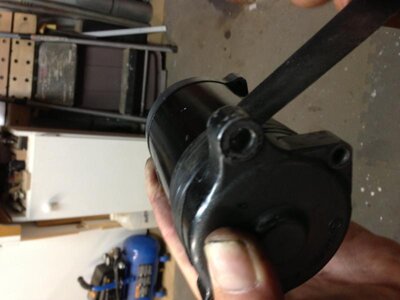
My starter arrived and looked to be in good shape, just like the pictures I had been sent. I installed the starter but only got the solenoid clicking. I believed the starter to be good, so I began testing everything. For those who are familiar with diagnosing this problem, skip the rest of this paragraph. I swapped the batteries but no luck. I bypassed the positive, and bypassed the negative cables by jumping them with another cable, but no luck. I sued several different cables and batteries but still no luck. I removed the starter and tried to jump it, but nothing. I jumped my old starter which was frozen, sparky, not particularly safe, so I knew something was wrong with my new starter. I thought back to the way the starter was packaged, and came to the conclusion that it might have been damaged during shipping. So, I removed the nuts and connected the positive, while wiggling the cable, I got some love, a weak turning of the starter. This is where my problem was, so I preceded take the starter apart.
I want to point out that this is the 1st time I have had a starter apart, so if I had a washer in the wrong spot or something, someone please say something so I can update this thread.
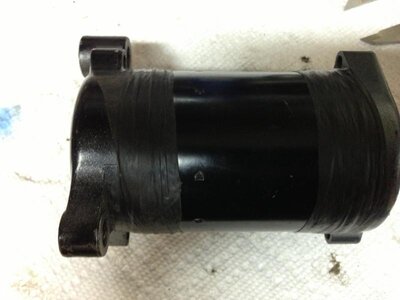
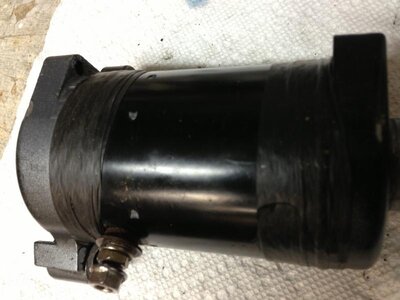
Starters are not overly complicated as you will see from the pictures. They are not something to be afraid of. The only really complicated part is getting the brushes back in, as this job takes 5 hands and there is a lot of spring tension. If you are not a patient person, this might not work out for you...
The starter is opened simply. Remove the 2 long bolts and then the end caps. It is important to be careful during this process! The part connected to the positive terminal (brush holder assembly) can get stuck to the inside of the rear cap. Do not force it out, you will break the positive pieces. It is easiest to remove the front cap 1st, then remove the armature (big shaft in the middle), then the rear cap. Don't loos you washers, there are about 7 of them, 3-4 on the back side that will get stuck in the end cap or inside the housing.
Here is a picture of the broken positive assembly.


Naturally, you need replacement parts. Well, here's a picture of my old starter. Rough shape I know. I used a 4" grinder with a fiber blade to cut the bolts off. I beat the end caps with a hammer to get them off. VERY IMPORTANT! Remember what I said about breaking the positive brush assembly? Well, my old starter was swollen so bad I could not get the bush assembly out of the rear end cap, so I had to cut the sides of the end cap to get enough flex for the brush assembly to come out undamaged.

Here is a picture of the part we are after. While my housing is completely shot, there are still usable pieces inside. This piece is a big one. The brush assembly, the armature, all of these parts can be saved to be put into a good fresh water housing with a bad armature or brushes.

Before reassembly, clean the starter. Use a clean, dry rag and clean all of parts, especially the housing. Starters are dry, so do not use any chemicals or lubricants. Simply use a clean dry rag and wipe out the dirt and build up.
Now, for assembly... The positive assembly is simple. On the inside... Place the plastic spacer (the piece with a curve to it), then the positive assembly, then the bolt. On the outside, add the 2 smaller fibrous washer, then the one larger fiber washer, then the metal washer, then the lock washer, then the nut. Tighten snugly, but do not torque the nut, let the lock washer do it's job or you risk spinning the bolt and hurting the positive assembly.

This is the part that absolutely sucks. There is no great trick I know of for this. It is just a fight. The brush assembly faces out from the housing like shown. The two brushes from the positive assembly fit through the small gaps in the brush assembly plate. The brushes have a curved side and a side with a notch. The notched side goes toward the spring, and the curved side goes toward the armature. This is challenging, and I am sure people who build these all day long have a special tool to hold the spring, something we do not have. I was able to get the armature back in by holding all the brushes in with my index finger, then sliding the armature in to the shaft, then to the short raised part, and finally sliding the armature in all of the way to the correct position. If you can get this done, you successfully completed the hardest part of this job.
Here is a picture of the armature and the brush assembly assembled. Don't worry, the armature wont fall out because of the magnets in the housing.

From here out, I want to point out that I am not 100% sure on the washers. I had a lot of parts involved in what you can see is a very small working space. I may have made some errors. My starter did work great yesterday so what I did will work, but I like to be perfect, so if someone has 100% correct information, let me know and I will correct it.
Next, put together the front cover on. It has pieces in it that do not come out for the bearings, so we need not worry about them. 1st is the shaped washer with the teeth, teeth facing the cover, then the fiber washer, then metal washers as shown.

Then put on the rear cover. Fiber washer, then 3-4 metal washers as shown.

Lastly, put in your bolts. The orientation important. Note the orientation in the picture. The mounting hole that is next to the bolt hole goes up and is just a bit clockwise of the positive terminal. This orientation doesn't have to be exact, but it is important or you wont be able to put your battery cable on. The orientation of the front cover doesn't matter. Use blue loc-tite on the bolts when you put it back together.

And that's it, two bad starters into one good starter. Save your bad starters, and when you have 2, Salt guys with bad housings get with the fresh guys with bad internals and trade one of each.
Here is a exploded diagram of a starter (The stuff at the top is the bendix and not related to this project). Edit: Sorry, right clicking gave a bad image. I will try to get a screenshot and update this attachment later. I need to run atm.

Bike bandit parts list. Great place for exploded diagrams.
http://www.bikebandit.com/houseofmotorcycles/2004-yamaha-super-jet-sj700bc/o/m145503#sch299616
My starter arrived and looked to be in good shape, just like the pictures I had been sent. I installed the starter but only got the solenoid clicking. I believed the starter to be good, so I began testing everything. For those who are familiar with diagnosing this problem, skip the rest of this paragraph. I swapped the batteries but no luck. I bypassed the positive, and bypassed the negative cables by jumping them with another cable, but no luck. I sued several different cables and batteries but still no luck. I removed the starter and tried to jump it, but nothing. I jumped my old starter which was frozen, sparky, not particularly safe, so I knew something was wrong with my new starter. I thought back to the way the starter was packaged, and came to the conclusion that it might have been damaged during shipping. So, I removed the nuts and connected the positive, while wiggling the cable, I got some love, a weak turning of the starter. This is where my problem was, so I preceded take the starter apart.
I want to point out that this is the 1st time I have had a starter apart, so if I had a washer in the wrong spot or something, someone please say something so I can update this thread.
Starters are not overly complicated as you will see from the pictures. They are not something to be afraid of. The only really complicated part is getting the brushes back in, as this job takes 5 hands and there is a lot of spring tension. If you are not a patient person, this might not work out for you...
The starter is opened simply. Remove the 2 long bolts and then the end caps. It is important to be careful during this process! The part connected to the positive terminal (brush holder assembly) can get stuck to the inside of the rear cap. Do not force it out, you will break the positive pieces. It is easiest to remove the front cap 1st, then remove the armature (big shaft in the middle), then the rear cap. Don't loos you washers, there are about 7 of them, 3-4 on the back side that will get stuck in the end cap or inside the housing.
Here is a picture of the broken positive assembly.
Naturally, you need replacement parts. Well, here's a picture of my old starter. Rough shape I know. I used a 4" grinder with a fiber blade to cut the bolts off. I beat the end caps with a hammer to get them off. VERY IMPORTANT! Remember what I said about breaking the positive brush assembly? Well, my old starter was swollen so bad I could not get the bush assembly out of the rear end cap, so I had to cut the sides of the end cap to get enough flex for the brush assembly to come out undamaged.
Here is a picture of the part we are after. While my housing is completely shot, there are still usable pieces inside. This piece is a big one. The brush assembly, the armature, all of these parts can be saved to be put into a good fresh water housing with a bad armature or brushes.
Before reassembly, clean the starter. Use a clean, dry rag and clean all of parts, especially the housing. Starters are dry, so do not use any chemicals or lubricants. Simply use a clean dry rag and wipe out the dirt and build up.
Now, for assembly... The positive assembly is simple. On the inside... Place the plastic spacer (the piece with a curve to it), then the positive assembly, then the bolt. On the outside, add the 2 smaller fibrous washer, then the one larger fiber washer, then the metal washer, then the lock washer, then the nut. Tighten snugly, but do not torque the nut, let the lock washer do it's job or you risk spinning the bolt and hurting the positive assembly.
This is the part that absolutely sucks. There is no great trick I know of for this. It is just a fight. The brush assembly faces out from the housing like shown. The two brushes from the positive assembly fit through the small gaps in the brush assembly plate. The brushes have a curved side and a side with a notch. The notched side goes toward the spring, and the curved side goes toward the armature. This is challenging, and I am sure people who build these all day long have a special tool to hold the spring, something we do not have. I was able to get the armature back in by holding all the brushes in with my index finger, then sliding the armature in to the shaft, then to the short raised part, and finally sliding the armature in all of the way to the correct position. If you can get this done, you successfully completed the hardest part of this job.
Here is a picture of the armature and the brush assembly assembled. Don't worry, the armature wont fall out because of the magnets in the housing.
From here out, I want to point out that I am not 100% sure on the washers. I had a lot of parts involved in what you can see is a very small working space. I may have made some errors. My starter did work great yesterday so what I did will work, but I like to be perfect, so if someone has 100% correct information, let me know and I will correct it.
Next, put together the front cover on. It has pieces in it that do not come out for the bearings, so we need not worry about them. 1st is the shaped washer with the teeth, teeth facing the cover, then the fiber washer, then metal washers as shown.
Then put on the rear cover. Fiber washer, then 3-4 metal washers as shown.
Lastly, put in your bolts. The orientation important. Note the orientation in the picture. The mounting hole that is next to the bolt hole goes up and is just a bit clockwise of the positive terminal. This orientation doesn't have to be exact, but it is important or you wont be able to put your battery cable on. The orientation of the front cover doesn't matter. Use blue loc-tite on the bolts when you put it back together.
And that's it, two bad starters into one good starter. Save your bad starters, and when you have 2, Salt guys with bad housings get with the fresh guys with bad internals and trade one of each.
Here is a exploded diagram of a starter (The stuff at the top is the bendix and not related to this project). Edit: Sorry, right clicking gave a bad image. I will try to get a screenshot and update this attachment later. I need to run atm.
Bike bandit parts list. Great place for exploded diagrams.
http://www.bikebandit.com/houseofmotorcycles/2004-yamaha-super-jet-sj700bc/o/m145503#sch299616
Last edited: