The FX1 that almost killed me

just joe

Site Supporter
Location
NorCal
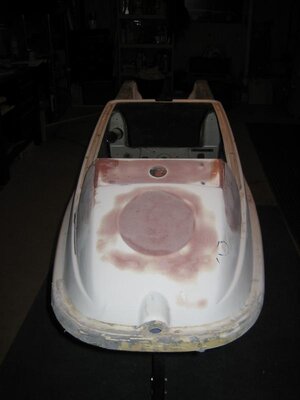
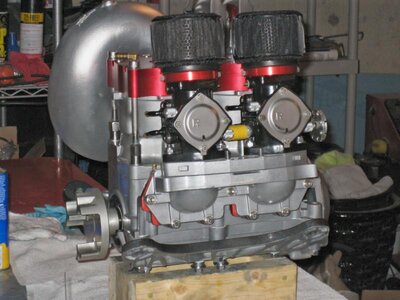
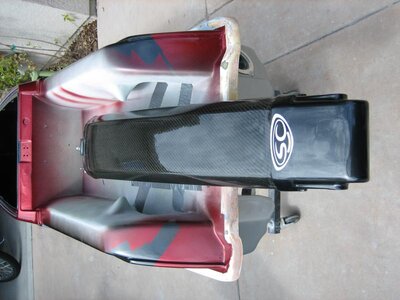
I've been working on this ski for a while now, but getting near the end, finally. I bought the ski from a board member 4 years ago, rode it for one year and have been working on it for the last 3, on and off.

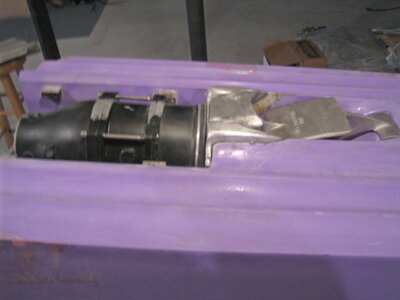
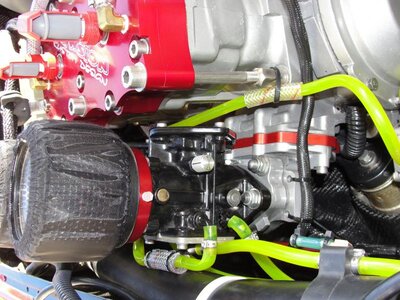
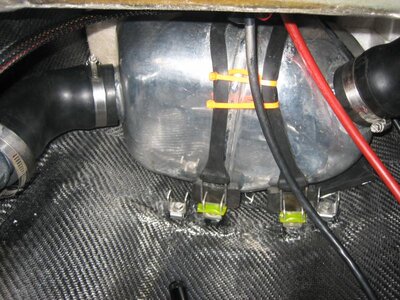
I decided to go with Blowsions 144mm pump kit, as at the time I bought it, other options weren't as available. I think I was one of the first with their pumps, and likely the last to actually get it installed. 22mm didn't seem that much bigger until I put the pumps next to each other.

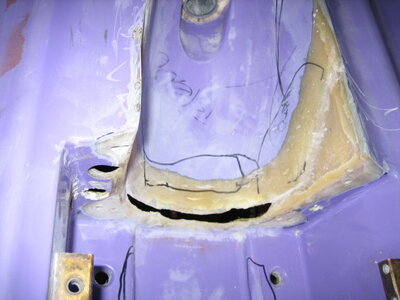
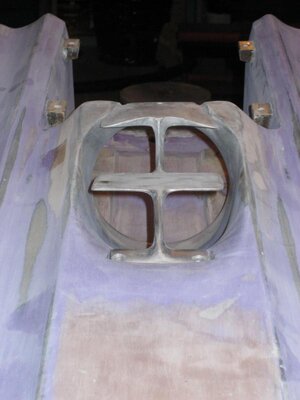
Also installed a 144mm pump shoe. Much work in cutting, measuring, sanding, aligning, but it all worked out well. Decided to use stock FX1 grate, and JD ride plate... fit, grind, glass, fit, repeat. I wanted to make sure the rideplate fit without shims, and that the pump was perfectly aligned to avoid excessive pump shims. To do this, I had to sink the pump and shoe into the hull slightly, using several layers of glass in the cavity to provide the meat to grind into.


Also bluprinted the pump and polished it... not sure why, though.


See pics.
 

Attachments

  • 144shoe2.jpg
    144shoe2.jpg
    136.3 KB · Views: 232
  • 144shoe4.jpg
    144shoe4.jpg
    144 KB · Views: 244
  • pumppolish1.jpg
    pumppolish1.jpg
    182.6 KB · Views: 203
  • 20061209_0519.jpg
    20061209_0519.jpg
    63 KB · Views: 222
  • profile144shoefx1.jpg
    profile144shoefx1.jpg
    34.4 KB · Views: 144
  • 144fxshoejdgrate.jpg
    144fxshoejdgrate.jpg
    40 KB · Views: 183
  • 144fx1shoe2.jpg
    144fx1shoe2.jpg
    35.1 KB · Views: 171
  • 144shoe.jpg
    144shoe.jpg
    184.2 KB · Views: 202

just joe

Site Supporter
Location
NorCal
It was about at this time in the build I had my accident. Was grinding some small burrs off the backside of my prop, and my 6" stone wheel broke in half and hit me in the face. Luckily I had safety glasses on, or I would have lost an eye. If I had turned my head, the docs said I might have been a goner. Some broken bones and stitches was all I had to deal with.
 

Attachments

  • face1.jpg
    face1.jpg
    136.5 KB · Views: 747

just joe

Site Supporter
Location
NorCal
Next up was tubbies, nose fill, and getting the hull tru. Used several custom foam rolls for the tru-ing, and glassed in the tubbies for a seamless bond.
 

Attachments

  • 20070501_1032.jpg
    20070501_1032.jpg
    42.3 KB · Views: 170
  • 20070501_1039.jpg
    20070501_1039.jpg
    30.2 KB · Views: 152
  • tubbie2fx1.jpg
    tubbie2fx1.jpg
    39.9 KB · Views: 173

just joe

Site Supporter
Location
NorCal
Now the fun part, carbon fiber. 2 layers in the engine compartment, 1 layer on bond line in gunwales, and 2 layers around the pole.

Also added Dawson Digger footholds and dual cooling lines.


I have a lot of pictures, so ask if you want to see something specific.
 

Attachments

  • CFhullliner.jpg
    CFhullliner.jpg
    140.3 KB · Views: 192
  • IMG_7813.jpg
    IMG_7813.jpg
    81.7 KB · Views: 168
Last edited:

just joe

Site Supporter
Location
NorCal
Now the motor... 62T/61X. I epoxied and ported the cases, learning from several on this site. Ported the cylinder using sport port templates and some tips from a few friends. 35cc domes in the Blowsion head, Moto T reeds, dual 44mm carbs, 62T lightened flywheel and stator. Intake ported, FP manifold ported. Also took the time to paint the cylinder and cases, and had the entire B pipe manifold, head pipe, and chamber ceramic coated.

Hope it runs as good as it looks...
 

Attachments

  • 20070112_0813.jpg
    20070112_0813.jpg
    81.4 KB · Views: 152
  • 20070112_0814.jpg
    20070112_0814.jpg
    65.9 KB · Views: 169
  • 20061214_0531.jpg
    20061214_0531.jpg
    81.8 KB · Views: 151
  • 20061214_0530.jpg
    20061214_0530.jpg
    70.7 KB · Views: 131
  • motor1.jpg
    motor1.jpg
    65.2 KB · Views: 210
  • motor2.jpg
    motor2.jpg
    57.4 KB · Views: 166

just joe

Site Supporter
Location
NorCal
Of all the work, paint seems to offer the most gratification. Again, I did it all myself... HOK hues, mother nature imparted a few imperfections, but it came out shockingly well for my paint booth.

Pics pretty much tell the story.
 

Attachments

  • IMG_7795.jpg
    IMG_7795.jpg
    73.6 KB · Views: 263
  • IMG_7775.jpg
    IMG_7775.jpg
    76.2 KB · Views: 290

just joe

Site Supporter
Location
NorCal
bottom side...
 

Attachments

  • IMG_7741.jpg
    IMG_7741.jpg
    61.6 KB · Views: 195
  • IMG_7742.jpg
    IMG_7742.jpg
    57 KB · Views: 138
  • IMG_7744.jpg
    IMG_7744.jpg
    50.1 KB · Views: 161
  • IMG_7743.jpg
    IMG_7743.jpg
    73.7 KB · Views: 250
  • IMG_7747.jpg
    IMG_7747.jpg
    54.7 KB · Views: 233

just joe

Site Supporter
Location
NorCal
top side... had only 2 small runs to sand out. I may re-spray the hood to add another color, not sure yet. Have a pint of tangelo pearl I am itchin to try.
 

Attachments

  • IMG_7809.jpg
    IMG_7809.jpg
    69.8 KB · Views: 188
  • IMG_7805.jpg
    IMG_7805.jpg
    56.1 KB · Views: 182
  • IMG_7804.jpg
    IMG_7804.jpg
    63.9 KB · Views: 245
  • IMG_7823.jpg
    IMG_7823.jpg
    63.2 KB · Views: 227
  • IMG_7824.jpg
    IMG_7824.jpg
    58.6 KB · Views: 184

just joe

Site Supporter
Location
NorCal
More build details below. When I started this ski, I lived on a lake so I had a flatwater plan. Halfway through I moved to santa cruz and changed my plan to a surf ski, especially after spending time at Pismo!

So I ditched my TL set-up and went to stock electronics with MSD enhancer.


pole shortened 1.5"
UMI sealed bearing steering, STD length
Blowsion lowered bracket
FX1 tank
SJ waterbox
SS battery tray
UMI zero bars
ODI grips
S/S mounted bilge switch
Dual 360 Rules
WD and WR hood latches
hood straps (maybe)


pics below bring us to it's present state. Reunited motor and hull, ran water lines and fuel lines. I had to flip the carbs around such that the throttle drum is toward the rear. This was due to a better fit from the reed spacer pushing the carbs into the exhaust tube. Also had to get creative on fuel pump mounting.

Skipping Flow control for now. Have 4mm restrictor in pisser lines, and a 195 main jet in the stinger inlet.

I also have a 175 jet in the fuel return line. Not sure if I need it with these OEM 44mm carbs, but I don't think it will hurt?

Need gas tank straps and new hood seal (on back order), and have to plan the turf job.

Let me know if you guys see any issues.
 

Attachments

  • IMG_8204.jpg
    IMG_8204.jpg
    83 KB · Views: 237
  • IMG_8213.jpg
    IMG_8213.jpg
    79 KB · Views: 211
  • DSC00054.jpg
    DSC00054.jpg
    50.1 KB · Views: 160
  • DSC00055.jpg
    DSC00055.jpg
    87.2 KB · Views: 195
  • DSC00056.jpg
    DSC00056.jpg
    93.4 KB · Views: 182
  • DSC00052.jpg
    DSC00052.jpg
    77.2 KB · Views: 164
  • DSC00042.jpg
    DSC00042.jpg
    90.5 KB · Views: 211
  • DSC00057.jpg
    DSC00057.jpg
    96.7 KB · Views: 208
  • IMG_8207.jpg
    IMG_8207.jpg
    92.2 KB · Views: 211
  • IMG_8214.jpg
    IMG_8214.jpg
    62.2 KB · Views: 204

#ZERO

Beach Bum
Location
Florida - U.S.A.
Your build looks great and glad to see you still have your eyes intact.


Ditto on the safety glasses; those 6-inch grinding stones don't like to see high rpm's.
 

just joe

Site Supporter
Location
NorCal
looking good. i thought the same thing as you about 22mm not being a big diff until i set them side by side... the bigger pump really helps out in the white water.

Thanks.

I hope the 144 works OK in the surf. My last ski had a 140mm Skat Mag setback pump that I absolutely loved.
 

just joe

Site Supporter
Location
NorCal
Your build looks great and glad to see you still have your eyes intact.


Ditto on the safety glasses; those 6-inch grinding stones don't like to see high rpm's.

I wear a shield now, and always. You can see how bad my eye looked from the safety glasses deflecting into it from the blow of the .5lb stone chunk.
 
Wow, glad to hear you are ok from that accident! I cringe when I see people not wearing safety glasses...after seeing your picture I may even consider better protection than just glasses(such as a shield)!

Ski is looking Excellent!!!
 
Top Bottom