SX/SXi/SXi Pro 750, 1992. Water logged back tray?

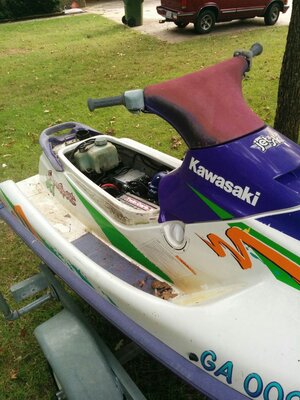
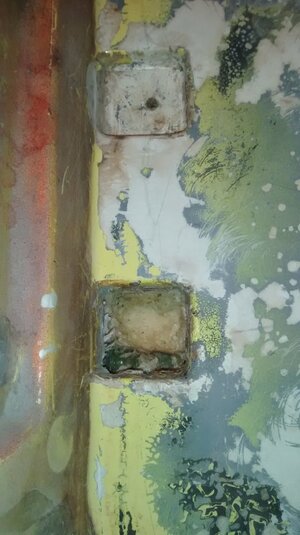
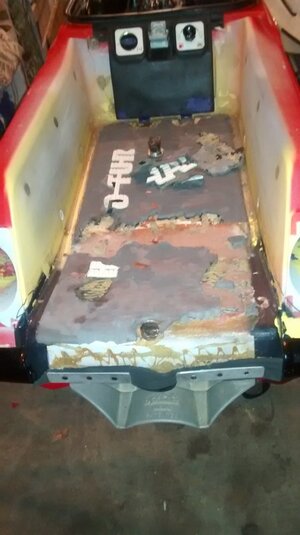
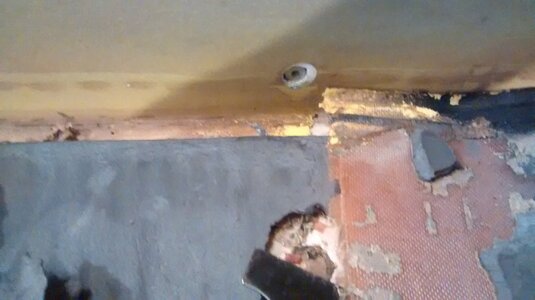
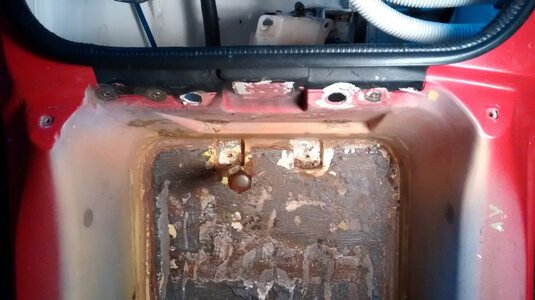
I bought the ski with a diy fiber class kick plate on the tray and some nice rails. I rode it for the summer like that and broke/cracked the kick plate. When replacing the kick plate and I find this: see pictures.

It is mushy where I slid that screw driver down in there. If you press hard on one side water seeps out the other hole... Overall, the tray is still ridged and hard everywhere else.
 

Attachments

  • IMG_20151018_173230862.jpg
    IMG_20151018_173230862.jpg
    94.4 KB · Views: 94
  • IMG_20151010_141345711.jpg
    IMG_20151010_141345711.jpg
    102.3 KB · Views: 93
  • IMG_20151012_185557947.jpg
    IMG_20151012_185557947.jpg
    76.3 KB · Views: 92
  • IMG_20151012_185613798.jpg
    IMG_20151012_185613798.jpg
    71.7 KB · Views: 88
  • IMG_20151012_190409443.jpg
    IMG_20151012_190409443.jpg
    76.3 KB · Views: 88
  • IMG_20151012_190423148.jpg
    IMG_20151012_190423148.jpg
    77.1 KB · Views: 88
  • IMG_20151018_173239490.jpg
    IMG_20151018_173239490.jpg
    95.8 KB · Views: 89
  • IMG_20151018_173226751.jpg
    IMG_20151018_173226751.jpg
    112.3 KB · Views: 92
Last edited:

Roseand

The Weaponizer
Site Supporter
Location
Wisconsin
Depends on what the intentions for your ski are and what your riding style is. If all you're gonna do is cruise around seal it up with some good epoxy and maybe a strip of glass, returf and just ride. But if you wanna shed some weight, possibly 10+ lbs, cut out the tray and dig it all out and replace it with the pink/blue EPS insulation foam that doesn't retain water and add some drain plugs.
IMO, I wouldn't waste your time unless you plan on adding footholds. Defoaming is a very messy job and a lot of work.
 
Well,
I guess i'll cut it out and see whats there.(i don't plan on doing back flips or racing per say......but i plan on carving buoys and jumping ski wakes as hard as i can :D )
Me and my brother have a couple project ski's that all need fiberglass work, so when in Rome right?
I've looked at what this guy is doing here: http://www.x-h2o.com/index.php?threads/550sx-defoam-re-turf-build.164848/
And looked over what this amazing man started building here: http://www.x-h2o.com/index.php?threads/making-of-the-snx-hull.146362/

So, two plans im thinking:
1. cut the tray out at the front, six inch section all the way across it, get the 'water logged' foam out, and put the correct filler in, and re-glass it. Do a custom turf job and BAM like new
2. Drill a hole just down that section and check it out, fill it correctly, and glass-patch it. turf, and BAM like new.

Does anyone have pictures/links/blue prints of one of these 750SX hulls opened up? I don't want to drill or cut into something/somewhere i shouldn't.
Also, see pictures for the other skis that will be getting some glass attention this winter.
Any advise on those fibers sticking out??
 

Attachments

  • IMG_20150817_200351494.jpg
    IMG_20150817_200351494.jpg
    97.8 KB · Views: 76
  • IMG_20150924_180556.jpg
    IMG_20150924_180556.jpg
    171.6 KB · Views: 78
  • IMG_20151018_170034.jpg
    IMG_20151018_170034.jpg
    60.8 KB · Views: 76
  • IMG_20151018_170058.jpg
    IMG_20151018_170058.jpg
    72.9 KB · Views: 76
I cut into it. (see pictures).
The problem seems to be isolated. The rest of the tray is still ridged. The foam was wet, so I started digging. I cut down about an inch and then everything was dry!!! SO, getting some pink, closed cell foam for filler, going to class-patch/epoxy seal it up.IMG_20151025_114235265.jpg IMG_20151025_115412668.jpg
 

Attachments

  • IMG_20151025_115437352.jpg
    IMG_20151025_115437352.jpg
    104.7 KB · Views: 69
  • IMG_20151025_120203446.jpg
    IMG_20151025_120203446.jpg
    95.2 KB · Views: 68
  • IMG_20151025_150412469.jpg
    IMG_20151025_150412469.jpg
    94.4 KB · Views: 66
  • IMG_20151025_150422179.jpg
    IMG_20151025_150422179.jpg
    97 KB · Views: 63
Last edited:

Vumad

Super Hero, with a cape!
Location
St. Pete, FL
Decide if you want foot holds before you turf.

Make your cuts with a grinder and diamond blade only going to the depth of the glass, this will help avoid cutting through anything. You can buy an air body saw if you have a good compressor or a small one and patience. Its a small sawall.
 
Thanks for the advice Vumad. I'm passing on the foot holds though.. I just feel like for what I plan on doing (recreation racing around buoys with friends) that foot holds may not be worth the trouble...

Gradual Progress:
Foam filler- See pictures for the test run.
Capping off the hole- working on buying the right fiberglass/epoxy, 1992 750 hulls are SMC resin, and apparently regular ole fiberglass resin set up won't do the job.

Here is my plan for turf job/layout-I plan on going back, without the face plate. Instead i plan on turfing these sections: tray bottom, side rails, and front panel area, all my self and all directly to the hull. (seems to be what a lot of people do..so mimic away!!!!)
I'm going to buy a block of foam, set up a 1 1/2" wedge in the back for the 'kick plate'. A front "hill" for the toe area, and possibly lifter side rails. (again just mimicking what modern set ups look like)
IMG_20151102_175543851.jpg IMG_20151102_175640517.jpg
 

Attachments

  • IMG_20151102_174611784.jpg
    IMG_20151102_174611784.jpg
    84.7 KB · Views: 57
  • IMG_20151102_175530427.jpg
    IMG_20151102_175530427.jpg
    75.4 KB · Views: 55

Vumad

Super Hero, with a cape!
Location
St. Pete, FL
Foot holds let you widen your stance. You can put you back foot in one surf stance allowing you to open your stance with easier toe out. It can take a load off your back. Subs and nose stabs are fun too. If you dont want them, then dont get them, but tom21 budget holds are like $75, youre already doing glass and turf work.

Expense and labor are not thd only downsides. They also protrude into the tray some. They are not for everyone.
 
I came across a new problem: One of the inserts for the ride plate fasteners is cracked (and water logged a bit)
After looking over the pictures does anyone know where I can buy one of these 'cylinder-slide-in' units? (i'm hoping I don't have to fabricate one myself..)
pump over look.jpg crack over look.jpg crack cut 1.jpg crack cut 2.jpg crack cut 3.jpg crack cut 4.jpg crack finish overview.jpg crack finish overlook close up.jpg
 

Vumad

Super Hero, with a cape!
Location
St. Pete, FL
I came across a new problem: One of the inserts for the ride plate fasteners is cracked (and water logged a bit)
After looking over the pictures does anyone know where I can buy one of these 'cylinder-slide-in' units? (i'm hoping I don't have to fabricate one myself..)
View attachment 301772 View attachment 301771 View attachment 301765 View attachment 301766 View attachment 301767 View attachment 301768 View attachment 301770 View attachment 301769

If you can access from the inside, you can use a UFO from jetmaniac or McMaster Carr

We fixed one from the outside in a x2 with nuts and washers.

cut the head off a bolt (or use threaded rod.
Wax the stud, put on nut washer nut, (we didn't use the m6 washer we used one slightly bigger so it stuck wider than the nut)
Clean and prep the hardware and the hull, ensuring your hardware will be in the right spot when the stud is removed.
Fill the hole with epoxy mixed with cabosil, not too thick you want it to let the air settle out.
Put in hardware, cover with epoxy mixed with cabosil
Cover epoxy with a layer of 10oz or 2-3 layers of 4oz cloth. About the size of a half dollar 1.5" approx
Goop some left over thickened epoxy on the glass so you can skip the body work step later.
Let fully cure for 2 days
Lightly move stud ensuring hardware is secured
Remove stud, hardware should not budge.
Sand down the epoxy, but don't sand into your fibers.

That job hasn't failed yet.
 
Got some more work done! I took a tap and die set to the insert I took out and cleaned it up. At that point, I figured-hell why not just try and go back with this thing?!
See pics... (I dripped wax into the insert, and all over the screw... hope that works to get it out!)
clean insert.jpg clean insert 2.jpg dry fit.jpg dry fit 2.jpg add wax.jpg dry fit 3.jpg finish overlook.jpg finish up close.jpg
 
Here was the final product on the turf job. (it's my first go at it.. and it was a lot harder than i thought it would be...)
It looks okay in the picture, it looks worse in person though, trust me ;D
turf job done.jpg
 
Top Bottom