750sx...My turn for the freestyle setup

Waternut

Customizing addict
Location
Macon, GA
I should've started this a while back but didn't so some details will be left out for sure. Here is what I've got so far...

Hull
Custom rattle can paint job
Custom footholds but seriously considering the flat deck w/footstrap conversion
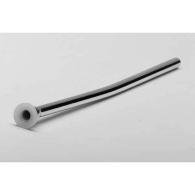
Aluminum handlepole
Quick turn steering
Jet Dynamics intake grate
Modified hood for better air flow and less water intake

Engine
Cylinder bored over 1mm so the displacement is 762cc
Factory Pipe
Timing advance plate
Milled stock head

Drivetrain
12/17 Skat Trak Swirl prop (just sent to Impros for a clean up)
WW freestyle cone
X2 trim currently at 30° up but non functional

Currently this setup is tipping the scales at 300 lbs. with more to lose!
 
Last edited:

Waternut

Customizing addict
Location
Macon, GA
Now for the current pics

The hull in it's rattle can form.
1_IM000036.JPG


The bilge has been completely painted with appliance epoxy and it looks amazing
2_bilge.JPG


Picture of the custom footholds. Yes I know the turfing job is horrible and I will be replacing it soon.
1_08-26-07_1350.jpg
 

Waternut

Customizing addict
Location
Macon, GA
The engine has been cleaned up. 3 leaks sealed in the crankcase and about 6-7 leaks fixed in the head. It will now hold 10 psi for 10 minutes! :headbang:

1_engine.JPG


Here's what it looks like in the ski.

1_engine_bay.JPG
 

Waternut

Customizing addict
Location
Macon, GA
Still working on the trim setup but I bored out my stock nozzle to 82mm and it made a nice difference. Now I've got the X2 nozzle which has veins and is 83mm. Hope it helps.

1_nozzles.jpg


More to come...
 

Waternut

Customizing addict
Location
Macon, GA
Here is my version of a C.A.T.S.
I went online to JensionUSA and got the following:
2 V-brake levers $12
3500mm x 1.5mm (11.5 ft) tandem brake cable $7.50
25 ft. of brake cable housing $7.50

Then got these parts:
X2 nozzle, trim ring, and steering nozzle from PWCtoday $40
Chrome toilet supply tube to go through the hull from Lowes $2
046224030201md.jpg


Total cost $69

I modified the X2 trim ring so that it would allow up to 30° of up trim.
Drilled a nice long hole and used 5200 epoxy to mount the toilet tube in the hull to allow the cable housing to go through without leaking.
Cut a piece of sheet metal to mount to the nozzle so that the cable had a back stop. Then used a mountain bike brake noodle I had lying around to attach the cable to the metal.
I originally just pinched the cable between two washers on the trim ring but pulled that off the first time I pulled the lever and gave it some gas…Plan B…bought a cable crimp for 25 cents and made a loop in the cable. The crimp is supposed to have more holding power than the cable but I added some JB Weld because I knew the crimp wasn’t perfect.

Here are the pics of it:

1_uptrim.JPG

1_side.JPG
 
Last edited:

Waternut

Customizing addict
Location
Macon, GA
The back of the SX has no room for up trim so the back of the ski had to be cut out A LOT!
1_cut.JPG


Right now the nozzle will just barely touch the back of the ski. I left it this way so that the steering nozzle takes the abuse instead of the reduction nozzle and trim ring hitting each other.
The X2 nozzle is longer than the standard SX so the steering cable had to be adjusted. I unscrewed the adjusters all the way to the last 1-2 threads and the steering still wasn’t perfectly straight. One hard turn and I ripped the adjuster out which led to an interesting trip back to shore. I have plenty of cable and housing in the hull but the ends have a fitting which can’t really be adjusted any further. The only other adjustment I can see is spacing out the mount on the handle pole. This cuts the angle down slightly and gives a bit more room.
The cable does have a good bit of stretch but I’ll address that later.
 

Waternut

Customizing addict
Location
Macon, GA
Hooked up the two brake levers and had to grind the mount for the start switch so that it would all fit.
1_bars.JPG


Probably took a good half inch off that mount.
1_switch.JPG
 

Waternut

Customizing addict
Location
Macon, GA
Here is the new WW freestyle pump cone. Also just installed the swirl prop from Impros. I forgot to take a picture of that but it looked really good.

1_pump.JPG
 

McDog

Other Administrator
Staff member
Location
South Florida
Looking good man. I can't wait to try it out to see how different it is. I really like the CATS too. I need to go downstairs and get to work on mine now.
 

Waternut

Customizing addict
Location
Macon, GA
How did your paint process go?

The painting really wasn't that bad at all. The sanding and removal of old paint was the biggest pain. The masking wasn't the most fun I've had either.


mcdog said:
I can't wait to try it out to see how different it is. I really like the CATS too.

Thanks. I think the nozzle getting pushed back has made the biggest difference. You're welcome to try it any time.
 

Waternut

Customizing addict
Location
Macon, GA
Finally got a new angle die grinder so I was able to shave the ride plate down to fit. Initially I put my old Mariner ride plate on but it won’t even fit with the X2 nozzle in place. My R&D ride plate fits but the pump and X2 nozzle chaffe it some. I shaved it down in the center to give clearance for the pump but now the trim screw catches an edge and won't come up smoothly. A washer wasn't enough so the shaving continued. I shaved the support right above the R&D letters so the screw could clear. All of this may be a good excuse to make a fiberglass ride plate…More on that later. Here's the shaved plate. See how shiney it looks in the middle...
plate.jpg
 

Waternut

Customizing addict
Location
Macon, GA
The engine and carb have been a nightmare since I rebuilt the carb last summer. I played with that thing for 4-5 months. Turns out I had an air leak…more specifically MANY air leaks. I had 3-4 in the crankcase and a bunch in the head itself with a brand new head gasket. After a long ordeal of tracking them all down and revising my test setup, I sealed up the leaks in the crankcase and used high temp gasket spray on the head gasket and that fixed the leaks in the head. I pumped the engine up to 10 psi and it held the pressure for 10 minutes…success!

Put the engine back in, confident that all was fixed but it still acted lean. Put in an older carb with older gaskets and it ran great. I might buy another rebuild kit but not any time soon because I’m sick of messing with the carb. It runs right now so I’m happy.
 
Last edited:

Waternut

Customizing addict
Location
Macon, GA
[From the steering correction post]The only other adjustment I can see is spacing out the mount on the handle pole. This cuts the angle down slightly and gives a bit more room.

Well I thought this was a good plan. The screws that were on there were incredibly tight and required heat to remove them. I figured that problem was solved so I went out today to test my new swirl prop. After about an hour the steering broke again. Only this time it was the bracket. I guess the salt was holding those screws in the handlepole because the pole is stripped almost a half inch in.

Best thing I can come up with to fix this is drill and tap an oversized screw in the handlepole...brilliant! Got a slightly longer screw to compensate for the washers (just in case). Then proceeded to twist the head right off the bolt :censored::censored:!! Plan C...when the screw head broke, it had enough clearance to put a nut on the end of it and fasten the bracket...brilliant! Then I twisted the head off the other screw only this was one flush and I couldn't use a nut. I thought these were stainless bolts but clearly they had to be aluminum. Plan D...Hopefully the JB Weld holds up because I'm out of options now.

I think this ski is cursed.
 
Last edited:

WATERDOGLOUIE

Play till it hurts
Location
south west Idaho
I love the trim you put on this thing! I dont usually follow this site, but I think Im going to watch it more often now. I have an X2 nozzle in route to the house and planned on doing the trim thing as soon as it gets here. Let me know how yours works. Now, thanks to this thread, I have some guidence.

Nice build, keep it up!
 

Waternut

Customizing addict
Location
Macon, GA
The fun continues with the flywheel this time. I've got a lightened flywheel in my posession now but I can't get the old flywheel off. Stripped an aftermarket flywheel puller, which is an 18mm x 1.5 bolt. Then I went and got a spark plug thread chaser and stripped that as well along with the threads on the flywheel.

Spent 2 hours drilling 3 holes in order to use a harmonic balancer puller. Another hour tapping the holes and I still can't get this thing off. I've tried hammering, heating, torqueing, torqueing and hammering, etc. All together, I've spent about 10+ hours on this thing and all I've done is made it so I can't use the ski until it's replaced basically. I'm basically out of commission until I figure out a way to get this thing off...
 

Waternut

Customizing addict
Location
Macon, GA
Finally got the flywheel off!! Got a new drill bit and drilled 3 new holes and tapped 3 clean holes. Torqued, heated, hammered, etc. I torqued the puller soo much that I literally couldn't turn the wrench...I couldn't do it, not with a hammer, nothing. Hit the flywheel with a hammer, nothing. Then used a blow torch for 3-4 minutes...twice. By this point I began to think it was welded on and got impatient and quit tapping and started really hitting it.

A couple good blows with the hammer and it rocketed off hitting my knee a foot away!! (it was on the ground)
Hopefully no one else has this problem.
 

surfjetlouie

R.I.P. 11/27/2008
Finally got the flywheel off!! Got a new drill bit and drilled 3 new holes and tapped 3 clean holes. Torqued, heated, hammered, etc. I torqued the puller soo much that I literally couldn't turn the wrench...I couldn't do it, not with a hammer, nothing. Hit the flywheel with a hammer, nothing. Then used a blow torch for 3-4 minutes...twice. By this point I began to think it was welded on and got impatient and quit tapping and started really hitting it.

A couple good blows with the hammer and it rocketed off hitting my knee a foot away!! (it was on the ground)
Hopefully no one else has this problem.

I had the same problem on a Polaris flywheel and I have used a 900 lb impact gun and the thing will not come out so every day I tork it a bit more with the impact gun and after 5 day it finally gave up. the funny thing is when i was opening the shop that morning it was dark and I walk right next to the bench to turn the light on and at that time the flywheel came of. I though it was a rodent or something taking off from my bench and knocking some tool I left there the night before.
 
Top Bottom