So after reading threads upon threads on my lunch breaks the past few months I decided to dive into my first standup more specificallly superjet build. I got the ski in late 2013 and barely got any time on it in 2014 with summer classes and a new house to work on. I want to document much of what I am doing for others to give feedback and hopefully help other people. Just have to remember to take lots of pictures!
Many of my ideas I got recently are in this thread starts in 2013
http://www.x-h2o.com/index.php?threads/basic-sn-build-completed-tuning-time.139048/
Heres what it came with
62t engine bored out I think 85mm pistons (760cc?)
61x electronics
footholds,
unknown brand aluminum pole for a RN
Blowsion Tubbies
Rest was basically stock
Last year and this year I bought
ADA girdled head w/ 35cc domes
Have a B pipe w/ mod chamber
Nearly new Nynja C4 chamber I am going to start out with, will hopefully make pipe removal 10x easier
MSD enhancer
Hooker 10/15
Wolf shorter nozzle cone
Raider trim nozzle -still need cable, bracket, and finger pull setup
SBN 46 carb w/ 650sx intake mani/adapter
My plan:
Cut out tray
Defoam and refoam under tray
Move tray out 1" on each side to widen it
Reinforce engine bay with carbon mat
Cut back botton 2-3"
Install through tube for trim
Re glass tray in with added plastic strips.
Drain on each bottom corner
Possible tear hood liner out, redo do that and glass over the top & front holes.
Paint, Turf, Tune, and Braaaappp!
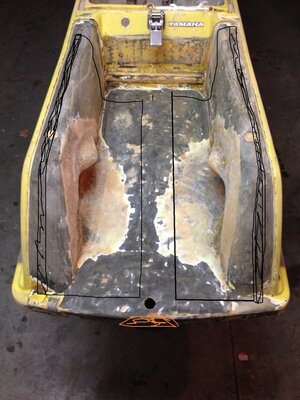
Picture is how she sits as of last night. Air chisel with custom 4" sharpened blade made quick work of removing the turn and most of the pad. Then used a paddle wheel on the angle grinder which made quick work of the pad, paint and excess glass from the previous owners foothold install.
2nd pic is of my plan to cut out two large sections of the tray and sides, then remove a 1" strip along the sides so the pieces I cut out match up. Want to leave a strip down the middle of the tray for extra oem support. Then going to get like 1/8" thick plastic strips from a friend's work to put in the "2" 1" gaps on the tray. Glass them in simular to what #hesty32 did on his youtube video. The shaded out area is were I plan to remove material. I plan to keep the angle on the rear were it goes down to the bond line and then will have to shape a little foam towards the front of the tray to taper it back into stock width.
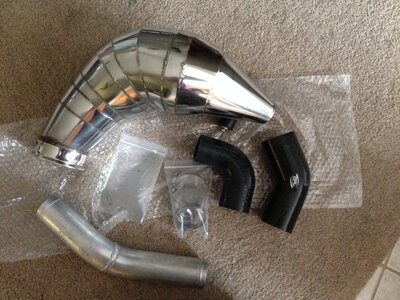
3rd pic is exhaust porn!
Got a huge order in at US composits for 5oz carbon mat and 12 oz biaxial mat, 16lb of the 4lb foam, gallon kit of epoxy resin, and a couple other small things. I want to have the tray cut and foam removed by weekends end and most of the engine bay ready for resin/glassing.
Let me know what you guys think!
FIRST QUESTION:
Does the glass/smt having to be showing anywere that mat/resin is put onto? The tray isnt a big deal but for the engine bay wasnt sure if all the paint had to come out or just rough the surface.
Many of my ideas I got recently are in this thread starts in 2013
http://www.x-h2o.com/index.php?threads/basic-sn-build-completed-tuning-time.139048/
Heres what it came with
62t engine bored out I think 85mm pistons (760cc?)
61x electronics
footholds,
unknown brand aluminum pole for a RN
Blowsion Tubbies
Rest was basically stock
Last year and this year I bought
ADA girdled head w/ 35cc domes
Have a B pipe w/ mod chamber
Nearly new Nynja C4 chamber I am going to start out with, will hopefully make pipe removal 10x easier
MSD enhancer
Hooker 10/15
Wolf shorter nozzle cone
Raider trim nozzle -still need cable, bracket, and finger pull setup
SBN 46 carb w/ 650sx intake mani/adapter
My plan:
Cut out tray
Defoam and refoam under tray
Move tray out 1" on each side to widen it
Reinforce engine bay with carbon mat
Cut back botton 2-3"
Install through tube for trim
Re glass tray in with added plastic strips.
Drain on each bottom corner
Possible tear hood liner out, redo do that and glass over the top & front holes.
Paint, Turf, Tune, and Braaaappp!
Picture is how she sits as of last night. Air chisel with custom 4" sharpened blade made quick work of removing the turn and most of the pad. Then used a paddle wheel on the angle grinder which made quick work of the pad, paint and excess glass from the previous owners foothold install.
2nd pic is of my plan to cut out two large sections of the tray and sides, then remove a 1" strip along the sides so the pieces I cut out match up. Want to leave a strip down the middle of the tray for extra oem support. Then going to get like 1/8" thick plastic strips from a friend's work to put in the "2" 1" gaps on the tray. Glass them in simular to what #hesty32 did on his youtube video. The shaded out area is were I plan to remove material. I plan to keep the angle on the rear were it goes down to the bond line and then will have to shape a little foam towards the front of the tray to taper it back into stock width.
3rd pic is exhaust porn!
Got a huge order in at US composits for 5oz carbon mat and 12 oz biaxial mat, 16lb of the 4lb foam, gallon kit of epoxy resin, and a couple other small things. I want to have the tray cut and foam removed by weekends end and most of the engine bay ready for resin/glassing.
Let me know what you guys think!
FIRST QUESTION:
Does the glass/smt having to be showing anywere that mat/resin is put onto? The tray isnt a big deal but for the engine bay wasnt sure if all the paint had to come out or just rough the surface.