94 SN “cellulite Cindy”

I went out last week with the O’side crew and got the bug, but my square I just finished in April is too nice for the salt for me. I need a surf boat. Some horse trading happened and I managed to bring home “Cindy”. Cindy has had a rough life, she’s has some patches, she’s bare, she’s rough, and she’s been on fire. None of her sides are straight from being on fire but I plan to remedy that. Today I finally broke into the project after completing my squaretisserie that I posted in the fab section. I make a lot of my own stuff like pole and cable brackets so there will be plenty of DIY in this thread. I’m keeping track of hours and cost for this build and will have totals when it’s all said and done. I’ll be updating this thread as the build progresses but I’ll also be posting a ton on my Instagram.
Plans:
Shorten the bottom, no rocker.
Install Tom21 tubbies
Widetray
Shape new nose
Flatten hood
Install 08+pole
62T/61x motor
Custom paint
Turf
Surf
 

Attachments

  • 8FE011D5-A9CB-4516-AE8A-C37AB5AB619D.jpeg
    8FE011D5-A9CB-4516-AE8A-C37AB5AB619D.jpeg
    193.9 KB · Views: 62
  • 15787C0D-C450-4E0C-8B6F-4C825BDD1125.jpeg
    15787C0D-C450-4E0C-8B6F-4C825BDD1125.jpeg
    76 KB · Views: 48
  • 15FAF3B2-AD25-48D7-9352-C1FE60564BB9.jpeg
    15FAF3B2-AD25-48D7-9352-C1FE60564BB9.jpeg
    107.1 KB · Views: 43
  • 93C85E2A-4E80-4D41-B425-86E27AB5D211.jpeg
    93C85E2A-4E80-4D41-B425-86E27AB5D211.jpeg
    93.3 KB · Views: 45

Sanoman

AbouttoKrash
Location
NE Tenn
Lots of hours on these projects.Keep a tab on how many hours you have in it.And then figure out what your actual time is worth.As in how much you think your hourly rate would be for the build.Be interesting to know ;)
 
Lots of hours on these projects.Keep a tab on how many hours you have in it.And then figure out what your actual time is worth.As in how much you think your hourly rate would be for the build.Be interesting to know ;)
I’m interested in the hours only. My normal hourly rate welding or doing welding inspection would make this thing the price of a GP1 lol. I just want to see what it takes. So far I’m doing pretty decent compared to build threads I have read. I also find that logging the time I work faster than when I don’t track the time. It’s kinda funny.
 
I’m afraid I’m the type of person who sniffs out stuff that the previous owner has lavished much care and $$$ on so that I can pick it up for a fraction of what they have into it.

A while ago I bumped into a guy at a car show who immediately sold (effectively at a loss) his cars after restoration so that he could start another one. For him the fun was the restoration process, not the final product.

To each their own.
With these projects that are a hobby, you can’t value time or they will always be a loss. I have more time than money and enjoy projects and the build. On my previous boats that I’ve had, I’ve always made money on them to where each new boat was more than the previous. Before even starting this ski, I know for a fact that it will be a lot of work, but I’ll be able to build it relatively cheap. I barter when I can. We will see how it all pans out.
 

Quinc

Buy a Superjet
Location
California
Lots of hours on these projects.Keep a tab on how many hours you have in it.And then figure out what your actual time is worth.As in how much you think your hourly rate would be for the build.Be interesting to know ;)
Do the same thing but for how many hours you've spent staring at your phone and the tv. :p
 
Got a little bit of an update today. Since the ski has been on fire previously the hood seal tray was wayyyy more bowed than a square is supposed to be. Since I am going to fully reinforce the inside with new glass I wanted to try and straighten this out before glassing in new material. I read about metton a little and see that it’s a thermal formed material. I also see what the heat from the fire did to ole bumpy Betty. So I got some clamps and my heat gun and went to town. I’m pretty happy with the bit of movement I got from it. Also peeled up a repair that looks like it was done with polyester. It came right up with a chisel.
 

Attachments

  • 7299B206-F6E8-46F8-873E-E191751A575C.jpeg
    7299B206-F6E8-46F8-873E-E191751A575C.jpeg
    125.1 KB · Views: 31
  • B4390B18-EC77-4184-B529-7962B9BE74D5.jpeg
    B4390B18-EC77-4184-B529-7962B9BE74D5.jpeg
    78.1 KB · Views: 31
  • 4BFCC57D-7A67-4FA3-B846-1298EE490EA1.jpeg
    4BFCC57D-7A67-4FA3-B846-1298EE490EA1.jpeg
    133.6 KB · Views: 35
I hit up Tom Rill on Facebook a couple weeks ago and had him send me some tubbies. These things are massive and glorious. Fed ex dropped them off and I had them on in about 30 minutes. They are currently only dry fit, they’ll get fully glassed when I start the glass work.Thanks @tom21.
 

Attachments

  • B67C309A-8CA7-4BAE-83F8-E131E4B5739D.jpeg
    B67C309A-8CA7-4BAE-83F8-E131E4B5739D.jpeg
    113.1 KB · Views: 26
  • FC7F9322-70FB-458B-877F-A1356382D5E3.jpeg
    FC7F9322-70FB-458B-877F-A1356382D5E3.jpeg
    118.1 KB · Views: 28
  • F1D0B2FA-9E1B-47D3-BC09-D88B4A068D6A.jpeg
    F1D0B2FA-9E1B-47D3-BC09-D88B4A068D6A.jpeg
    114.2 KB · Views: 37
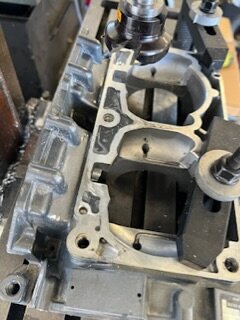
Got some more time on the ski the last couple days. I was given a couple cylinders to mess around with. First was to see if I could get the cylinders out using my heat treat oven. They come out pretty easy after about 5 minutes soak or so at 420°. Then I got the @yamanube porting templates, put them in solidworks, and waterjet cut sheetmetal templates to make it easier to scribe. The motor for this ski will be a bored and ported 62t/61x. I own a mill so this was fairly easy to do. I struggled to find a 90 hand piece for my flexshaft so I ran to harbor freight and picked up the 3” extended die grinder that allowed me to remove the step on the other ports. Today I’m milling the JB weld/aluminum filler cases, and will begin finger porting. I have more research to do on this as I don’t want to lose bottom end.
 

Attachments

  • 0A4BA588-AB4E-4D8A-9D60-C106258662E7.jpeg
    0A4BA588-AB4E-4D8A-9D60-C106258662E7.jpeg
    148.2 KB · Views: 24
  • A1709B94-7B1C-4BA8-9CCC-55F28EEFEF5A.jpeg
    A1709B94-7B1C-4BA8-9CCC-55F28EEFEF5A.jpeg
    157.9 KB · Views: 24
  • BE56E22F-4F29-4DAC-82B1-A3928CECE099.jpeg
    BE56E22F-4F29-4DAC-82B1-A3928CECE099.jpeg
    151.5 KB · Views: 25
  • 1429250D-205A-400D-8757-9557D0EB74FB.jpeg
    1429250D-205A-400D-8757-9557D0EB74FB.jpeg
    142.3 KB · Views: 26
  • F158F5A8-873E-47B4-89B7-2116C5A8E7CB.jpeg
    F158F5A8-873E-47B4-89B7-2116C5A8E7CB.jpeg
    147.5 KB · Views: 27
Nice work.

With the Porting Template, I just color in the New Port with a Sharpie, then grind away the material covered by the ink/dye.

Scribing not needed.
I’m kinda used to working up to a scribed line. I milled down the JB weld on the cases this morning but have decided to wait to do any porting until I can research more.66750932-27BF-4D0C-AC1F-679B786529C1.jpeg
 
Top Bottom