FX-1 Another FX1 Build I Feel I Should Share With You All..!

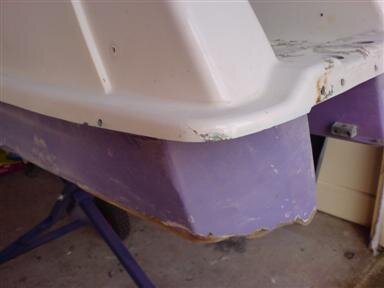
So how did I block off the back end I hear you cry... Well, here it is:

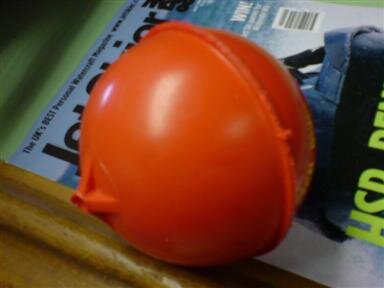
1. Take one ball float from a toilet (or buy a new one like I did).
2. Cut it in half along the seam.
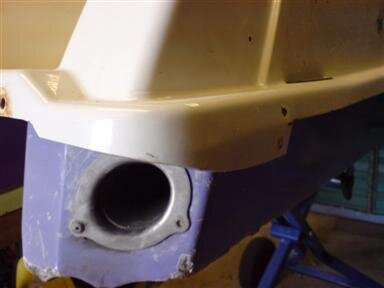
3. Mark off and cut the half of ball float to suit inside profile behind Hole for Hands (refer to pictures).
 

Attachments

  • 20080726_152751_DSC00256_Custom.jpg
    20080726_152751_DSC00256_Custom.jpg
    18.7 KB · Views: 29
  • 20080726_153135_DSC00258_Custom.jpg
    20080726_153135_DSC00258_Custom.jpg
    19.6 KB · Views: 29
  • 20080726_153211_DSC00257_Custom.jpg
    20080726_153211_DSC00257_Custom.jpg
    24.5 KB · Views: 26
  • 20080726_153639_DSC00259_Custom.jpg
    20080726_153639_DSC00259_Custom.jpg
    17.7 KB · Views: 26
  • 20080726_152628_DSC00255_Custom.jpg
    20080726_152628_DSC00255_Custom.jpg
    17.5 KB · Views: 25
I roughed up the outside of the balls and prepped the inside of the hood ready to carbon kevlar the (home made) hand hold block offs in place.

Not very tidy I know but you will not see it as it will be covered with the new liner. The layers were also placed in a way to give added strength. Whilst I was in there I blocked off the forward and top breathers to stop excessive water entery when subbing or doing other tricks...
 

Attachments

  • 20080728_234250_DSC00250_Custom.jpg
    20080728_234250_DSC00250_Custom.jpg
    23.9 KB · Views: 33
  • 20080728_234328_DSC00259_Custom.jpg
    20080728_234328_DSC00259_Custom.jpg
    39 KB · Views: 49
  • 20080728_234437_DSC00254_Custom.jpg
    20080728_234437_DSC00254_Custom.jpg
    12.5 KB · Views: 34
  • 20080728_234531_DSC00255_Custom.jpg
    20080728_234531_DSC00255_Custom.jpg
    14.8 KB · Views: 34
Last edited:
Thought I would clean up the lines of my FX1 and believed that my hull's rear end would look better (when turffed) like so...
 

Attachments

  • 20080726_154636_DSC00251_Custom.jpg
    20080726_154636_DSC00251_Custom.jpg
    15.5 KB · Views: 37
  • 20080726_154700_DSC00253_Custom.jpg
    20080726_154700_DSC00253_Custom.jpg
    19.5 KB · Views: 35
  • 20080726_154721_DSC00252_Custom.jpg
    20080726_154721_DSC00252_Custom.jpg
    14.6 KB · Views: 33
My hull and such like went off to my mates spray shop at this stage so I got on with some cleaning, painting and polishing. As you can see from the pictures, I am quite anal.
 

Attachments

  • 20080801_190435_DSC00262_Custom.jpg
    20080801_190435_DSC00262_Custom.jpg
    23.8 KB · Views: 27
  • 20080801_190420_DSC00261_Custom.jpg
    20080801_190420_DSC00261_Custom.jpg
    25.1 KB · Views: 27
  • 20080708_191745_DSC00215.jpg
    20080708_191745_DSC00215.jpg
    20.9 KB · Views: 31
  • 20080708_191812_DSC00216.jpg
    20080708_191812_DSC00216.jpg
    21.7 KB · Views: 26
Some more:
 

Attachments

  • 20080708_192207_DSC00209.jpg
    20080708_192207_DSC00209.jpg
    24.8 KB · Views: 33
  • 20080708_192227_DSC00207.jpg
    20080708_192227_DSC00207.jpg
    22.5 KB · Views: 37
  • 20080801_191042_DSC00267_Custom.jpg
    20080801_191042_DSC00267_Custom.jpg
    21.9 KB · Views: 39
  • 20080801_191147_DSC00268_Custom.jpg
    20080801_191147_DSC00268_Custom.jpg
    16.3 KB · Views: 29
One set of UMI bars and UMI Steering Plate cleaned, polished and all bearings replaced:

The main bearing was a nightmare to get out...
I had to grind out the inner part of the bearing. Then I had to drimmel out part of the outer to relieve pressure.

The end result was that it glided out:
 

Attachments

  • 20080801_190644_DSC00266_Custom.jpg
    20080801_190644_DSC00266_Custom.jpg
    29.6 KB · Views: 34
  • 20080801_190627_DSC00265_Custom.jpg
    20080801_190627_DSC00265_Custom.jpg
    29.7 KB · Views: 41
  • 20080801_190916_DSC00269_Custom.jpg
    20080801_190916_DSC00269_Custom.jpg
    18 KB · Views: 29
I made the carb look better also... Well... I think I did...
 

Attachments

  • 20080730_013141_DSC00258_Custom.jpg
    20080730_013141_DSC00258_Custom.jpg
    26.5 KB · Views: 32
  • 20080730_013204_DSC00265_Custom.jpg
    20080730_013204_DSC00265_Custom.jpg
    20.4 KB · Views: 43
Went down to the spray shop the other day to see how my friend is getting on. Looking good and I am well excited!!!

I told him to fill his boots and do what he thinks would look good as I couldn't make up my mind... So off he went and I am well pleased with the colour that he has gone with.
 
So here it is... My painted ski ready for fitting:

Believe it or not but it is mainly purple:
 

Attachments

  • 20080808_002554_DSC00261_Custom.jpg
    20080808_002554_DSC00261_Custom.jpg
    28.4 KB · Views: 43
  • 20080808_002653_DSC00262_Custom.jpg
    20080808_002653_DSC00262_Custom.jpg
    24.5 KB · Views: 40
  • 20080808_002716_DSC00263_Custom.jpg
    20080808_002716_DSC00263_Custom.jpg
    29.3 KB · Views: 40
  • 20080808_002745_DSC00267_Custom.jpg
    20080808_002745_DSC00267_Custom.jpg
    28.7 KB · Views: 53
A couple with the pole and hood:
 

Attachments

  • 20080808_002805_DSC00268_Custom.jpg
    20080808_002805_DSC00268_Custom.jpg
    28.1 KB · Views: 78
  • 20080808_002827_DSC00269_Custom.jpg
    20080808_002827_DSC00269_Custom.jpg
    25.9 KB · Views: 49
looks GREAT!

watch those handholds....one upsidedown landing will likely break out your toilet ball holds....

sweet ski though! long live the fx1

Cheers for the nice comments... Do you really think they will break free? There is an awful lot of carbon kevlar over the top of them...
 
Top Bottom