Completed 650SX Build - From 50Hp to 60+

Hey dude, sorry for not getting back to you right away. I honestly didn't know there was another response to my thread lol. But what I found after getting sick of that problem, was the base gasket. It was so strongly sealed to the base and cylinders it was insane.
It finally tore after I had enough of it and took around a 1" dia. aluminum round bar as my drift and started whaling on the tabs. I would try to run a new 1-1.5" wide paint scraper in between that base and the cylinders. Try to free up the gasket because I think it was the gasket the whole time that held me back. The locating pins didn't have a hard time going in or out of the cases for me. Hope that works out for you...I wish I would have known that a long time ago lol.
 
Last edited:
Next up is the old head pipe gasket... yeah I did re-use it lol, but I added some OMC Gelseal (Anearobic flange sealant) to both sides of it so it should be fine. I've done this in the past with a 100% sucess rate of a solid seal.

I am taking back this claim, I had my first seal job not work out using the anaerobic gel seal. I pulled the carb today to fine tune some adjustments and clear out some trace amounts of water only to find the gel seal didn't take in a few places. It was ok initially but apparently gas will deteriorate it even if it's been cured. I was always told otherwise and believed it until today. So I re-sealed with some Permatex Ultra Black sealant. I use it most often when reinstalling the bases onto chainsaw engines so it should work out in this situation. So heads up everyone...OMC GelSeal has it's limits.
 

D-Roc

I forgot!
it is not available in canada but xeon should be able to bring some over for ya when need be. i have one tube here you can check out, take a look at the race formula, this stuff is pretty good imo and it cleans off in seconds with acetone. i have saved gaskets for years now and keep wiping them with acetone and reapply.
 
I get to take it back! The GelSeal still holds it's glory, after making a gasket out of very good quality material and having no changes in my carburetion problem the Gel gets to maintain it's 100% success rate. I am however still diagnosing the problem but think I have narrowed it down to bad throttle shaft bushings in the carb. They are beyond worn out...there has to be at least 1mm of play between the shaft and I.D. of the bushings. Hoping this is the cure to what ails it.
 
Last edited:
Time for a new update...9 months later lol. The next little mods will be D-cutting the ride plate, extending the stinger by 4 inches, and making my own tail cone. I've seen the WetWolf tail cones and heard a lot of good things about them. But I'm cheap right now so I plan to turn something up on a lathe at work. Pics will be posted.
 

550klunker

kickin it old school
Location
Temple, GA
sounds like a great build. i was looking to do the same stuff to my jet ski, im just not as mechanically inclinde nor have access to the tools you used. how did boring the pipe help out? id like to go about it in the similar way, just need some help
 
Boring the pipe out helps let it breathe. It's just that extra bit of volume to help pep it up. As for boring it at home, I'm not sure how you would be able to do it. I'm more than happy to help with anything I can though for how I did mine. Most of this stuff I did with a Dremel. The only shop things I had done were bore the intake manifold and head pipe. The head was already planed before I bought it but that would be the last machine shop thing you would need done. As for the stainless welding, you can weld stainless with a MIG, it just doesn't look as pretty and might eventually rust.
 

550klunker

kickin it old school
Location
Temple, GA
yeah i think a friend of mine bought a hone at the auto parts store so i could probably do that. probably wont do any welding just yet tho. may wait till closer to summer to do the dual cooling mod. but as for the intake and and header i could probably just take to a machine shop right? but im in the process of trying to get a pipe and head so i may not need to do the exhaust mod lol. but if i do then i will. my 650 already has a grate and ride plate on it so i dont really need to do much there.
 
I'm still running the stock ride plate but I plan to D-cut it soon. I already have it scribed, I just need to get out of being lazy and do it lol. If you have a head and pipe on way then I wouldn't worry too much about modding the stock set-up. I did mine up just because I'm too cheap to put money into it so I stayed with the poor man's mods lol. As for the dual cooling mod, I don't know if that's a good idea or not. I remember my old exact same ski ran soo cold that the cylinders were always sweating and cool to touch after a few hours of use. I think they should at least be hot enough to the touch that you wouldn't want to hold your hand there for long. As it is right now, my ski has stock cooling, it gets hot but I can put my hand on it for a few seconds and not be burnt, and the heads aren't hot enough to boil water if it were to drip onto it. So I think it's running at a good temp. Just remember if you're running too much cooling and you're in colder waters than normal you also could run the risk of a cold seizure, or as some know it as a 4 corner lock-up. The piston warms and expands faster than the cylinders can handle and then you have a nicely welded piston to the cylinder. Just something to keep in mind.
 

550klunker

kickin it old school
Location
Temple, GA
ha yeah true. but i may not have the head and pipe coming so i may need to do these mods. don't really know much about milling the head myself otherwise i would do it. but i'm sure i can just take my pipe to a machine shop and get them to bore it right? if not, what will i need to do it and how do i know how big it is? i'd like more compression but i don't wanna spend the cash on a head if not necessary ya know?
 
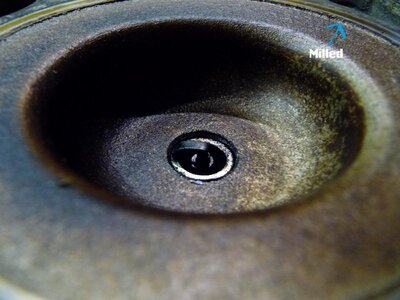
A machine shop can mill the head and bore your head pipe and intake manifold. If you take it all in at the same time you'll likely only have to pay for an hour or two tops. Not sure what the going rate is in your area but where I work they charge 40/hr. You have a 650 right? If so, when you remove the head, measure from the outer edge of the dome down to the gasket surface. There chould be between 0.020" - 0.060". If you have a huge amount like that you can have most of it milled off. Here's a pic of mine, notice that the edge of the dome has a very small step to get to the gasket surface. My domes right now have something like 0.005". On yours you should notice a fairly thick shoulder before you get to the edge of the domes where as mine it's paper thick.

The head pipe you want them to bore out to 44mm, remove the water fitting though. I like to remove that stuff and keep it at home because they can always forget about putting it back and eventually lose it. The intake manifold you'll need bored out to 42mm but you'll need to remove the oil injection fitting from that too. You'll also need to port match the head pipe gasket to the new 44mm head pipe bore and the same for the intake manifold gasket. I just used a Dremel with a sanding drum, ground a little off at a time until the I.D.'s looked nicely matched. The intake manifold isn't overly necessary to have bored out but it's just easier to do it all at the same time. You'll probably eventually want a 42mm carb so at least boring the manifold with the other 2 pieces will make the carb a bolt on and go mod when and if you decide to go that way.
 

Attachments

  • heads.jpg
    heads.jpg
    60.3 KB · Views: 138
Last edited:
Update for July 25.2010

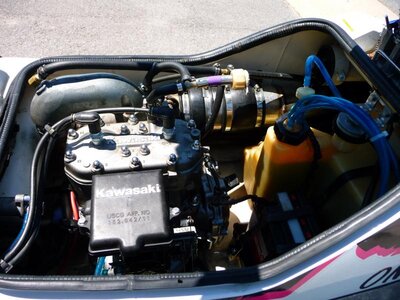
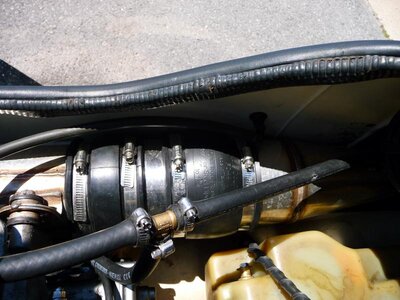
If you want to make this ski a lot more fun and have much more bottom end, get a piece of schedule 10 stainless tubing which measures 4" I.D. x 1/16" thick wall x 4.5" long (any place that sells metal will cut you a peice, I just happened to have some at work so it was free for me :cool2:) and add it between the stinger and the rubber coupler. It makes it into a poor man's B-pipe but totally changes the attitude of the ski. I did this just a few weeks ago and there is absolutely no bottom end bog anymore and no struggling to get up out of the hole. As for the coupler between the stainless pipe and the stinger, I just used a 4" rubber coupler found in the plumbing dept. at places like Rona or Home Depot for about $14.00

I tried using a blue Keihin 42mm carb with this set-up but it sucked horribly. Sucked tons of gas and was crappy on performance. I used the stock jetting, then upped only the main jet to the 160 (the stock pilot being 78) with very minimal improvement. Stick to the stock 38mm Keihin, it has good top end but works at it's best through bottom to mid range. One thing I have found with the engine mods and all the bore out work is that the stock 38mm Keihin does need a slight high speed mixture screw adjustment. I found that the ski runs great but seems to have a lean surge on wide open throttle. This is because of a lack of fuel charge to compensate for the new CFM demands of the engine mods. The carb is not sending a rich enough fuel charge through the high speed adjuster (at stock settings) which will give these side effects. You will just have to try adjusting it a little at a time and running it until the ski sounds like there is no surging. Before you do the adjustments, take it out and listen/feel for the surge, you will feel it happening as the ski will feel like it picks up and holds good top end, but for a split second will drop off just a touch then pick up again, almost as if you just ran over a sand patch. I noticed that with my ski, it happened all the time. I tried a bigger main jet which cured that but made bottom end tuning a pain and used more fuel due to the mixture screw adjustment.

Inside the carb and adjustments: I originally started out with stock jetting and mixture screw settings. I found that slight occasional surge so eventually I tried using a larger pilot and main jets going from the stock size of 75 pilot and 140 main to 85 pilot and 152 main. The results were that the slight surge was cured but the ski became noticeably harder on fuel, was running a bit too rich and was hard to tune in. I put the stock jets back in, cured the bottom end bog while staying with stock mixture screw adjustments at 5/8 out for the high speed adjuster, and 1 1/4 turns out for the low speed adjuster. For the top end surge, going from 5/8 to 3/4 of a turn out on the high speed adjuster should cure it unless your metering diaphragm is dried out and crispy sounding. That will require a bit more tuning until you get a new carb kit in there. When I re-jetted, I also tried a range of different needle valve springs for different pop-off pressures hoping to cure the bottom end bog but found that the stock spring was the best for the stock airbox and flame arrestor set-up even with the over-sized intake and exhaust manifold bores. The only time pop-off really needs to be changed is if you start playing with aftermarket F/A's. This is due to the larger airflow they offer and when more air comes in, the pressures inside the intake manifold are lowered which in turn requires lowering the pop-off pressure to balance the carburetion requirements. But I wanted to try it anyway for the experience points.

I think of all the things I've done to my ski, this is by far the best improvement yet. One thing I forgot to mention, when you put this set-up together, the new stainless pipe will slip over the first little bit of the stinger and the first little bit of the main pipe. To help insulate the new rubber coupler, I pushed the new pipe as far in to the first coupler as I could and locked it down with a gear clamp (you will feel and hear the new pipe butt up against the stock main pipe), then pushed the stinger as far into the new pipe as I could being able to hear and feel the stinger butt up against the new pipe and locked it down with a gear clamp. How this helps to insulate the coupler is by preventing it from having any contact with the exhaust gases (which reach temps of 1200*) and only dealing with the transferred heat through the stainless surfaces of both stock and added in pipes (which only range between 110 and 230* depending on the cooling set-up). I have run this set-up several times now running non-stop through a full tank each time (about 2.5 hours per tank) and the coupler hasn't melted or shown any signs of melting. The next thing to come will be a Mikuni SBN44 carb and intake, I'll keep an update of that when it happens.

August 08.2010

An update is required as I just found out that the stainless tubing I used apparently is not an overly common item. But I still think a steel supply company should have some kicking around somewhere since they are there to supply as many machine shops and outside sources as possible with as much diversity as possible. One alternative which might be more abundant in stock than the stainless is schedule 10 aluminum tubing. From what I understand it is supposed to be the same in dimensions and will save you a small amount of weight. If this material is not available where ever you go looking, or is just ridiculously expensive, the next best and probably cheapest route would be to find someone with an old stock exhaust they want to sell. All you will need is the straight portion that has been welded onto the stinger. Cut that off and add it to your exhaust the same way as mentioned above. The only thing you will need to worry about is butting the extra pipe portion up as tightly as you can to the leading expansion chamber and the same for the stinger to the extra pipe portion. This is because your heat barrier won't be there as it would be with the schedule 10 tubing. You want as much metal on metal contact as possible to prevent those exhaust gases from coming into contact with that new rubber coupler or it might melt down. There is also a chance it will hold out reasonably well it just depends on the internal cooling.
 

Attachments

  • P1010159.jpg
    P1010159.jpg
    80.7 KB · Views: 332
  • P1010158.jpg
    P1010158.jpg
    71.9 KB · Views: 336
Last edited:
Top Bottom