Super Jet DaveO's SN Build

I picked up this SN about a year ago from a member on here and it has been sitting in my garage pretty much ever since. Last week I made room in my basement to start working on this thing. I have never done anything like this before so I am learning as I go. When it is complete it will be my first time riding a superjet as I currently ride a 650sx

The ski was in the middle of being built when I bought it so it already has a chopped hood to be lowered and the liner is out (which is a bonus!). The nose trim has also been chopped. The plan is getting this thing into a running state before I get too crazy, so essentially I am going to finish what the previous owner started. After I have ridden it for a while I will probably start doing things like widening the tray or anything else I feel is necessary.

The plan is to reinforce the hull, fix the huge crack along the side, mod the nose to be similar to Yami-Rider's work here: http://www.x-h2o.com/index.php?threads/sn-from-hell.129666/, and finish the hood work. The previous owner tried to repair the crack already, but I easily pulled off the layer of fiberglass that was laid with a light pull. He had warned me that I might want to redo it.

Here are the parts it came with / I bought already:
- 61x/62t engine
- modded 38 mm carbs/billet spacer/vforce reeds
- riva red pipe
- ada girdled head 185 psi
- bored over to 710
- wiseco pistons
- welded trued cranks
- round nose water box/exhaust
- bilge pump
- RN handle pole

I have fiberglass materials coming tomorrow, so today I started by grinding the ribs from the hull. I need to get my hands on a dremel to finish off the bottom of the ribs as my grinder was too big and bulky to finish them off. It wasn't too bad doing the grinding, I just kept the vacuum running and used the talc powder trick to try to minimize the itch.

The next step is the grind out the crack. I am not sure if I just grind all they way through and widen it up? Then I just fill it with microballoons and epoxy? Any advice / critiques would be much appreciated!

IMG_20140308_160149.jpg IMG_20140308_160128.jpg MG_0866.jpg IMG_20140311_190319.jpg IMG_20140309_115922.jpg
 

TheCoz43

Jet Surfer
Location
Pismo Beach, CA
Yes, Micro balloons and epoxy. Turn the ski on its side. You can pour it in then brush it a liltle. Just do one side, then let it dry, before you do the other.

It looks like you have a good motor set up. Should be a fun build.
 
Supplies are here! Also picked up a dremel to grind out the crack. Forgot to order foam for the nose shaping. Is 2 part urethane foam the goto material for that kind of stuff?

uploadfromtaptalk1394666283058.jpg

Sent from my Nexus 5 using Tapatalk
 
A little update. I have sanded the engine compartment and filled the bondline and cracks. Only took 3hrs to sand o_O. The PO's epoxy made a lot of extra work and the paint on the upper sides was a pain to remove. I realized I had a better tool for this after I was done.... Of course.

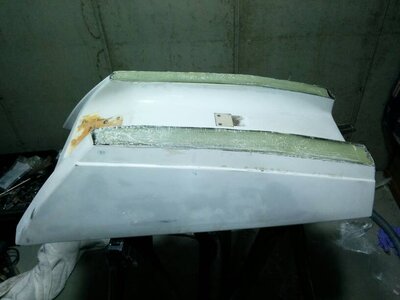
I also attempted to lay fiberglass for the first time. I filled the cut out top of the hood with 2 layers of 12oz biax. It turned out better than I thought.

I have tried to figure out what to put on the fiberglass so I can smooth it out. Do I just use epoxy thickened with phenolic microballoons? After doing the bondline this way and seeing how it likes to slowly ooze, I question if this is the best way to do this. Seems like I would need to babysit it for a few hours so it doesn't ooze right off. Anybody have any input on this?
uploadfromtaptalk1395272799018.jpg
uploadfromtaptalk1395272822788.jpg

Sent from my Nexus 5 using Tapatalk
 
Last edited:
I think I have found an answer to my question. I just need to keep adding microballoons to the epoxy until it is more of a peanut butter consistency. My bondline was done with more of a cake batter consistency. I will be giving this a shot this weekend. Also I hope to get started on laying 17oz biax in the engine bay.
 
Another update. Not too exciting of a build for people here, but as a newbie I am having fun with this build. I covered the hood fiberglass now and am waiting for it to dry so I can sand it smooth.hood2.jpghood1.jpg
 
I have been working on reinforcing the engine bay this weekend and also working on the liner of the hood. I have also sanded the top of the hood but I am not liking how it turned out yet. It is close but has some unevenness that I will fix yet.

8any3ety.jpg

u3a8yhy9.jpg

u3ege3e4.jpg

e4e5atyg.jpg


Sent from my Nexus 5 using Tapatalk
 
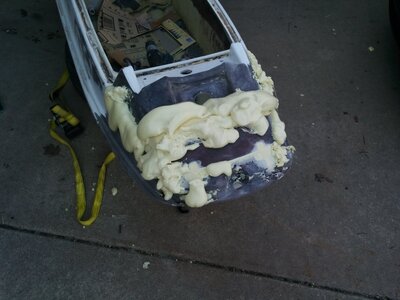
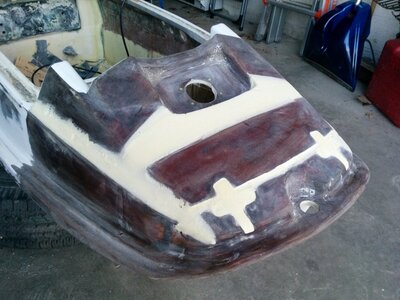
Well, I had a bit of delay with this project because my son was born, but now I am back to work. The hull is now completely reinforced as well as under the handlepole. I also got the top of the hood mostly done, just need to work on perfecting it. I made some hood vent covers much like Yami-Rider's, but I am going to scrap them and use some louvred vent covers that I ordered off Amazon. I just didn't like how they looked in the end. I also started to fill in the nose with foam and I am getting close to being ready to lay some fiberglass. The last thing I did was pick up some 3" PVC pipe that I am going to try to use for a custom fire extinguisher holder.

IMG_20140405_103701.jpg
IMG_20140418_172901.jpg
IMG_20140420_173636.jpg
IMG_20140420_192222.jpg
 
This weekend I worked on fiberglassing the nose and I am going to give it a few days to completely harden as it is pretty chilly out now. I also fabricated a custom piece for holding the steering cable in place at the top of the handlepole. Not sure if I will ever use it, but it was a fun side project while I wait for fiberglass to harden. I am missing a lot of these little parts that I will need to pick up yet.

I started to glue in the air tubes to the new liner with 5200 fast cure and cut the holes in the back of the hood for the air vents. The air vents haven't been fastened in yet, but they are pretty snug as it is and takes some prying to get out.

IMG_20140322_162725.jpg
IMG_20140427_161619.jpg
IMG_20140427_161629.jpg
IMG_20140427_161946.jpg
IMG_20140427_162310.jpg
 
Been a while since I worked on this. Had a few kids since then and am getting back to work on this.

This is where I am at with this. Working on footholds now.

Question, is it normal for having practically no foam around the exhaust pipe, or is that a sign of another issue? I show it in the last pic. I did not take any foam out going down, just straight back so I have room for the holds.
 

Attachments

  • 20200726_163007.jpg
    20200726_163007.jpg
    189 KB · Views: 70
  • 20200726_162920.jpg
    20200726_162920.jpg
    189.1 KB · Views: 72
  • 20200728_180722.jpg
    20200728_180722.jpg
    180.4 KB · Views: 76
Thanks mikidymac. That is what I figured. I did some sampling looking for waterlogged foam and didn't find any, so I don't think I need a defoam. I will use some 2 part pour foam to fill the missing cavities around the footholds.

I ordered some paint and going with orange. Much like everything else, this will be my first time painting. I also have a Hazard Bracket ordered as I have a rn pole I am using for this.

My biggest worry at this point is figuring out what bolts and hardware I am missing. I never had everything as I bought the ski disassembled and didn't know I was missing a bunch.
 
Ya it was a long break for sure. The ski sat in my barn all that time and an animal chewed two holes in the hull, which I have patched now. Had 3 kids in the process with the oldest being 6 now. Now my oldest keeps talking about riding skis when he gets older, so I better have some ready for him when he is old enough for his boating license.

Once I start assembling I will know more on what I am missing. Right now I know I am missing one steering cable coupler, the U-Shaped steering cable pole mount, 6 bolts that fasten the flame arrestor to the carbs, the pump shoe screws, and the bolts to mount the ride plate and intake grate.
 

Sanoman

AbouttoKrash
Location
NE Tenn
Right now I know I am missing one steering cable coupler, the U-Shaped steering cable pole mount, 6 bolts that fasten the flame arrestor to the carbs, the pump shoe screws, and the bolts to mount the ride plate and intake grate.
Maybe @brraaapperdoodle will have some leftovers.l probably also some small bolts too.
 
Location
West MI
I have some OEM square nose parts I will send a picture
Fewer than I thought... original turf in excellent condition, pole spring (from blowsion ~4 years ago?), steering, bars, throttle lever and cable, temp sensor... that’s about it. I thought I had screws from intake grate, but don’t see them.
 
Top Bottom