650/X-2 First build

Location
RI
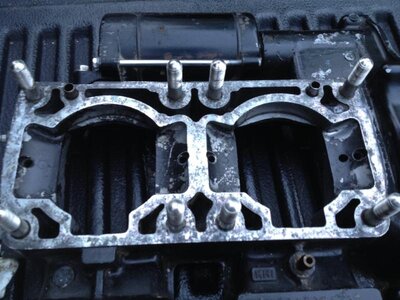
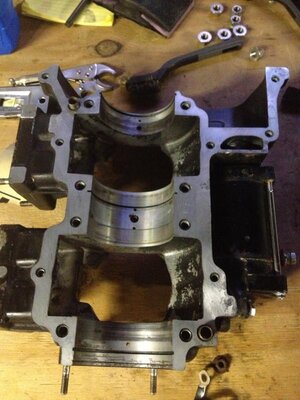
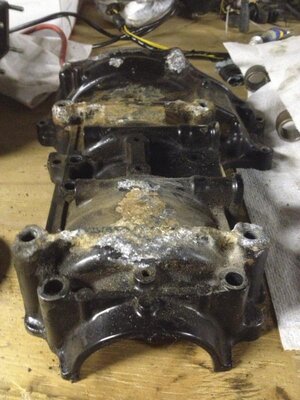
First build, first post on any forum so let me know if I am in the wrong place here. I was given a 1988 650sx and have been slowly disassembling and cleaning it for the past few months. It had been sitting with dirt, mold, and water in it for years so I was wondering if I should reuse the corroded lower case.

I am at the point where I am ready to start rebuilding it but I will probably take it slow since this is a first for me.

This is from a thread I posted on another site earlier:

____

I got it for free. It was sitting for many many years with water and dirt in it (none in the motor) and had a seized pump. Somehow the stock impeller had bound itself to the pump. It also had scored cylinders. Once I got the exhaust, battery, engine, etc. out I couldn't see any of the hull. It was caked in dirt, mildew, oil and grime. I never thought it would clean up but with some highly concentrated ZEP degreaser it miraculously shined right up. The ski also came with a bunch of extra parts, some installed, some not, and most of them pretty rough condition-wise:
Coffman pipe
Westcoast exhaust manifold
PRO racing ride plate
A lot of rough looking carbs (five or six) including duals with a r&d dual intake
Jetinetics ignition
Pole spring
Bad bones waterbox
500gph bildge - not hooked up
Plastic trigger throttle
Rear exit exhaust
No choke - primer set up
Two extra engine bay covers
One extra stock handle pole setup
Extra junk engine - sat outside for years with the head and flywheel cover off
Spare head
Other small things including spare electronics

I also bought/had done:

one step up wiseco top end kit
bore and hone service to match the pistons I bought
a skat trak straight 16 impeller
a new/used jet pump assembly

new oil seals
crankcase block off plate
oil pump block off plate (oil pump shaft was already broken as far as I could tell)
Used driveshaft bearing and plate that is slightly better than the one I had
CD based manuals

I have a few more things to purchase and some work on the hull but basically I may be able to start putting this thing back together soon. I am worried about corrosion on the bottom of the crank case and two of the ride plate screws aren't threading. Any tips on that?

I still need to purchase:
wrist pin bearings
liquid gasket
torque wrench
electrical parts
spark plugs
battery


Also the two engine mounting plates I have are pretty rusted. I grinded one down a bit and will probably just paint it and use it unless I find a nice one for a good price.
I also broke the stator mount in the disassembly process but I was able to salvage one from my junk motor and switch everything over.
I had trouble removing the drive coupler (and had to reassemble the engine to do it) so I bought a used one of those to replace the one I mangled.

Here are some pictures of the ski:

http://imgur.com/a/WcZO2

This album has a picture of the crank case that I am worried about:

http://imgur.com/a/sGomD

Here is the corroded crankcase again, what do you guys think?:
IMG_5661.jpg


Thanks!


Last edited:
The crank case, I'd probably just clean it up, paint it and run it. Its only a 650, so if it blows you can get another pretty easy or do a 750 swap. Get some high temp engine enamel, maybe blue to match the hull.

Its not like you can just swap the lower crank case, you pretty much have to get an entire new block as the bearing surfaces are all matched.

The ride plate screws: are the inserts in the hull spinning or are you just having trouble getting a bolt started?
 
Location
RI
You have confirmed my suspicions with regard to the lower case. I wasn't convinced that it would be a simple swap of one part due to tolerances.

I will probably just paint it a little where it is corroded and keep with the black. Blue would be interesting though.

As for the ride plate screws, it feels like the inserts are gone. I will have to check since it has been a while but I think the bolts just spin freely in those two spots.
 
Location
RI
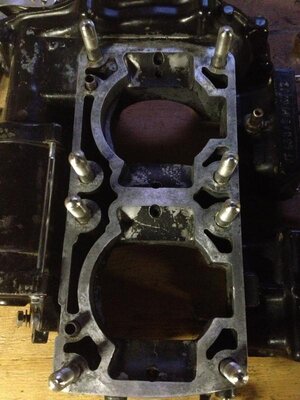
Does anyone know how to clean the paper gasket off of the top of the case? I have tried carefully scraping with a razor, using a brass wire brush, and wiping it with a rag soaked in brake cleaner. How clean should I get this?

IMG_6661.jpg
 
Last edited:
Location
RI
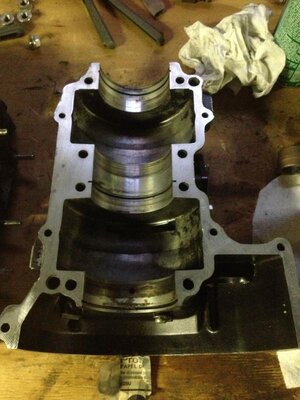
Here is the cleaned up and painted bottom case. I used backyard grill paint for the heat but it probably isn't the best choice is it?

IMG_6550.jpg
 

SkiDiggity

formerly kawirider142
Just use high temp engine paint you get at your local NAPA or any auto parts store. As for the gasket crap, I just use a razor blade but you have to be careful and try not to gouge the surface. It will take time and your hands get tired but it will all come off.
 
If you are riding in salt that paint will probably come off the engine. I did my engine bed plate with some grill paint from sears a couple years ago and it was awfull a month later. I ride in salty bay though. Look around you might find a lower case for 35 bucks. I now use por15 when I paint stuff and it has been working great. . If the paper gasket isn't too bad on there I would use a razor blade for the big chunks and scotch pad you use for cleaning pots to get it completely off you can also take the studs out to make it easier. And if you do that you can then sand it with some fine paper after cleaning it up. To sand it you glue a couple sheets of sand paper onto a glass sheet and slide the block over it adding even pressure. There is some more info and YouTube videos of that online.
 
Last thing. While you have that case on your workbench I would not reuse the crankcase block off. I would tap the two holes and jb weld the appropriate size bolts in there. The block off plates rely on two rubber rings to seal the case and those can get messed up. Jb welded bolts are pretty solid though.
 
Location
RI
I figured that I used the wrong paint. I will get some of the engine enamel and do a couple coats of that - I don't think this engine is worth using por15 on.

The razor blade wasn't having an effect on the mating surface so I used some 600 grit which did a better job. It is smooth and showing more metal now but still somewhat stained.
 
Location
RI
I was told that with the tight clearances associated with the crankcase that it wouldn't be a simple matter of switching out the lower case. What do you think?

Also, how do you remove the studs, channel locks or some sort of stud extractor? I have heard about the glass method and that sounds like a good idea.

As far as the block off plate goes, I just bought the kit on ebay for replacing the drain. You're saying that these kits aren't reliable? I would have to purchase a tap set if I went with the bolt method so I am a little hesitant to go that route. Should I just finish the rebuild and do a leakdown test and see how the block off does for now?

Do you know what size tap I would need? I have a couple taps laying around but that is it.
 
Location
RI
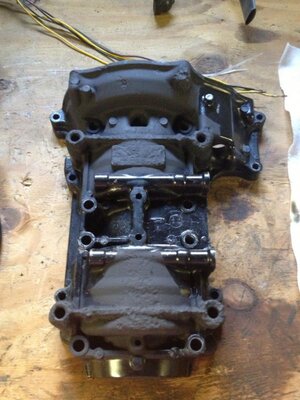
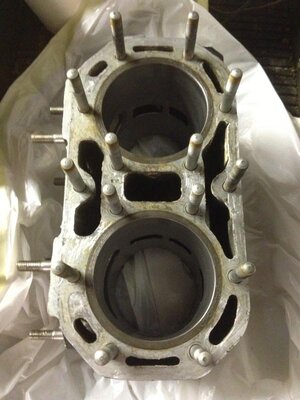
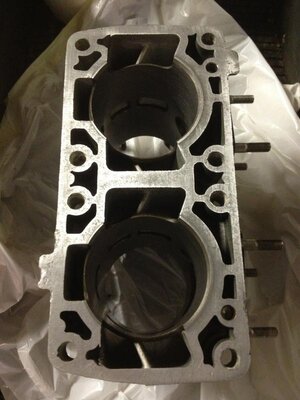
Here is the current status of the mating surfaces (minus the head):

IMG_6697.jpgIMG_6698.jpgIMG_6699.jpgIMG_6700.jpgIMG_6701.jpg

With regard to the top case (first image), this is after scraping with a razor, rubbing with brake cleaner on a cloth, and sanding with 600 grit. I haven't done much to the cylinder block yet.
 
Last edited:
I meant just replace the entire crankcase and reuse your crank. But if yours isn't broken, then ride it until it is. I believe there are stud extractors, I've removed a couple and I just use two bolts and thread them on then tighten against each other and crank on the bottom bolt. I wouldn't grab the stud anywhere with vise grips. You will be fine using a new block off plate for a long time probably. I just rebuilt my engine a year ago and it had a block off plate on it. The o rings were pretty flat from heat and pressure and for all I know it had been on their for 20 years so I just tapped the hole and put a bolt in there. May have been a 9/16" bolt, don't quote me on that though, it's been a year.
 
Location
RI
Oh ok, yeah I thought about just getting a new crankcase too but I am trying not to spend too much more on this project.

I may try the nut trick on the studs but everything on this motor has been so neglected that I am sure it will be a pain to get all of the studs out even if I do get a couple of them loose. Then I also have that (copper?) cooling nub that sticks up out of the case too.

I know what you mean about trusting those rubber gaskets on the crankcase drain holes. I checked out the two taps I have on the holes and it looks like the 5/16 is about the right size (I also have a 1/4). I don't have a driver for it but I could probably carefully use some other tool. It says "5/16-18 N.C. USE F DRILL". Obviously I am a little unprepared to be tapping the thing at the moment but I can do it later if need be.

I bought some Dupli-Color semi-gloss black engine enamel from Pep Boys today. I am just going to go over the lower case again with that as well as my engine mounting plate which was also painted in a few coats of the grill paint.

Other questions (thanks for the help):
Jet pump bearings and drive shaft bearings- I bought the jet pump and the through-hull plate used. Should I check the bearings for play, regrease them, replace them, etc.?

Gasket spray sealer on the head gasket - It doesn't call for it in the manual but some people recommend coating the metal head gasket with it. Thoughts?
 
personally i would just throw some marine grease on the bearings and call it a day. if you run it and they are bad then replace. my guess is the housing on the pumps break way before the bearing would ever get used. i grease the crap out of everything. i havent used any spray sealer on my engine head gasket (only rebuilt 3 engines so far, so by no means an expert) and all my engines have worked fine. just torq it down to spec.
oh and im not sure what fitting your talking about but it is probably brass (my best guess is your talking about the pulse line which feeds to the carb).
i didnt read through that thread but it looks like he was talking about retapping the two holes that he stripped trying to tighten down the block off plate. im talking about tapping the other two holes that the block off plate is blocking ( i think you understood that though.)
 
Location
RI
Sounds like a good plan as far as the grease and spray sealer go. I have torque wrenches and all the specs so I will follow those closely and grease everything liberally.

There are little maybe 3/8" nubs that stick out of the crank case that help join the cooling channels between the block and the case. They would keep me from sanding the mating surface with a pane of glass even if I was able to remove the studs.

I tried the nut truck on one of the studs last night and it wouldn't budge. Also put a couple coats of engine enamel on the lower case and on the engine mounting plate. I just went right over the bbq paint layer with no prep, I figure I will replace those parts soon anyway. The engine mounting plate was completely rusted when I got it so it isn't going to last long either.

Yeah he was talking about tapping the drain holes because he had stripped the other two (non through holes) and couldn't mount a block off plate anymore so they were advocating your method. I will have to purchase some more taps for that process.

This could be a stupid question but for the crank bearings you leave those ungreased and just let the oil do all the work, right?

Not related but I also took the gas tank out last night and drained the remaining old gas. Any tips on cleaning the tank out? There is a little bit of dirt/residue in the bottom in one of the corners.
 
Last edited:
U can use some of the oil you will mixin with your gas on your crank for while it is sitting there. Those pins line up the cases and they may pull out but yours could be corroded in from use.
 
Location
RI
Just an update on this project, I know it has been a while. I brought the hull down to my buddy's fiberglass shop and worked on it in the mornings before work. I flipped it over, got it sanded and prepped and he patched up a couple spots with some fiberglass mat and some sort of resin, I didn't ask. Hopefully epoxy not pu. I then sanded it again and prepped it for paint. He was kind enough to then spray the bottom with basic gray two part epoxy primer. Bottom is now gray. Above rub rail is stock.

I also finished rebuilding the engine and pressure tested it. It drops less than one psi every 5 minutes from 10psi. I figured that was about as good as it was going to get and that the slight leak may have been in my homemade test rig. I kept improving the rig since it was losing a psi per minute the first time around and I am happy with where it is at now.

I also installed the jet pump with silicone and put the (aftermarket anti-porpoising) spacer and steering assembly on. The new/used jet pump I got off of eBay has an extra fitting tapped onto it so I will have to figure out what to do with that. Does anyone know why that might be there? My exhaust looks like it is rigged for dual cooling so maybe that will come in handy but the original jet pump didn't have it.

I bought a JRE quicksteer turn system from eBay with the adjustable bars and installed that at zero degrees for now. There are a few other options that I can adjust to later if I want. Still need to buy grips. The steering cable has a rough spot where if I turn one way there is a bit of resistance. Do you think this will be dangerous when I ride it or not noticeable (I've never ridden one of these before)?

I also bought a dry cell odyssey battery which I am currently waiting on. I took the ebox apart and it looked pretty clean so I sprayed it all down with some silicone and bolted that back together. The box had its gasket and some silicone sealant from the previous owner. I didn't reseal it.

I put the drive shaft in with plenty of grease along with the drive shaft bearing plate. The previous owner had put silicone sealant on this as well but the manual didn't call for it so I left the surface between the hull and the drive shaft bearing housing bare. Any thoughts here? I dropped the motor in and tightened that down before tightening the bolts on the shaft bearing plate. I then bolted the Coffman pipe back in which took a bunch of maneuvering. I think I will have to pull this back out in order to install the bilge pump and what not.

Before all of this though I cleaned the fuel tank out with water (yeah) and then threw some rags in it and shook it around to get most of the moisture out. Then I let it dry out for a few days. I reinstalled it with new clear fuel lines making sure that the vent check valve worked. I will probably put an in line fuel filter in but I haven't bought one yet. Any recommendations here?

The primer is hooked up to the old oil injector tube on the intake but I need to figure out where I want to put the primer source T fitting in. Any ideas on that? I think it was on the "ON" line that ran to the carb before. I am not running a reserve because the previous owner took the switch out so I am just running "ON" from the reserve pickup. I am also running pre-mix as I may have mentioned before. One other thing, I found a westcoast fuel pickup system in my spare parts bin the other day. Should I use it? It looks a bit beat up. What would the purpose of an aftermarket fuel pickup be?

In general, for the entire re-assembly I used blue loctite as called for by the manual, plenty of grease, and all the appropriate torque specs as called for. This ski has been so neglected that even while I was putting everything back together I was cleaning parts. Every little part on this machine needed a thorough cleaning.

What is left:
1. I decided to go with the single 38mm Keihin CDKII. I used a dremel to bore out one of my stock intakes to fit that. I just need a rebuild kit for that.
2. Install bilge pump. I have a Rule 500 GPH bilge but it is missing the clip on screen and I have no mounting plate or waterproof switch.
3. Hook electrics back up. I need connectors for the 5 stator to CDI wires and some heat shrink tube. Also might have to rebuild the starter but we will see. Probably need to put in new spark plug wires.
4. Route some new cooling hoses and install PRO ride plate and stock grate. I had to tap the bolt hole for the intake grate on the jet pump which came stripped. Still only going to have 5 of the 6 ride plate bolts available. That should be fine, right?
5. Register ski with no title or bill of sale and possibly get new fire extinguisher (do people do that?)
6. I think there is one ding in the fiberglass left above waterline near the bow and there are four small holes in the side under the rub rail from where the total loss ignition was mounted. I might ignore the ding for now and put bolts in the holes.

Sorry for all the words in case anyone actually reads this. Pics to follow....
 
Last edited:
Top Bottom