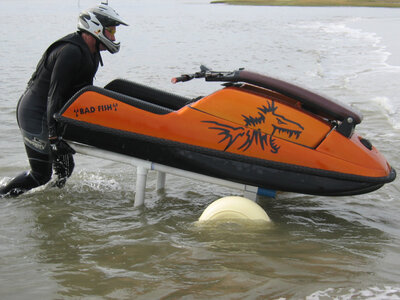
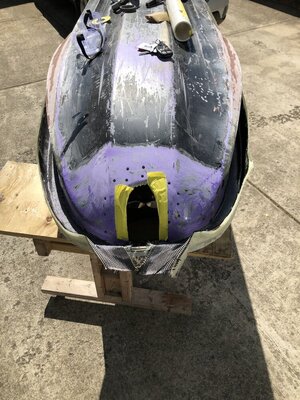
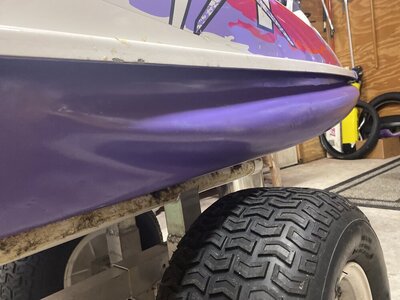
FX1/144mm Bottom Replacement

Flash-FX

No Square..No Round..FX-1
I noticed those things were HUGE

I want to put a few rides on my F1 and then add some sponsons.....


Which have you guys deemed the best for the fx platform??

Sorry, we don't have that pinned down yet. My latest versions are somewhere between these two...(WaveHog & Frankie Jr). But with a twist.
 

Attachments

  • IMG_2636 copy.jpg
    IMG_2636 copy.jpg
    445.1 KB · Views: 328
  • IMG_3361 copy.jpg
    IMG_3361 copy.jpg
    367.5 KB · Views: 296
i have got to say i envy your skills. i wish i.....hell i am going to give it a try...going to start small parts first.... but when i get there i am going to make a blaster 1 hull..could you point me in the direction i would need eg:- layers, resins etc to do a full carbon hull? strong enough to withstand wavejumping? forgive the ignerance but will i need that gel coat mixure on a full carbon?
 

MikeyB

H2O-Addict®
Location
Michigan
Awesome build and tons of great info here!

What type of glue and filler did you use with the divinyl foam? I would have thought regular body filler would have melted it.

Great job on this ski!!!
 

Flash-FX

No Square..No Round..FX-1
I read this whole awesome thread and never got a ride report.

How about one now, 14 years later?

Well, it’s still alive! I ride it all the time. Rebuilt the pump & drive line at least 7-8 times. For power, I’ve had a lame non pv Lamey motor that never got to run right (junk), a 1- baby scream 771cc, 2- Team Scream 865cc, & 1-TS 900cc. Been through a bunch of Different pitch Skat-Trak 144mm impellers (for the 1” set back mag), with the current pitch of 16/20. The motor can spin that prop @ 7800 easy. It hooks up great with a custom grate and is faster than the average rider can handle. 1/3 throttle is about as as fast as a new 2019 Superjet @ wot. It pulls really hard from there. at 50+ things get pretty sketchy and you better Be paying attention.
 

E350

Site Supporter
Location
Sacramento Delta
My guess is that nobody knows more about the bottom hull of the FX-1 than you. And I noticed that you said you made your own front tubbies. Do you have photos. What are your recommendations for tubbies, tubby design and how the FX-1 handles with tubbies.

Also @wydopen
 

Flash-FX

No Square..No Round..FX-1
Over the years I've messed around with different designs on the FX, (along with Wave Hog, aka Carl and SpecialFX, aka JD). After all that, there isn't one "perfect" design or shape. We ride mostly creeks and some surf up here in NJ. The big tubbies help keep the nose from pearling while riding surf (added area), While when long down the side help when riding fast and carving turns. It's all freestyle design for your riding style. The current "tubbies" on my ski are set about 1" from the bottom edge. It forms like another chine when you are carving a turn, Kinda like the old 550's feel when turning/carving. On the other hand JD's and Carl's tubbies start at and close to the bottom edge, and are rounded up from there. Basically there's no right or wrong way for design.

I've ground them off and started over at least twice. I always used 4-5oz. divinycell foam. That stuff sands so nice as compared to the pink or blue construction insulation. I make tape patterns and mirror them for the other side. It's easier to laminate multiple layers of say 1/4" thru 1/2" to get things to conform and stay on track. Shaping a single 2" thick piece of foam might sound easy, but it's not. Unless you are a master sculptor...lol.

I have some tape patterns (see pix below) that I've used in the past (bottom two blue patterns were from a earlier design that got ground off) and for the current sponsons. The long one at the top was the base layer of 1/4" foam. Then the following layers are 1/2". The final thickness ends up about the width of the top rail. I "glued" them on with U-Pol fantastic body filler. That stuff is hard to find now but came in a toothpaste like bag. REAL easy to sand. After you laminate the foam layers on, you sand to shape, then seal things up with some layers of fine 6oz cloth. I use epoxy resin, but polyester works a little quicker for the cure times. Hope this answered some of your questions...
 

Attachments

  • IMG_8081[499] patterns.jpg
    IMG_8081[499] patterns.jpg
    202.2 KB · Views: 35

E350

Site Supporter
Location
Sacramento Delta
Thank you! When you get time, would you mind posting up a photo of your ski with the tubbies on?

Gotta respect: "No Square.. No Round.. FX-1"
 
Last edited:

Sanoman

AbouttoKrash
Location
NE Tenn
l took the chine away from where the tubbie meets the hull by adding thickened epoxy to the bottom side of the tubbie.Not my idea,but understand that it will allow the hull to slide better on a wave.Of course,l have to finish the ski and actually get it in the surf to find out.:rolleyes:
@E350,you have asked a ton of questions about changes we have all made on the fx1 for a while now.Have you actually started making all these changes per your requests? lf not,it’s time to get busy....
 

Attachments

  • FD5B86EB-E07B-48EE-A91B-E497B4D4ED93.jpeg
    FD5B86EB-E07B-48EE-A91B-E497B4D4ED93.jpeg
    211.8 KB · Views: 28
Over the years I've messed around with different designs on the FX, (along with Wave Hog, aka Carl and SpecialFX, aka JD). After all that, there isn't one "perfect" design or shape. We ride mostly creeks and some surf up here in NJ. The big tubbies help keep the nose from pearling while riding surf (added area), While when long down the side help when riding fast and carving turns. It's all freestyle design for your riding style. The current "tubbies" on my ski are set about 1" from the bottom edge. It forms like another chine when you are carving a turn, Kinda like the old 550's feel when turning/carving. On the other hand JD's and Carl's tubbies start at and close to the bottom edge, and are rounded up from there. Basically there's no right or wrong way for design.

I've ground them off and started over at least twice. I always used 4-5oz. divinycell foam. That stuff sands so nice as compared to the pink or blue construction insulation. I make tape patterns and mirror them for the other side. It's easier to laminate multiple layers of say 1/4" thru 1/2" to get things to conform and stay on track. Shaping a single 2" thick piece of foam might sound easy, but it's not. Unless you are a master sculptor...lol.

I have some tape patterns (see pix below) that I've used in the past (bottom two blue patterns were from a earlier design that got ground off) and for the current sponsons. The long one at the top was the base layer of 1/4" foam. Then the following layers are 1/2". The final thickness ends up about the width of the top rail. I "glued" them on with U-Pol fantastic body filler. That stuff is hard to find now but came in a toothpaste like bag. REAL easy to sand. After you laminate the foam layers on, you sand to shape, then seal things up with some layers of fine 6oz cloth. I use epoxy resin, but polyester works a little quicker for the cure times. Hope this answered some of your questions...
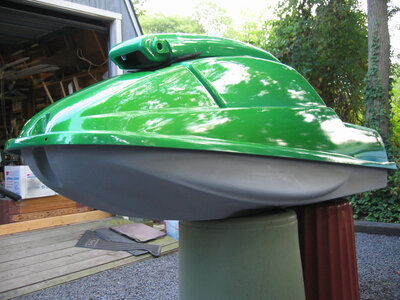
That's some good info. I've been shaping two part foam to try different front sponson shapes on my buoy ski. Divinylcell probably makes it easier to get good symmetry.
 

Flash-FX

No Square..No Round..FX-1
That's some good info. I've been shaping two part foam to try different front sponson shapes on my buoy ski. Divinylcell probably makes it easier to get good symmetry.
Divinylcell foam sands nice and uniform, (4-5oz). Pour foam ends up with hard and soft areas that will make the sculpting job a nightmare. Divinylcell also doesn't absorb water like pour foam does.
 
Last edited:
Divinylcell foam sands nice and uniform, (4-5oz). Pour foam ends up with hard and soft areas that will make the sculpting job a nightmare. Divinylcell also doesn't absorb water like pour foam does.
Not sure where in the FX Mafia mine evolved from but they’re big and are the bomb in the surf.image.jpgimage.jpg
 

Attachments

  • image.jpg
    image.jpg
    113 KB · Views: 16
Top Bottom