SX/SXi/SXi Pro How to build a 750sxi the right way

Location
WA
Hi everyone, I've been snooping around on here nearly everyday since last September and figured it was about time I contribute something...

I've been riding standups for a few years (2010 SJ) but never really knew much about them (I still don't). So, I decided to buy a 1996 750sxi a few months back and tear the thing apart. Here is journal of my exploits, hopefully someone out there on the internets will read this and learn something. Even if what they learn is that dumping a ton of money and time into an old 750 is a bad idea :).


So, here we go...


For my build, I've decided that I want something along the lines of an all around rec ski that runs on pump gas with the original 750 engine. Something I can cruise on the river with, hit the buoys, and maybe even attempt some barrel rolls in the surf with. My goal is a relatively cheap do a little bit of everything ski.


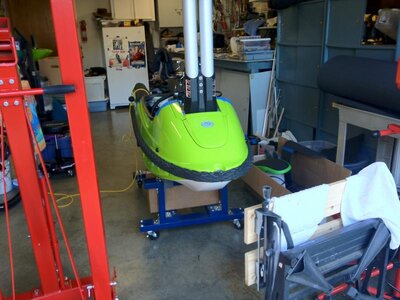
Here is what i started with..

photo.JPG
 
Last edited:
Location
WA
I'm not going to lie, the first thing I noticed about the ski my first time out was just how crappy it handled compared to the SJ I normally ride. The ski felt extremely unstable in corners and tended to tip over when I shifted my weight even a tiny bit to much to one side. When comparing it to the SJ, the SJ feels like riding a square and the 750 feels like riding a narrow pencil (as many others have pointed out). However, this also made it a blast to ride especially when running at full throttle and trying hit sharp corners, and then flying off and skidding across the water.

So, to improve the handling and make the ski more "square" feeling, I decided to install the tubbie destroyer sponsons from Blowsion. Blowsion said that it would take about 15-30 min. per side. For a complete newb like me it ended up taking the better part of an afternoon to make sure they fit correctly and checking they weren't installed backwards. Also, i had to cut out a chunk of foam on one side in order to make room for one of the bolts. The tubbies also came with some really odd washer thingys, where in order to install them you need to drill out circular holes in the hull and insert them in the hull. I called Blowsion about this, and they said that these were for if you wanted to be able to take the tubbies on and off, and weren't really necessary. I just ended up buying some large washers from home depot and not using the hardware bits blowsion provided. I also ended up with 1/4 in. gaps in the front of the sponsons. I'm thinking maybe a body filler or thickened epoxy could fix this?

tn.jpgphoto(3).jpgtn.jpg
 
Last edited:
Location
dfw
I'm not going to lie, the first thing I noticed about the ski my first time out was just how crappy it handled compared to the SJ I normally ride. The ski felt extremely unstable in corners and tended to tip over when I shifted my weight even a tiny bit to much to one side. When comparing it to the SJ, the SJ feels like riding a square and the 750 feels like riding a narrow pencil (as many others have pointed out). However, this also made it a blast to ride especially when running at full throttle and trying hit sharp corners, and then flying off and skidding across the water.

So, to improve the handling and make the ski more "square" feeling, I decided to install the tubbie destroyer sponsons from Blowsion. Blowsion said that it would take about 15-30 min. per side. For a complete newb like me it ended up taking the better part of an afternoon to make sure they fit correctly and checking they weren't installed backwards. Also, i had to cut out a chunk of foam on one side in order to make room for one of the bolts. The tubbies also came with some really odd washer thingys, where in order to install them you need to drill out circular holes in the hull and insert them in the hull. I called Blowsion about this, and they said that these were for if you wanted to be able to take the tubbies on and off, and weren't really necessary. I just ended up buying some large washers from home depot and not using the hardware bits blowsion provided. I also ended up with 1/4 in. gaps in the front of the sponsons. I'm thinking maybe a body filler or thickened epoxy could fix this?

View attachment 175325View attachment 175331View attachment 175332
Just seal them up and take it for a spin. The old 750 hull already easy to get on edge so the tubbies that you got may be too much of a good thing. Racers would often use flat plates on the sides to make them easier to ride at high speeds. The 96 was the best year for the original hull, it had the latest engine and a shortened pole pad/turn plate. Get a deep grate and enjoy it as it is.
 
Location
WA
Just seal them up and take it for a spin.

Weather around here has been in 30-40's lately, so it looks like I wont be riding it anytime soon.:puppy_dog_eyes:. Since the thing is in pieces, and I plan on getting it re-painted, I figured it was a good time to install some footholds. I decided on the "dawson diggers" from Blowsion because they supposedly fit better. I bought the blowsion footwell install kit as well, which I would highly recommend especially if you have never done any sort of fiber glass work before (like me). Comes with everything you need as well as some pretty decent step by step directions. Perfect for a newb like myself. pics coming soon.
 
I don't get your reasoning behind not using the supplied hardware from Blowsion? A hole is a hole, whether its big or small. I think that's part your issue with the large gap between the sponsons and the hull, not being able to suck in tight enough and disperse the load over a larger area? I also think long term those bolts will loosen up, auger out the hull and cause issue's down the road. Just my 2 cents. I have the Destroyers on my SXI too, another tip to get them to fit with minimal gap is to tighten the front bolt first and then move back. I barely have a 1/16 gap on mine in the very front. Destroyers are the best mod to the SXI in my opinion, I wouldn't trade mine for any Superjet.
 
Location
WA
I don't get your reasoning behind not using the supplied hardware from Blowsion? A hole is a hole, whether its big or small. I think that's part your issue with the large gap between the sponsons and the hull, not being able to suck in tight enough and disperse the load over a larger area? I also think long term those bolts will loosen up, auger out the hull and cause issue's down the road. Just my 2 cents. I have the Destroyers on my SXI too, another tip to get them to fit with minimal gap is to tighten the front bolt first and then move back. I barely have a 1/16 gap on mine in the very front. Destroyers are the best mod to the SXI in my opinion, I wouldn't trade mine for any Superjet.

The reason I didn't use the hardware was because it requires you to glue these inserts into the hull. So, I called Blowsion and asked if it was really necessary, and if I could just use large washers and a nylon locking nut. They said that would work just fine. I guess well see what happens long term. I think we did back to front, maybe ill pull them off and try tightening them down front to back like you suggested tonight and see how that works. Thanks for the suggestions, I'm stoked to get this thing out on the water.
 
The reason I didn't use the hardware was because it requires you to glue these inserts into the hull. So, I called Blowsion and asked if it was really necessary, and if I could just use large washers and a nylon locking nut. They said that would work just fine. I guess well see what happens long term. I think we did back to front, maybe ill pull them off and try tightening them down front to back like you suggested tonight and see how that works. Thanks for the suggestions, I'm stoked to get this thing out on the water.

Even with Devcon and the best surface prep you can still get the inserts off if needed, if that's what your worried about. A little heat and they just pop off.
 
Weather around here has been in 30-40's lately, so it looks like I wont be riding it anytime soon.:puppy_dog_eyes:. Since the thing is in pieces, and I plan on getting it re-painted, I figured it was a good time to install some footholds. I decided on the "dawson diggers" from Blowsion because they supposedly fit better. I bought the blowsion footwell install kit as well, which I would highly recommend especially if you have never done any sort of fiber glass work before (like me). Comes with everything you need as well as some pretty decent step by step directions. Perfect for a newb like myself. pics coming soon.

would love to see some pics of the footwell install. im currently working on a stock 1995 750 sxi. havent had it long so these sorts of forums are really helping me get a grasp on what mods i can do. keep up the posts, look forward to seeing it done.


p.s if any1 could give sum tips what i could do to the engine without blowing budget it would be much appriciated....

Here was my install - http://www.x-h2o.com/threads/115451-Digger-Foothold-Install


OP - did you ever do any more work to the ski??
 
Location
WA
Sorry guys, I've been busy the last couple months working on the ski and busy with work. But, I'll definitely continue to update this thread until I get the ski done...didn't realize there were people that were actually interested :) .

Got the footholds installed, new paint, rrp handle pole, turf, carbon fiber reinforcement and more over the last couple months. I'll post pics and explain the install processes I went through here over the upcoming week. Keep in mind this is the first time I have ever done any fiberglass/carbon fiber work, turfed a ski, or worked with epoxy resin. It was a learning experience to say the least...

Foothold install:
I bought the blowsion digger footholds, the blowsion foothold install kit, and 2 part foam. I would recommend purchasing the install kit from blowsion because it comes with the perfect amount of install materials is reasonably priced, and the instructions are actually pretty decent.

1. Basically I sanded everything down and measured out the distance from the back of trey to where I wanted the footholds to start with a piece of tape. If I remember correctly blowsion recommended to install the footholds about about 2-3 in from the back of the ski, so that's where I put them.

2. Next, I drew a rough outline of where I wanted to make my initial cuts and drilled a couple holes to get started. Then, I took a sawzall with a really short blade and started cutting. I would really recommend using a dremel tool to cut the purple plastic tubes and using a flat head screw driver and a knife to cut out the foam. Cutting the tubes was the most time consuming part. I basically just kept cutting and fitting, cutting a little bit more and fitting until the footholds fit.

3. To glue the footholds in I used epoxy resin with a bit of silica powder included in the install kit from blowsion. I basically mixed in the powder with the resin (and hardener) until it turned into a peanut butter type paste, and applied it to both the ski and the foot holds. I also used some vices to keep the footholds firmly in place for a couple days while the resin cured.

4. I dunno if this was necessary, but we drilled in a bunch of screws for extra strength after the epoxy cured. Next, we drilled a couple holes in the tops of the sides of the tray and mixed up some 2 part expanding foam from blowsion. The foam started expanding/curing really fast, and it was a bit tricky to pour the foam into all the tiny gaps behind the footholds. I would recommend using on of those plastic syringe things to do this. We also ducktaped some flat pieces of clear plastic to the end of where the tubes were to make sure the foam completely filled inside behind the footholds.

5. Last, we cut off the tops of the screws with a dremel and used the fiberglass cloth included in the install kit and laid it around all of the seams in order to mold the footholds into the hull. It took lots and lots of sanding to get things to look ok, but I think it turned out alright.

So, to sum up the foothold install; We basically followed the instructions included in the blowsion foothold install kit. If your a newb like me, I would definitely recommend this. Here are some pics of the process...next step Carbon Fiber Reinforcement!

IMG_0016.jpgIMG_0022.jpgIMG_0023.jpgIMG_0029.jpgIMG_0032.jpgIMG_0037.jpgIMG_0044.jpg
 
its awesome that youre local to me. im right up in lake stevens and one of the skis i have that never gets ridden is a 93 750 with blowsion footholds and tubby 2's on it. it handles pretty well but still is slow as hell
 
Location
WA
G/L with your ski Draggingto, hope something on here is of use to you.

Nice to see someone from the Seattle area on here. Seems like everyone on here is from the Midwest …lol. I’m at Lake Stevens all the time with my family riding a Honda couch, 550sx, and blue RN (and hopefully soon a Kawasaki green 750 haha!). I’ll be there tomorrow morning for a couple hours actually.

Carbon Fiber Reinforcement:

I bought the ski with a few cracks in it, which initially appeared to be just cracks in the paint around the handle pole area and hood. However, after I took the ski out for the first time I noticed that the cracks got significantly worse. So, to prevent cracks from forming in the future I decided it was a good time to do some reinforcement work. The first thing I did was place thick fiberglass cloth behind the existing cracks using epoxy resin. There are a ton of how-to’s on here on this subject already, and this is really easy to do (I also don’t have any pics of this process) so I’ll skip this step. After I had reinforced the nose and handle pole area of the ski, I decided to reinforce the sides of the hull as well just in case I ever wanted to attempt any barrel rolls ( let’s be honest I probably never will anyways with this ski J ).


  1. First, I did a ton a research on this site on carbon reinforcement. There is a great thread already on this subject here. I basically followed this same process so I’ll try and make this short, and go over the stuff that worked well/didn’t work based on my experience. Basically, my goal was to just apply two sheets of carbon fiber to each side of the inside of the hull.
  2. I bought 2 sheets of carbon fiber and epoxy resin from US composites. I would definitely recommend this site, the carbon fiber was good quality and reasonably priced. While I was waiting for the stuff to arrive we removed the engine, fuel tank, handle pole etc. I’m not going to go into any detail on this because despite what you may initially think, it was actually really easy to do even for a newb like me. Just make sure you label every hose, wire, clip, etc. (I really can’t stress this point enough!). Just label everything and take pics .
  3. Next, I sanded everything down lightly on the sides of the ski where I was going to apply the carbon fiber, and then cleaned/vacuumed the entire area to make sure it was completely clean.
  4. In order to ensure that the carbon fiber turned out decent looking and was one seamless piece, I made a template like the one described in the post I referenced in step 1. I took some blue painters tape and made an outline around the inside of the hull of where I wanted the carbon fiber to go. I kept laying tape over the outlines/templates for each side a few times to make sure they weren’t going to lose their shape once I removed them.
  5. Once I was happy with the shape of the templates for each side, I removed them and laid each one across the sheets of carbon fiber. I then took some hair spray and sprayed around the template (where I would be making the cuts) in order to prevent the carbon fiber from unraveling once I cut it. The hairspray didn’t work very well, and I ended up with some unraveled ends on my pieces. If I were to try this again I would definitely use temporary fabric hold, it might work better.
  6. I then cut out the pieces of carbon fiber using fabric scissors/sheers, and applied epoxy resin to the hull. I let the resin cure for about 30 mins until it was tacky so the carbon fiber pieces would stick once I laid them down. I would recommend flipping the ski on its side to do this, and do one side at a time over two days, leaving some time for the carbon fiber to cure/harden before flipping the ski over to do the other side.
  7. Now comes the tricky part. Once the resin was tacky I laid the pieces of carbon fiber down and smoothed out any bubbles with a heat gun/my hands. Then, I applied resin to the carbon fiber in order to wet it out. Finally, I used a heat gun and my hands to smooth everything out and make sure the carbon fiber was completely flush with the hull and free of bubbles/bumps. Just keep in mind that the carbon fiber is going to dry and harden at whatever point you leave it at, it doesn’t move on its own or adjust itself to fit flush during the curing process. This process took quite a bit of time. Once I was happy with it, I let it sit for 24 hours then did the other side.
  8. After the carbon fiber dried I used a dremel to cut the excess carbon fiber around the hood seal area, and sanded the top edge lightly so it was smooth and flush with the top of the hull.

Sorry I don’t have to many pics of this process but there are some nice pics and additional info in the thread I referenced in step one.

At this point all of the hull work was done, so it was time for prep work and then paint. I’ve never painted anything like this before and I wanted the cracks in the hull to be fixed the right way so I ended up taking the easy (and more expensive) route and had a local shop paint the ski. During this time I ordered an RRP handle pole, turf, blowsion steering system, blowsion riser bars, and other bits. Here are some pics I took while I was laying down the carbon fiber, I’ll post pics here in a few days showing how the paint turned out, as well as the RRP pole install, and turf processes:

IMG_0097.jpgIMG_0098.jpg
 
Last edited:
Location
WA
Don't hate on Stevens man haha. There were a ton of boats making some nice rollers the other day, 80+ temps, it was perfect. The river is nice at high tide when you don't have to worry about running into stuff tho.

Anyways, got the boat back and threw on the RRP pole. Yes, I know it's ridiculous to spend 800 on a pole when the ski is only worth about a grand, but I couldn't stand the kawi steering setup and AC racing pole and wanted some adjust-ability. Lets face it, RRP poles just look plain bad ass period, and really at the end of the day that's what it's all about:cool:.

RRP Pole Install
So, if you decide to throw an RRP pole on your 750 you are going to need to first grind down the metal piece on the front inside portion of the pole bracket in order for the pole to clear the bracket when the pole is standing straight up (hope that made sense?). Sorry I don't have any pics of this, I'll try and throw some up tomorrow.

Next, I just pounded the plastic bushings into the pole and then I filed down the bushings until the pole fit in the bracket. This took a bit of time, just filing and fitting, filing and fitting etc. But, now the pole is tight and it stops where I place it. Pretty straight forward. I think it turned out pretty sick considering I've spent less then the cost of a used late model RN so far. Next up, turf...

IMG_0179.jpgIMG_0192.jpgIMG_0228.jpg
 
Location
WA
Finally finished putting the motor back in and hooking everything back up. There are a million threads on here on how to turf, so I won’t go into too much detail. Basically, I just used 5 or 8 mm padding on the sides and 24ish mm padding on the tray. I had to sand down some of the padding in the foot wells in order to fit my feet. I ended up going with the blowsion steering system and riser bars as well. I had planned on throwing on a FP limited exhaust, but summer is almost over here in wa and I really want to get this thing on the water this weekend. I’ll throw up a ride report if anyone is interested. Here are some pics of the finished ski:

IMG_0223.jpgIMG_0232.jpgIMG_0263.jpg
 
Location
NJ
Finally finished putting the motor back in and hooking everything back up. There are a million threads on here on how to turf, so I won’t go into too much detail. Basically, I just used 5 or 8 mm padding on the sides and 24ish mm padding on the tray. I had to sand down some of the padding in the foot wells in order to fit my feet. I ended up going with the blowsion steering system and riser bars as well. I had planned on throwing on a FP limited exhaust, but summer is almost over here in wa and I really want to get this thing on the water this weekend. I’ll throw up a ride report if anyone is interested. Here are some pics of the finished ski:

View attachment 194255View attachment 194256View attachment 194257


Great looking build - coming to NJ anytime soon? could use a turf tutorial
 
Location
WA
Thanks. Will not be in NJ anytime soon tho. Yeah, I thought it turned out ok being this was my first experience turfing. Couple things that worked really well: 1) using wax paper to cover parts of the rails you don't want the turf to stick too as you lay it down. 2) heating up the knife with a heat gun every few inches when making the final cuts, makes the cuts allot easier/smoother. I used dap to glue everything down, it's been holding really well so far. Feel free to pm me if u have any questions.
 
Top Bottom