Hi,
I have a Superjet RN (62T) that had a damaged charge coil. The resistance was only 400ohms as some windings were punched through (should be between 498 and 600ohms).
As a new OEM coil here in Europe is 220 Euro I decided to rebuilt it. Here’s a quick tutorial. There may be better ways but this is a pretty simple way that worked great for me:
First get yourself some AWG 36 wire (wire dia. 0.125mm), solderable, single or double layer isolated (outer dia. max. 0.14mm). You’ll need a length of 380m to get 550ohms. But you better buy twice the length to have a second try if something goes wrong.
Take the coil off the stator plate and unsolder the brown cable.
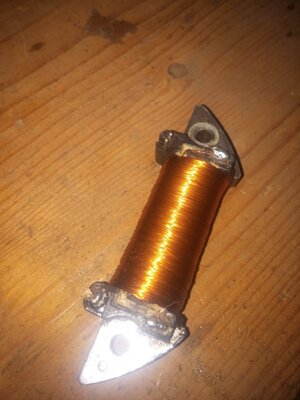
Remove the old wire from the coil. I used a dremel with a small disk to carefully cut it half and then unwrapped it.

Clean the coil and unsolder the old wire from the two connection points.
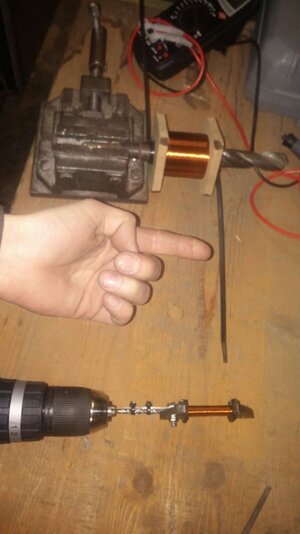
Build a small iron sheet, screw it on the coil (the side where the brown cable was) and strap a small driller (4-5mm) on it. Make sure that the center of the driller is approx. on the central axis of the coil. Span the driller with the coil on it in a drill. I attached the drill on my workbench with zipties so that it can’t move. Put the wire reel on a shaft so that it can freely spin.

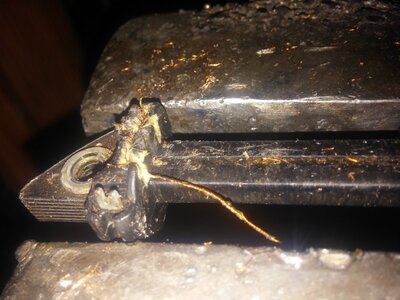
Take approx. 20 inches of the end of the new wire and twist it fourfold (to get a thicker end of 5 inches that’s easier to solder to the connection point). Solder the new wire to the connection point on the opposite of where the brown cable was. Slowly start wrapping clockwise and use your hand to keep a little tension on the wire and move it back and forth to get an about evenly winding. You can carefully increase the drilling speed depending on how good your construction is - but make sure the wire doesn’t tear off! After approx. 20min of wrapping at medium speed the coil should be filled. If you don’t know how long your wire is just wrap more on it, then cut it off, grind away the isolation from the wire and measure the resistance. Unwrap the coil (1m= approx. 1.45ohms) and repeat measuring until you get approx. 550ohms. Make sure you measure at approx. 20°c as the resistance increases with higher temperature. When you have the right resistance twist again the last 20 inches as described above and solder it to the other connection point.

Make sure the soldering points are not too high because otherwise they touch the flywheel and your new coil will be torn into pieces.
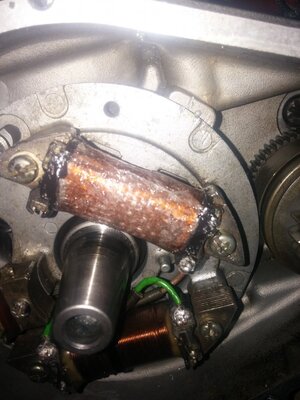
Now seal your coil. I wrapped a small fiberglass mat with epoxy resin around it but I think special seal tape is better and easier. After it hardened seal the sides and the open wire at the connecting points with silicone rubber.
Solder the brown cable back on and put all back in.

Regards,
Malte
I have a Superjet RN (62T) that had a damaged charge coil. The resistance was only 400ohms as some windings were punched through (should be between 498 and 600ohms).
As a new OEM coil here in Europe is 220 Euro I decided to rebuilt it. Here’s a quick tutorial. There may be better ways but this is a pretty simple way that worked great for me:
First get yourself some AWG 36 wire (wire dia. 0.125mm), solderable, single or double layer isolated (outer dia. max. 0.14mm). You’ll need a length of 380m to get 550ohms. But you better buy twice the length to have a second try if something goes wrong.
Take the coil off the stator plate and unsolder the brown cable.
Remove the old wire from the coil. I used a dremel with a small disk to carefully cut it half and then unwrapped it.

Clean the coil and unsolder the old wire from the two connection points.
Build a small iron sheet, screw it on the coil (the side where the brown cable was) and strap a small driller (4-5mm) on it. Make sure that the center of the driller is approx. on the central axis of the coil. Span the driller with the coil on it in a drill. I attached the drill on my workbench with zipties so that it can’t move. Put the wire reel on a shaft so that it can freely spin.

Take approx. 20 inches of the end of the new wire and twist it fourfold (to get a thicker end of 5 inches that’s easier to solder to the connection point). Solder the new wire to the connection point on the opposite of where the brown cable was. Slowly start wrapping clockwise and use your hand to keep a little tension on the wire and move it back and forth to get an about evenly winding. You can carefully increase the drilling speed depending on how good your construction is - but make sure the wire doesn’t tear off! After approx. 20min of wrapping at medium speed the coil should be filled. If you don’t know how long your wire is just wrap more on it, then cut it off, grind away the isolation from the wire and measure the resistance. Unwrap the coil (1m= approx. 1.45ohms) and repeat measuring until you get approx. 550ohms. Make sure you measure at approx. 20°c as the resistance increases with higher temperature. When you have the right resistance twist again the last 20 inches as described above and solder it to the other connection point.

Make sure the soldering points are not too high because otherwise they touch the flywheel and your new coil will be torn into pieces.
Now seal your coil. I wrapped a small fiberglass mat with epoxy resin around it but I think special seal tape is better and easier. After it hardened seal the sides and the open wire at the connecting points with silicone rubber.
Solder the brown cable back on and put all back in.

Regards,
Malte
