Motor Mount Insert spacer/filler

I have a Twangled Backie Chan, it has some very sketchy motor mounts, one has torn out completely and some of the others are a little wobbly.

I want to go through and redo all of them.

I can fairly easily make myself some nice peices of aluminum, but the bottom of the hull has a lot of shape to it, and the pieces of aluminum will be basically flat...so some sort of filler or spacer is going to be needed between the aluminum and the actual hull.

What do people use?

Also I'm interested in any info about what's appropriate for what sort of material and how thick and how many layers and whatnot for glassing them in.

I've searched around looking for any examples of people glassing in motor mount inserts but haven't found any.

Any help much appreciated.
 
That's the one that tore out. I'm not really sure how this helps answer the question though.

I had in mind to completely cut/grind out and remove the existing inserts and start over from the the bare hull.
 

Big Kahuna

Administrator
Location
Tuscaloosa, AL
Just a thought, clean all that up, drill holes from the bottom of that plate. Use mixed up West Systems or equal with 404 filler adh. The holes will help give the resin/adh a mechanical bond. Then cover with carbon. You will need to use your motor as a jig to get the depth set correctly. I have never done this. But this should work. @Jr. @Sanoman have all fooled with this type stuff, I think @CD155MX just did this.
 
I should probably add more detail.

The existing inserts are too high, I put my motor in with couch mounts and it sat almost a quarter inch too high to line up correctly. Ended up doing some machining on the bedplates to lower the motor so it would fit, so I'd like to put the new inserts lower to fix that.

The mount that tore off has some sort of foam spacing the aluminum chunk away from the bottom of the hull. Nothing appears to be very well made, the aluminum chunk is rough and appears to have been corroded, the foam was waterlogged. I actually re-attached this broken mount already hoping to get back on the water this season, but I'm not super thrilled with how it turned out, so now I want to redo all of them.

So, because they're all too high, and I'm guessing they all contain water logged foam, and the general crapiness of the construction, I wanted to grind it all out and start fresh.

I have an idea for a fixture to locate everything, I'm not too bad with machining and fabricating on metal, just clueless about composites.

I have all winter now to work on it, , and a short summer to ride, so I want to do it right and not have to do it again.
 

Sanoman

AbouttoKrash
Location
NE Tenn
Mix some cut up fiberglass or carbon pieces (small fibers) into the resin and cabasil mix.Add the fibers after you have mixed your resin.Your peanut butter mix needs to be fairly thick.So the blocks won't settle.
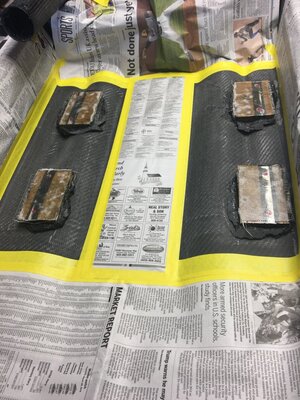
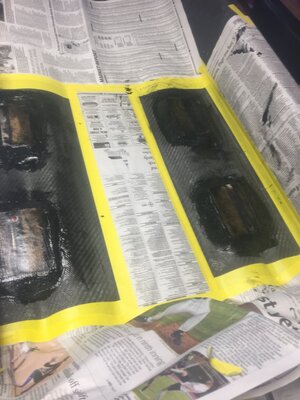
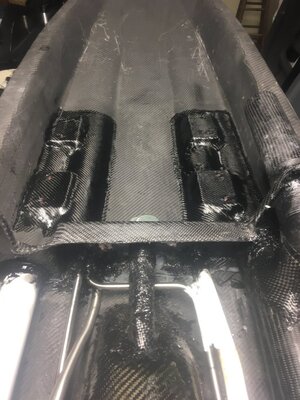
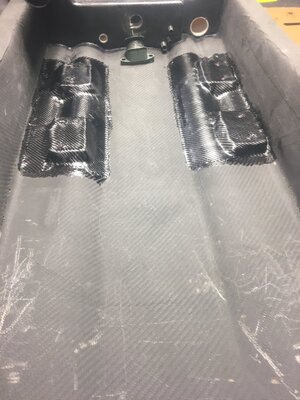
Then cover with several layers of fiberglass cloth (15-18oz) on and around the blocks (after previous step).Make sure to compensate for the added thickness.
 
The couch mounts are definitely not helping the alignment situation, but there is still all of the other stuff.

Consensus seems to be fill with thickened epoxy.
 

Christian_83

Xscream
Location
Denmark
Damn thats not to nice :(
Is it a carbon or glass hull?
2 things concerns me:

1. Is it correct, that the alu inserts, sits on top of some foam? As this would have the largest surface area to bond to the hull, its seems insane to me, that its not epoxy/glue that bonds the insert to hull - but FOAM.

2. the corroded alu insert or plate, i would as BK say drill some holes or mill in bottom of insert to make cavity for the epoxy/glue.

ideally you could get new insert anodised to keep them from corroding.
And yes, please use some decent 2K epoxy with west systems 404, this makes a super great adhesive.

Hope you are back on the water in no time.
 
Mix some cut up fiberglass or carbon pieces (small fibers) into the resin and cabasil mix.Add the fibers after you have mixed your resin.Your peanut butter mix needs to be fairly thick.So the blocks won't settle.
Then cover with several layers of fiberglass cloth (15-18oz) on and around the blocks (after previous step).Make sure to compensate for the added thickness.


I'm finally getting around to actually doing this, got a little distracted with snowmobiles during the winter, but summer is coming!


@Sanoman, are you saying several layers of 15-18oz cloth, or are you saying several layers of cloth totaling 15-18oz? (so like three layers of 6oz or some such?)

Basically what cloth and how much should I use for covering up the new inserts?

Current plan is:

Grind all of the old stuff out down to bare fiberglass in the bottom of the hull,

probably put a layer or two of something over the whole area where I ground out the old mounts to reinforce whatever damage I did with the grinding

1708 seems to be kind of the common "general purpose" layer for stuff like this, any reason I shouldn't use that?

Make myself some nice aluminum inserts. This thing is highly unlikely to ever see saltwater (I live in Minnesota, and I've only even seen an ocean once), so I think bare aluminum will be fine.

US composites epoxy resin, cabosil and 1/2" fiberglass fibers for the filler

make a jig to locate the inserts allowing some room for the fiberglass cover, plus a little so I have room for some shims (easier to shim up than down)

Cover with several layers of cloth. Any recommendations on the specific cloth appreciated. Should I use Twill for conform-ability? Covering the inserts is kind of an awkward shape to conform to, I think (?)

What is a reasonable "overlap" to cover past/around the inserts? Seems like maybe 4" or so in every direction?

Surprisingly hard to find examples of people who have done this, seems like everybody either chops/reinforces a superjet, or patches up an aftermarket hull that doesn't have this problem.
 

Sanoman

AbouttoKrash
Location
NE Tenn
I'm finally getting around to actually doing this, got a little distracted with snowmobiles during the winter, but summer is coming!


@Sanoman, are you saying several layers of 15-18oz cloth, or are you saying several layers of cloth totaling 15-18oz? (so like three layers of 6oz or some such?)

Basically what cloth and how much should I use for covering up the new inserts?
Total around 18 oz.
Current plan is:

Grind all of the old stuff out down to bare fiberglass in the bottom of the hull,

probably put a layer or two of something over the whole area where I ground out the old mounts to reinforce whatever damage I did with the grinding

1708 seems to be kind of the common "general purpose" layer for stuff like this, any reason I shouldn't use that?
1708 will work,just be sure you wet it completely out.

Make myself some nice aluminum inserts. This thing is highly unlikely to ever see saltwater (I live in Minnesota, and I've only even seen an ocean once), so I think bare aluminum will be fine.

US composites epoxy resin, cabosil and 1/2" fiberglass fibers for the filler

make a jig to locate the inserts allowing some room for the fiberglass cover, plus a little so I have room for some shims (easier to shim up than down)

Cover with several layers of cloth. Any recommendations on the specific cloth appreciated. Should I use Twill for conform-ability? Covering the inserts is kind of an awkward shape to conform to, I think (?)
Layers of 5 oz trill will conform better.You can also build up around the blocks sloping out away from the blocks.
What is a reasonable "overlap" to cover past/around the inserts? Seems like maybe 4" or so in every direction?
Yes.
Surprisingly hard to find examples of people who have done this, seems like everybody either chops/reinforces a superjet, or patches up an aftermarket hull that doesn't have this problem.

Hope that helps.The pics will give you some idea of filling in around and then covering over the whole area.l answered your questions inside the quote in bold.
 

Attachments

  • image.jpeg
    image.jpeg
    207 KB · Views: 69
  • image.jpeg
    image.jpeg
    130.8 KB · Views: 66
  • image.jpeg
    image.jpeg
    151.8 KB · Views: 67
  • image.jpeg
    image.jpeg
    140.5 KB · Views: 68
Top Bottom