Transom Jobbie pt. 1 of 2
Time for some more fun with ole red. My transom finally blew out during the latter part of the 2010 season. I've lightly hit bottom a few times with the back end of this ski but it never showed much if any damage afterwords. So this carnage is primarily from going big and landing on the back as is pretty damn standard with these. I guess I am making a point to mention this because I was previously under the impression you had to hit bottom to destroy a blaster transom. Well that was before Art ported my motor. Seriously, the extra power I got from that added enough air underneath me to destroy what was a perfect transom in one season. Anyways, here is what it looked like before I started. Oh just a couple of small cracks here and there you say. Ha, just wait...

Although most of the damage was to the bottom deck and shown in the previous photo, I did have some cracking on the top deck as well. Here you can faintly see it between the two solid sharpie lines. In the foreground of the picture is the deck cut off of another blaster, flipped over and lined up with the deck on this one. The dotted black line shows a rather hard to see line where the pile they laid in the corner ended (from rear heading forward). Lines up pretty good with my topside crack, eh?

Here is the deck cut open with internal reinforcements applied (all of which done with the ski on its tail). Notice where I cut in relation to that topside crack, ie as far forward and away from it as possible while still leaving myself enough room to work. Also notice that you can see the tip of my reinforcment sticking out that covered that entire lip that is obviously a weak point. I used 17oz biax with epoxy resin from uscomposites for everything. I ran individual pieces covering each side of all edges, big pieces on either side shaped just like the transom, and small 4x6 inch squares with one corner nicked off kitty corner to each upper corner of the pump tunnel. This area is where you typically see the most damage and I noticed that yamaha placed small squares like this in the original layup. I just made them bigger and doubled them up. So with all of that I am looking at anywhere from 2-8 layers of glass depending on the specific area and you can kinda see it is lighter in certain areas which is where it is the thickest. Bottom left corner you can see some purple goo (microballoons and resin). I smoothed every corner or crevice that was too small to get glass into with this stuff to avoid any voids. In hindsight the goo was much more important than I thought.

This shot shows how much I had to grind off the outside to get rid of all the damaged glass. Yeah, it was a lot worse than I thought it would be too. If you notice the entire top part of the rear lip on the bottom deck is gone. It had completely delaminated from the top deck. The face of the transom was also heavily ground down along the edges where there was previously cracking that you commonly see on these. Notice the purple goo (or maroon here) poking through in areas, ie I had to grind all the way though! The pink foam is a mock up I did of a new rear hold down I designed using the front tie down bar off another b1 hull. Below it is obviously the rough cut hole that will soon be the tie down point.

Here is the extruded polystyrene foam core I carved to fill the rear lip. IMO the shape of the rear lip and how it scoops the water on a landing is what makes this area fail. So it's curtains for the lip but that also means bye-bye to the rear bow eye hence the new tie down point. Notice the foam is not a tight fit, I left room for glass around it. This shot also gives a view of the rest of the transom after grinding, and grinding, and grinding some more. The previously flat face of the transom now has a 3D compound curve to it (high points being the white D shaped areas). I am going to leave it that shape because curves are inherently stronger than flat parts and so the water gets ushered out of the way as apposed to that face caving in a bit and trapping water (ie pressure) in the middle.

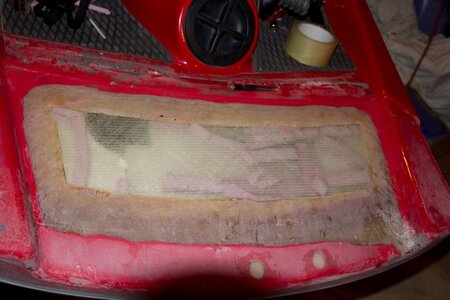
External reinforcements laid up. 3 layers of 17oz on the face and 5 layers around the foam core. I used cabosil and resin as a bonding agent for the core and for filling any voids around it. I let it cure like this, the edges will get cleaned up later. You can also see that tie down point coming to life!
Trimmed up edges and roughly sanded.
Here it is after a float of purple goo, some hela-sanding, a squirt of some rattle can high build primer, and some more sanding. Masked off and ready for paint...


