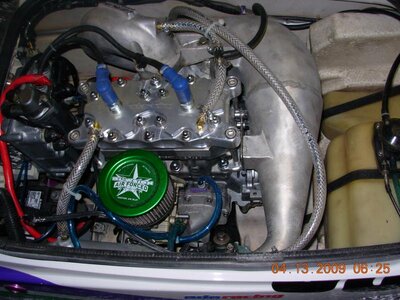
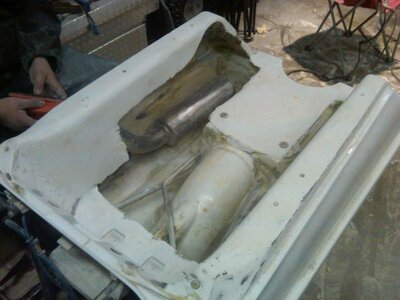
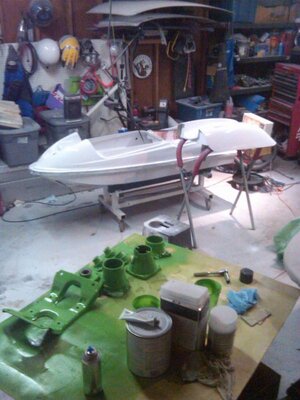
This is my SXI 800 freeride ski. not sure what coffman pipe this is but it works great. If any knows let me know. The motor is done for now except for total loss. It has a 48 sbn carb, westcoast intake, v force reeds, mild port, 82 mm pro-x pistons, sx cylinders and big pin crank. Just made new footholds to replace the old ones and have to pull the tray to refoam and install a one way valve.
You are using an out of date browser. It may not display this or other websites correctly.
You should upgrade or use an alternative browser.
You should upgrade or use an alternative browser.
my sxi 800
- Thread starter 509freerider
- Start date


toomessedup
is drunk
- Location
- coeur d alene, idaho
dont forget the sick bad attitude pole
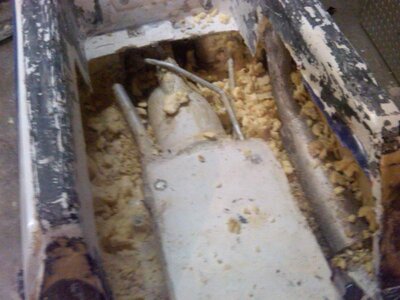
Gave up on the one way valve after reading all the horror stories, I ride a lot of river rapids and sometimes can't get to my ski soon enough. Going for duel 800gph bilges, my old atwood 500 took a dump last weekend. This weekend is going to be fun, wife and kids out of town, turf and pad on its way. Plus a x2 tilt nozzle overnighted from Louisana. Tomarrow night gonna mold new footwells, cut tray and grind out old, nasty, wet foam, yeah! Off to strip turf!:headbang:
vitalikol
Jetski-Snowboard
- Location
- Pennington,NJ
dont forget the sick bad attitude pole
x2
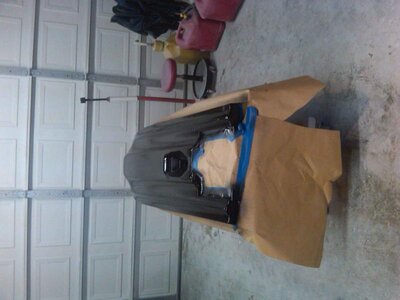
Finally got a chance to post some pics of the build up. Spent last weekend cutting, defoaming, and fiberglassing. Defoaming sucks, but it is going to be worth it!
Attachments

509freerider;934457 I ride a lot of river rapids and sometimes can't get to my ski soon enough.[/QUOTE said:Where do you ride rapids?
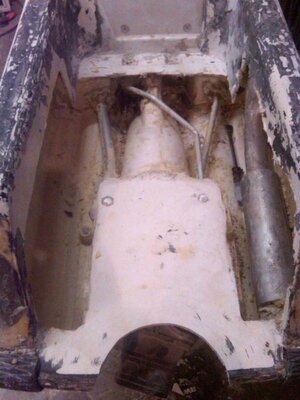
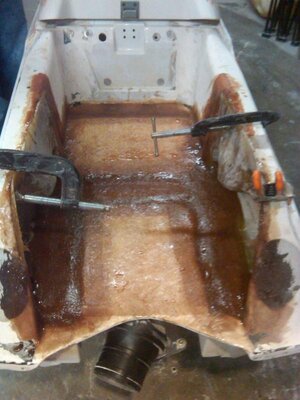
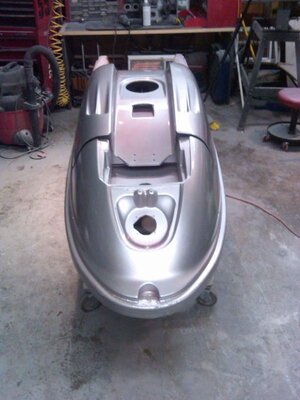
Then Sunday we celabrated Easter by fiberglassing the tray in with the new footholds I made the day before. I took a mold of some waterdog footholds toomessedup put on his ski and made them about a inch deeper and 3/8" wider so I can put a 8mm undermat in them. I would rather have them be too loose and be able to shim them up with padding where I want it. The fiberglassing was pretty easy just time consuming. This was the inital layup so it took the most time to get everything right. We also notched out the tray to install a X-2 up trim.
Attachments


Last edited:
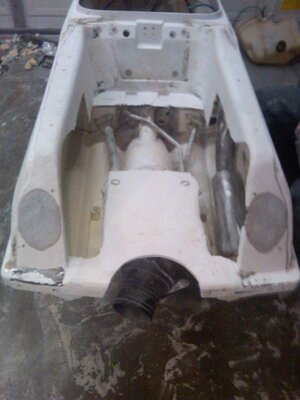
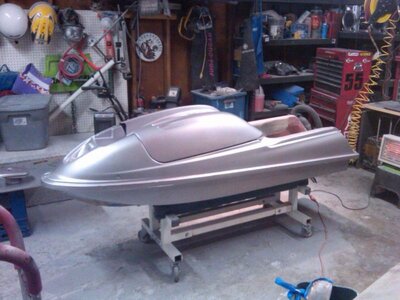
Monday night I made a cover for the big gaping hole in the back of my ski for the tilt nozzle. I could see myself wacking my shins on the pump nozzle and thought it would make the ski look more finished off. Plus I like a kick wedge on the tail so it was easy to just build one out of fiberglass.
Attachments


- Location
- Kennewick, WA
Looks awesome... Where did you say you ride? What rapids?
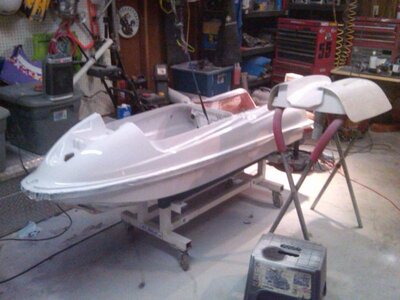
Tuesday I got the final layers of glass in the tray and the tail wedge glassed on. Wednesday toomessed up came over and we flipped the ski and glassed in some cracks on the bottom and painted it black. Forgot to take any pictures of that. Then I got lucky Thursday and did not have anything to do all day. The wife was at work and the kids at daycare figured what better to do than paint!
Attachments

We have a cabin in Hells Canyon, south of Clarkston, Wa. We also go out on the Spokane river up here.Looks awesome... Where did you say you ride? What rapids?

vitalikol
Jetski-Snowboard
- Location
- Pennington,NJ
The paint is slow curing due to it being cool and wet up here so I made a curing oven out of my bathroom. With two heaters it gets well over 100+, so tomarrow I will be turfing.
Your wife veeeeeery understanding women !!!
toomessedup
is drunk
- Location
- coeur d alene, idaho
:Banane25:
not really, he just does whatever he wants:shocked::swordfight:
Your wife veeeeeery understanding women !!!
not really, he just does whatever he wants:shocked::swordfight:
Where do you ride rapids?
Snake River Mostly and the Spokane River when its high enough
Re painted
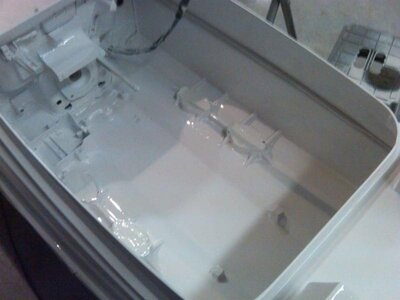
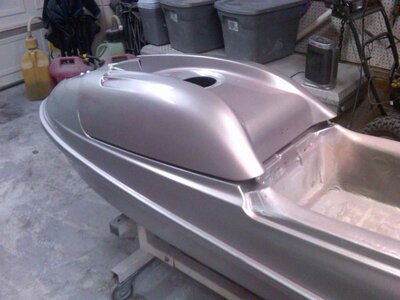
Well it only took a week before I was tired of white. Just did not like the way it turned out and decided to strip it back down again. I wanted to do something different and had not seen alot of silver skis. But I also wanted red so I made some weird kinda silver, red candy pearl sorta color. I looks silver but the curves and contures are red and change with light and angle. I found the greatest thing for stripping paint and not melting your ski Citristrip. I spent almost a week sanding with little results before this. The Sxi has some areas that are almost impossiable to sand down, so this is a god send. I was a little scared to put stripper on SMC or fiberglass but I tested it on my hood figuring I could get a new hood easy enough should it melt, but it just took the new/old paint off easily down to the e-coat with no softening or any issues at all. Then it was back to two weeks ago again sanding tapeing again. We took it down a little lower this time and used a selfetching primer. Then moved up to hot rod black primer. Sunday I wet sanded and shot 4 layers of ultra silver, then metallic silver, then 5 more layers of ultra silver and clear. Its beautiful!
Well it only took a week before I was tired of white. Just did not like the way it turned out and decided to strip it back down again. I wanted to do something different and had not seen alot of silver skis. But I also wanted red so I made some weird kinda silver, red candy pearl sorta color. I looks silver but the curves and contures are red and change with light and angle. I found the greatest thing for stripping paint and not melting your ski Citristrip. I spent almost a week sanding with little results before this. The Sxi has some areas that are almost impossiable to sand down, so this is a god send. I was a little scared to put stripper on SMC or fiberglass but I tested it on my hood figuring I could get a new hood easy enough should it melt, but it just took the new/old paint off easily down to the e-coat with no softening or any issues at all. Then it was back to two weeks ago again sanding tapeing again. We took it down a little lower this time and used a selfetching primer. Then moved up to hot rod black primer. Sunday I wet sanded and shot 4 layers of ultra silver, then metallic silver, then 5 more layers of ultra silver and clear. Its beautiful!
Attachments


more pics
Attachments
-
 IMG00097-20100418-1807.jpg34.4 KB · Views: 32
 -
 IMG00104-20100418-2009.jpg58.5 KB · Views: 38
 -
 IMG00103-20100418-2009.jpg52.9 KB · Views: 30
 -
 IMG00102-20100418-2009.jpg53.6 KB · Views: 33
 -
 IMG00101-20100418-2008.jpg56.2 KB · Views: 33
 -
 IMG00100-20100418-2008.jpg66.5 KB · Views: 38
 -
 IMG00094-20100418-1806.jpg47.6 KB · Views: 38
 -
 IMG00087-20100418-1208.jpg53.9 KB · Views: 42
 -
 IMG00084-20100418-1207.jpg52.7 KB · Views: 43
Last edited:
toomessedup
is drunk
- Location
- coeur d alene, idaho
i sure do a good job working on your ski. looks like a heated up coors light can:booty:
Also re painted the bottom using a self etching primer, bed coat, and clear. I didn't worry too much about the bottom being scratched up, its just going to get beat up again. I just sanded a little and shot it.
Attachments


the WaTeRhAwK
fryin' up a/m electrics..
- Location
- okc
subscribed...