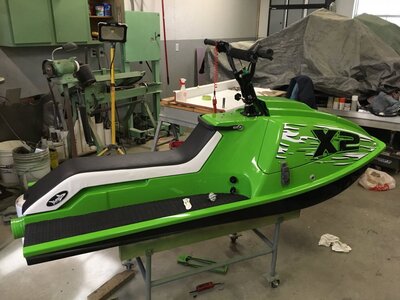
650/X-2 My X2 Mods

Location
iowa
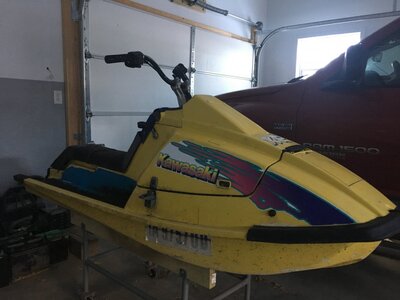
I started with a $200 701 and a donated 1986 X2. She was put away wet. The crank was rusted tight and foam was water logged. I had plans for the 701 but after research the swap seemed obvious. I searched for ideas for what mods to use. A lot of these are ideas I found out there so I chose what I thought were the best ones. Here is the beginning. IMG_1017 (2).JPG
 
Location
iowa
Defoamed and Installed check valve. Sure glad I read about skis that get waterlogged. I noticed foot wells were swollen. I didn't find any areas that cracked out though. I liked the flat back look and added extra fiberglass to stiffen up back. I replace water lines from pump and used Yami style through hull fittings. glued in from inside but outside part will still unscrew if need to.
 

Attachments

  • IMG_1122 (2).JPG
    IMG_1122 (2).JPG
    100.8 KB · Views: 152
  • IMG_1139.JPG
    IMG_1139.JPG
    93.4 KB · Views: 130
  • IMG_1138.JPG
    IMG_1138.JPG
    122.1 KB · Views: 124
Location
iowa
I left a bit more of the hood than I like but its starting to grow on me. I panned the air inlet and attached dust collection ducts to aluminum panning. 2 1/2" flex tubing attaches and drops down through the factory foam holes left for explosion doors. 5" of fresh air! I cut two large holes under hood scoop and foam filled factory air vents on each side of hood and glassed over.
 

Attachments

  • IMG_1167.JPG
    IMG_1167.JPG
    87 KB · Views: 125
  • IMG_1198 (2).JPG
    IMG_1198 (2).JPG
    152.5 KB · Views: 126
  • IMG_1202.JPG
    IMG_1202.JPG
    95.9 KB · Views: 130
Location
iowa
I cut off 1.5" and added a 1" spacer on pump. Installed a 2" Max Versi Plug with check valve and bilge pump. All great ideas from those before me. Thanks.
I am using PPG 2 stage urathane Chrysler paint code for a Kawi match green.
 

Attachments

  • IMG_1229.JPG
    IMG_1229.JPG
    79 KB · Views: 117
  • IMG_1200.JPG
    IMG_1200.JPG
    113.7 KB · Views: 120
Location
iowa
More photos to share. 4 lbs foam worked out good. I used 1" polystyrene board as a form. This made for a nice smooth outside surface and foam will not stick to. I made surf brace out of EMT. Surprising not very heavy after all. The 701 is stock except for static advance on stater and lighten flywheel from speedysprocket and milled head with added cooling tap from group K. I added the support for front cooling outlet. The head is too thin on top for enough threads and vibration loosens barb fitting, been there done that. If your going to tap stock head I recommend drill and tap on the front side where the material is thicker.
 

Attachments

  • IMG_1176.JPG
    IMG_1176.JPG
    91.1 KB · Views: 113
  • IMG_1187.JPG
    IMG_1187.JPG
    134.7 KB · Views: 112
  • IMG_1182.JPG
    IMG_1182.JPG
    120.5 KB · Views: 122
  • IMG_1177.PNG
    IMG_1177.PNG
    687.3 KB · Views: 124
Location
iowa
The little stuff that slows things down. The hood hinge broke so I made one that won't. I added a fine stainless steel mesh screen to inlet of drain tube to help keep check valve and versi plug clean. I used a Sea Doo seat latch with some ingenuity to make it work.
 

Attachments

  • IMG_1259.JPG
    IMG_1259.JPG
    90.9 KB · Views: 105
  • IMG_1272.JPG
    IMG_1272.JPG
    120.5 KB · Views: 100
  • IMG_1286.PNG
    IMG_1286.PNG
    282.6 KB · Views: 102
Location
iowa
I went the route of using a 95 HX water box elbows are from a waveblaster. The cradle is thin aluminum pop riveted together. I used stainless steel 90 deg fitting cut and welded to plate fastened to the B1 exhaust outlet with gaskets and bolted on. I plan on dumping water into outlet as well as inlet of W-box to muffle sound. I should mention the SeaDoo seat latch I had available. I don't have a Yami to compare but If I had to do it again I would use the GP 1200 style. This is my first Rodeo building an X2 so if the build looks like trouble ahead feel free to criticize.
 

Attachments

  • IMG_1276.JPG
    IMG_1276.JPG
    89 KB · Views: 97
  • IMG_1298.PNG
    IMG_1298.PNG
    540 KB · Views: 97
  • IMG_1305.PNG
    IMG_1305.PNG
    292.9 KB · Views: 104

Vumad

Super Hero, with a cape!
Location
St. Pete, FL
I can't criticize. I've never been able to get my X2 just the way I like it. Everyone has a different opinion of perfect and the most appealing part of the X2 seems to be that it's seen as a blank canvas and everyone paints something different. It's an experiment for all of us.
 
Location
iowa
Vumad, Ya I read that you are always making changes. X2 the rat rod of skis. My search on using a HX box was nerve racking because one guy swears it's no good and the next says it works great. I thought I might get some feed back on its use. I followed someone advice and plumbed it just like it was in the HX except it's mounted upside down. Top is down. I made a cradle for the stock '86 water box also if I need to swap out. To alex_hockey what state is Hamilton in. I C U have snow there. Hamilton Iowa ?
 
Location
iowa
There is a lot of good info out there for what products to use. I thought i'd show what i used since I had never used some of these products before and help out anyone like myself who has never attempted SMC body work . This is my opinion on how well the products were to use. The two part foam I used was 4 lbs and works great. I mixed it at the time in 65 deg room temp and had plenty of time to mix and pour. The 3 to 1 epoxy was too slow to set IMO at 70 deg. I did not notice much difference in how easy the different fillers sanded compared to one another. The Cabosil worked the best to thicken resin. I've used epoxy primers before but I had so much sanding to do I chose to use the Slick Sand. I strongly recommend reducing to 5-10% and use a 2.0 tip. If you spray it with no reducer it will cover scratches better but my gun did not lay out product very well. The hardener is concentrated that .75 oz will mix a full quart of sprayable material. Just be sure to add enough hardener or you will have rubber for a coat after 14 hours. The metal glaze worked good for deeper gouges and sands 1000 times better than epoxy resin with micro balloons or fairing compound. Prep Prep and more Prep for all this stuff and keep surface clean with wax and grease remover. I used Acetone for cleaning before applying Epoxy resin. I sanded Slick Sand with 320 wet and applied a sealer then two part base clear urethane.
 

Attachments

  • IMG_1308[1].JPG
    IMG_1308[1].JPG
    137.8 KB · Views: 91
Location
iowa
I made the trim cable using a brass rod threaded on one end to accept the tie rod and drilled the other to accept the soldered end of cable with Stay Silv 45% with flux. The adjusting nut is stainless steel that goes on before I soldered the cable to brass. I have less than 1" of cable travel and can get 28 deg of tilt.
 

Attachments

  • IMG_1315.JPG
    IMG_1315.JPG
    136 KB · Views: 94
  • IMG_1365.PNG
    IMG_1365.PNG
    341.8 KB · Views: 99
Location
iowa
My version of an air down system. I'm using Yami start stop bar switch for engine and used Kawi start button for bilge pump in second photo. I like a lot ! Can someone tell me if front of ski is above water line when upside down? I ride flat water and have never had that problem with an X2 or my B1. But just in case will the air hose in front be enough to stay above water? Seat, mats and decals coming.
 

Attachments

  • IMG_1347.PNG
    IMG_1347.PNG
    649.1 KB · Views: 91
  • IMG_1364.PNG
    IMG_1364.PNG
    565.8 KB · Views: 90
Last edited:
Top Bottom