RN surf build

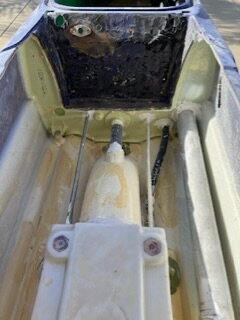
I was in the middle of working on a clapped out square when I finally found a RN hull for sale. This was Rosner’s ski and so it had definitely been ridden hard. It has destroyers, a low profile hood, and some reinforcement. Plan is to wide tray, clean up, paint, and surf.
I met Chris locally on Nov 29th and struck a deal.
40A249F9-2551-436D-9240-29DDD0F2B897.jpeg
I immediately started tearing off the old rotted turf, and the 9 million old stickers that were on the ski.
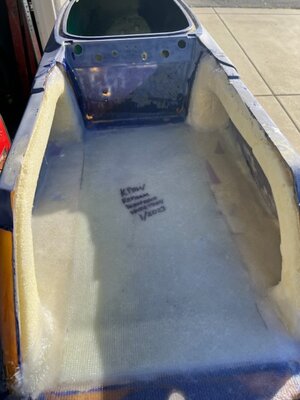
Judging by the quick repairs on the sides and the screws and silicone in the transom, I knew I’d be defoaming. I cut out the tray, dug the foam out and then pressure washed out what was left. I then reinforced both sides of the tray.
Then I grabbed the Multitool with the little grout blade and ground a reveal on the edge of the wide tray for turf.
I planned to reuse the tray floor but it was cracking and delaminating so I cut out a piece of steel, put it in the press brake and formed a kicker to use as a mold.
E7BEE1B0-350F-4BA7-B4B8-C41618CB3F3D.jpeg

712C8CB3-623E-422B-B441-CC6458029705.jpeg
1442FE48-2DC0-4A06-AD78-CC83B2805312.jpeg
Before I tab in the new floor, I wanted to glass over the pump inserts and I want the floor to sit right on the pump tunnel. I ground off the old adhesive and did 3 layers of 7oz and epoxy. This should keep the pump bolts from leaking into the tray.
5EF776DE-1970-426C-98C3-0DF60C700BBC.jpeg
Then it was time to tackle the exhaust tube, and plumbing for dual cooling. The exhaust was corroded from a crack in the side of the ski and the salt water sat on the aluminum. I welded it, smoothed it, and plated it with new sheet metal. I posted that in the fab section so check that out if you want. Since I did all that I decided to cut off the exhaust flange and make a new one from scratch. I modeled it after something.
3EF23380-0E4E-40E6-BFD5-C26ECB93CB67.jpeg
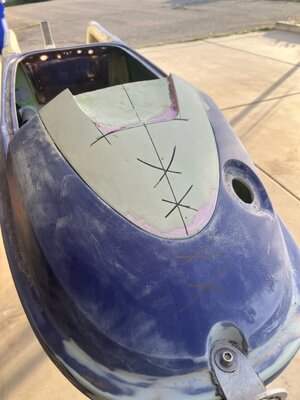
Then it was time to tackle the cracked nose. I ground the crack from the bottom, filled it with thickened epoxy and strips of 7oz cloth. Then covered the area with 7oz. Flipped the ski, ground down to the new glass and then repeated the process.
1800D36F-F961-4FE8-AD1E-4608F9A87741.jpeg
103B27C3-EC9B-470C-9FA6-325603553605.jpeg
I then sanded and faired with total fair epoxy filler. This stuff is awesome. You can also see that I had some chucks on each side of the pole area to repair. The total fair handled this super well.
DFEDCC0D-D3B9-4E44-8E92-7E170DAB7094.jpeg
 
My local jetski shop (thanks Pelican Performance) and I do a lot of business together and he got me a deal on a 62t and 61x. I did some porting on the cylinder and had it bored. Got carried away on Black Friday and got a head from Jetmaniac. I painted the whole motor using black single stage that I used on the bottom of my square. It came out good enough.
Scribe template. (Yamanube)
EBA30E0A-FC7B-41FB-B82C-53FA8B4F4A07.jpeg
598EBB4C-A629-4140-BA3E-B4E5D4E54857.jpeg
I epoxied the cases but decided not to port them at all. Once I got the cylinder back we got it all assembled.
E9570C4D-3031-41B6-884F-B6EC43D87EFA.jpeg
I stole the flywheel cover off my old 650, cut an aluminum plug, then welded it on. I already posted that in the fab section as well.
 
As I’m prepping to sand the bottom and remembering how terrible that was to do on my square, I drew up some blocks in solidworks and 3D printed them. This should make my life a lot better.

3D26B917-C612-4372-B7BC-7D5FD4C44F9C.jpeg

98774542-D2A0-4148-9D83-2FF97EBA39DA.jpeg
Today I peeled off some delam in the bilge, ground down the ribs and did a new layer of glass.
30BCCFD6-FC46-45D6-8FCB-96525479E115.jpeg
51114DA5-BD97-4FD4-AA78-C21A6B295CB0.jpeg

I then sealed everything up with 5200. I’m trying to get the tray done asap since there isn’t a ton of bodywork to do.
 

Attachments

  • F9562B25-BA32-4FC6-B537-1693B322297F.jpeg
    F9562B25-BA32-4FC6-B537-1693B322297F.jpeg
    32.7 KB · Views: 30
pulled the destroyers off and found half of pismo under one of them. These destroyers are much more thick and dense than another set I compared them to. They are also newer. Is there any reason why I shouldn’t just laminate these on with glass instead of silicone and bolting them on? I’d actually really like it being smooth and molded.
782E9209-F090-41D2-B09C-BB5B8F71BAAE.jpeg
 

tomski

X
Location
LHC
If you really want to strengthen the nose for the surf I have these available. If Chris would have installed these years ago you wouldn't have needed to repair.

 
If you really want to strengthen the nose for the surf I have these available. If Chris would have installed these years ago you wouldn't have needed to repair.

Those are awesome
 
2 weeks ago I got a 2 quart kit of foam and it was like $67. I started to do my foam pour yesterday and with the cool weather we have been having in San Diego I needed to go and get another quart kit. It’s gone up over $20 in two weeks. Not wanting to wait to get this done I bought it anyways. Got my molded floor in on the last pour of the tray floor. It worked well.F839B7A3-8BA9-4269-8C2B-05D88A47F648.jpeg
This morning I smoothed and sanded yesterdays pour. I then cut some pink foam, glued 3 layers together and wrapped it in a trash bag to pour the sides. This worked really well and I was able to pry it out and use it on the other side. The second pour came out better than the first and I’m getting the hang of working with the foam now.
5A0F2377-8B2C-4840-A3E6-CE276B460E52.jpeg
639421E1-CB8B-49F7-BA41-69D06489642A.jpeg

I flipped the ski over and poured the other side.
Then I cut and shaped the sides to my liking. I then mixed up some epoxy and silica and went around all the edges to fillet.
And finally I was able to get a layer of 1708 laid up on the full width floor. Super happy with the progress in the last couple days.
0EFB8322-7BA4-4F17-9FAE-0F3137A9A314.jpeg
 

Attachments

  • BFD00B63-8425-4E16-9FFA-D2DEAF78A1E8.jpeg
    BFD00B63-8425-4E16-9FFA-D2DEAF78A1E8.jpeg
    88.4 KB · Views: 23
Last edited:

way2manyhobbies2keep

https://www.ebay.com/usr/way2manyhobbies2keep?_trk
Location
Sandy Eggo
ing by the quick repairs on the sides and the screws and silicone in the transom, I k
Great work, I would love to find the time to do the same thing, looks like you are setting that ski up to own it a lifetime!,

Im down in Santee and have lots of odds and ends if you need anything. Hopefully see you out there sometime
 
Great work, I would love to find the time to do the same thing, looks like you are setting that ski up to own it a lifetime!,

Im down in Santee and have lots of odds and ends if you need anything. Hopefully see you out there sometime
Sick, we are in vista. Plan to run it in the harbor, fiesta and the river. I don’t build anything half assed. The water is cold right now so I’m not really in a super big rush to get it done.
 
Got back from a week in Nashville so I know the updates are lagging. Got some excess glass sanded off. Then made up some thickened epoxy to fill the dash holes and to fillet the foam to glass transition on the tray walls. Then I did a layup on the starboard side of the tray. This is 2 layers of 7oz and 3 layers in the corners and bends. Once this cures I’ll flip the ski back over to the port side, do the same and while it’s there I will grind down the ribs and reinforce with black 7oz like I did on the starboard side.

55C6ADB4-C6F7-46E2-99AA-844472DE253A.jpeg
 
Figured out how I’m gonna mount my straps. Made a piece out of 16ga stainless and welded inserts to it. This will get glassed down to my new tray floor. The inserts are m6x25 to allow for underpadding. Around the inserts I designed holes to act like a UFO mount. The slots give it more surface area to bond with the epoxy and glass. Now I gotta just figure out where I want it.AB478667-FB6B-4EB2-95C6-08200C034B80.jpeg
536C5CF9-6ADD-4A65-8695-E3D1D455B8E7.jpeg
F12493D5-9BE9-4592-AEB8-555DE83E8990.jpeg
 
Figured out how I’m gonna mount my straps. Made a piece out of 16ga stainless and welded inserts to it. This will get glassed down to my new tray floor. The inserts are m6x25 to allow for underpadding. Around the inserts I designed holes to act like a UFO mount. The slots give it more surface area to bond with the epoxy and glass. Now I gotta just figure out where I want it.View attachment 434462
View attachment 434460
View attachment 434461

Nice work!!! What kind of strap is that?? And how much for a mount :)
 
Nice work!!! What kind of strap is that?? And how much for a mount :)
It’s a “chakine”. China Dakine. It’s a strap purchased on Amazon. It’s a buddy’s strap. I still gotta get mine and hopefully by then I can source actual Dakine. They are functionally the same, I’d just want the logo.
I didn’t plan on producing these, but if there’s enough interest I can do a run of them. Haven’t even thought of a price point. Of course it would totally depend on need to justify going through the site sponsor and selling stuff. I don’t wanna piss off the board and understand what I gotta do to start peddling goods.
 
The carbon nose piece that was on the ski is delaminated, cracked and useless. I was gonna try and epoxy and clamp it to pull a mold off of it but instead I decided to just shape my own. I glues some pink foam together and got to shaping. Then I coated with a layer of total fair epoxy filler. Once I get this all sanded I’ll pull a mold off the plug. Planning to make it out of carbon fiber using vacuum infusion. I also have a bunch more foot strap inserts coming to weld to reinforcement plates. 7DB43F6E-4380-4E97-85C9-C7FC1AADBC6F.jpeg
0F768ECB-B493-4807-B369-8979241FD5AE.jpeg
 
Got a little more done on the plug today. Sanded it, redid the pole opening, and did another skim coat where I broke through down to foam. The epoxy total fair is working surprisingly well. I then popped the plug off the ski and spread some filler all around the edges of the plug.
 

Attachments

  • EE3186F1-DD87-4376-ACDB-FEB44D964B91.jpeg
    EE3186F1-DD87-4376-ACDB-FEB44D964B91.jpeg
    91.5 KB · Views: 21
I’m at a little bit of a standstill on the build. I’m trying to find a decent vacuum pump so I can get going on my carbon parts. I haven’t ordered the carbon or more epoxy because I haven’t found the pump. It all snowballs. I’m waiting on some carbide inserts so I can shorten my couch driveshaft. So while I’m at a standstill I whipped up some more foot strap plates for my local shop. I blasted these ones as I had read that this promotes better adhesion with epoxy resin.10172527-8014-4A45-B9D7-03E7C28E06E8.jpeg
9C7BAEA6-CEC9-4A11-A0B3-DDD17DB70C83.jpeg
 
Top Bottom