Wide tray questions and material lists

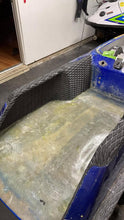
How does this material look for a wide tray and some miscellaneous backing on a 2016 SJ? Not worried about having a little extra I'll be doing three trays but not all at once.

I have a 5 year old who sometimes rides bouys with me so the extra room for him plus occasionally carrying bouys and weights is making a wide tray seem like a worthy endeavor.

1741368021424.png
I've watched the RSKI video numerous times and I'm ready to start cutting these footholds out, just want to have ducks in a row. I know I'll need other supplies like mixing cups, gloves brushes and the like. I am good on tools, have an extensive background in finish carpentry. My service body is equipped with necessary tools and blades. I work with my hands and these tools every day, except I don't have a tremendous amount of experience with fiberglass and resin.. I use maybe a quart of body filler per year repairing and painting windows and doors damaged in shipping to keep secrets. I can do bodywork pretty ok but tbh I would rather be making a tray out of wood than learning glass and resin.

I'll be adding another tube through the tray that may not be used right away but because I can. I will probably add drain bungs, seal whatever I can from any side I can.

I do not have pour foam on the list, brings me to another question. Seems like any foam will absorb water if given the chance... I have enough gun foam from OSI to raise the titanic. I work with it on the daily and am familiar with the characteristics of how it cures. It dries hard as a rock and can be cut, sanded and shaped seemingly as well as the two part variety I've seen on YouTube. Looks like all of it has to be sealed prior to laying glass. This bare cured foam can be dented with a hammer, but if there's an inch of this cured foam between two pieces of wood, you're not going to crush it. It is light years ahead of great stuff gun foam, I have been through hundreds of cans of great stuff, maybe a thousand cans of OSI. It is consistent from the start of the can to the last and doesn't develop spots that over inflate and cure brittle. I'd like to use what I have for free, but I am all ears if even higher quality gun foam is just a terrible idea for filling a tray and shaping gunwales.


1741368119043.png
Curious if anyone has any thoughts on this kit instead of learning how to hand lay glass on my own ski.

What I don't like is how sharp the inner edge of the gunwales appear to be. That's an area I'd like to have additional padding inside that area for sides of shins and maybe some on top for elbows Looks like it would be hard to turf. If anyone has had a good or bad experience lmk.

widetray2_110x110@2x.jpg


Has anyone regretted a wide tray for a bouy/rec ski? Any designs you would have done differently?

Thanks,
Patrick
 
Last edited:
Location
dfw
If you aren’t going to use adjustable foot holds cut slots high enough to clear your boots. The lower edge can be rounded for comfort and there’s enough gunwale left above to protect your ankle and leg. It makes the tray feel very wide and let’s you lock in when jumping. The only thing slots won’t do is keep your feet from sliding forward during a nose stab. Otherwise they’re very comfortable.
 
Question on the foam you're talking about. After its cured are you able to sand and shape relatively easy? Pour foam is extremely easy to sand and shape even for a first timer. You just want to take your time shaping and leveling, so you don't remove too much. Some people will go over the sanded areas with a bit of epoxy to encapsulate. That's what I did with my tray but I'm not sure if it was necessary.

Make sure you do a small test batch of your pour foam before pouring on your ski. The temperature they are store at is important and can effect the chemical reaction if it wasn't store properly.

Check this out

The only thing I may have change is decrease the width of the Top of the gunwales because it chafes my calf's a bit when I ride. Decreased width (See RSKI video) is probably what i would have done.

Also I may have ran the top of the gunwale all the way down to foot height, and created a slot to lock my feet into, all the way down the tray on the sides.

Also for what it's worth I would just make your own tray. You can shape it exactly how you want and in my opinion is just a little more work if any than getting a pre made one. I actually purchased a widened tray and then abandoned that idea.

If using pour foam, When leveling you tray floor use a 5 foot (or straight edge at least longer than your tray) with 80 grit https://www.amazon.com/ABN-Adhesive-Sandpaper-Aluminum-Longboard/dp/B00T8BJ3SM?th=1 tack it to your level or straight edge and Use the front and back of your tray (Green lines to establish your grade) use motions (Red arrows) However you see fit as you go along.

1741552564609.png
1741552763358.png
1741552824188.png
Hope this helps.
 
This came up early in my search when I started looking.

1.5 Gal of resin seams like alot!!!!!!!!! I have cut trays out and only used a fraction of that.
Have three skis to do, but not all at once. Might pare down if shelf life is an issue.
If you aren’t going to use adjustable foot holds cut slots high enough to clear your boots. The lower edge can be rounded for comfort and there’s enough gunwale left above to protect your ankle and leg. It makes the tray feel very wide and lets you lock in when jumping. The only thing slots won’t do is keep your feet from sliding forward during a nose stab. Otherwise they’re very comfortable.
I saw a post by I think MCrider who had something similar I think he had the slots pictured big enough to hug a row of the small gatorade bottles.
his slots ran the whole length and went off through the back of the tray in the same manner. I want to maintain as much rigidity as possible at the rear of the gunwales. Like RSKI but more meat to lean on with ankle and shin.
 
Question on the foam you're talking about. After its cured are you able to sand and shape relatively easy? Pour foam is extremely easy to sand and shape even for a first timer. You just want to take your time shaping and leveling, so you don't remove too much. Some people will go over the sanded areas with a bit of epoxy to encapsulate. That's what I did with my tray but I'm not sure if it was necessary.

Make sure you do a small test batch of your pour foam before pouring on your ski. The temperature they are store at is important and can effect the chemical reaction if it wasn't store properly.

Check this out

The only thing I may have change is decrease the width of the Top of the gunwales because it chafes my calf's a bit when I ride. Decreased width (See RSKI video) is probably what i would have done.

Also I may have ran the top of the gunwale all the way down to foot height, and created a slot to lock my feet into, all the way down the tray on the sides.

Also for what it's worth I would just make your own tray. You can shape it exactly how you want and in my opinion is just a little more work if any than getting a pre made one. I actually purchased a widened tray and then abandoned that idea.

If using pour foam, When leveling you tray floor use a 5 foot (or straight edge at least longer than your tray) with 80 grit https://www.amazon.com/ABN-Adhesive-Sandpaper-Aluminum-Longboard/dp/B00T8BJ3SM?th=1 tack it to your level or straight edge and Use the front and back of your tray (Green lines to establish your grade) use motions (Red arrows) However you see fit as you go along.


Hope this helps.

That's helpful. You ditched the old floor and started over I take it. 3-4 layers of 1708?


I filled a cardboard box with my foam from work last night. It cured hollow like a big bubble. I could punch my hand through it. It does cut and sand very well and cures nicely in smaller quantities but I don't think I'll be using it for the entire tray section. Dropped by Home Depot and poked at the xps foam and I really liked the strength for how lightweight it is. I think it could be scribed to the inside of the hull really well and fit tightly leaving a channel at the bottom for drainage. could glue the pieces together and glue to the inside of the hull. I could use my closed cell foam to fill in the gaps on the deck before sanding it all flat and shaping the inside of the gunnels with.
I think I used 4 layers, if I did I definitely could have gotten away with at least one less layer. I mean the oem floor thickness for an fx1 is like one layer of 1708 with backer mat. Check out the link I posted for my build thread. Foam board is exactly what I used alot of the og's are using that. I made channels and installed drains as well. The pour foam was just used to level the top layer, and shape my gunwales I'll continue to use this method on all of my builds moving forward.
 

hornedogg79

dodgin' bass boats
I use XPS for the most part but to fill voids and level the tray I use a little 2 part. I don't sand it flat though. It opens the cell structure and makes it vulnerable to water intrusion. Instead I will take a piece of the XPS sheet or a rigid piece of cardboard etc. and cut it to the tray shape. Cover it in plastic. Pour the foam then slap that piece down on top of it with some weight to hold it down. After it cures, pull the piece back up and you're ready for glass. If a spot is missed, do it again . I would make a couple blobs of foam at work and weight them down in a bucket of water. Leave one untouched and cut the other open a bit to see if they absorb water overnight.
 
I use XPS for the most part but to fill voids and level the tray I use a little 2 part. I don't sand it flat though. It opens the cell structure and makes it vulnerable to water intrusion. Instead I will take a piece of the XPS sheet or a rigid piece of cardboard etc. and cut it to the tray shape. Cover it in plastic. Pour the foam then slap that piece down on top of it with some weight to hold it down. After it cures, pull the piece back up and you're ready for glass. If a spot is missed, do it again . I would make a couple blobs of foam at work and weight them down in a bucket of water. Leave one untouched and cut the other open a bit to see if they absorb water overnight.
That's a great idea!
 
Top Bottom