08 Superjet Updates

Location
Oregon
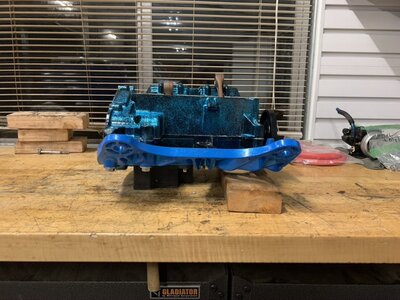
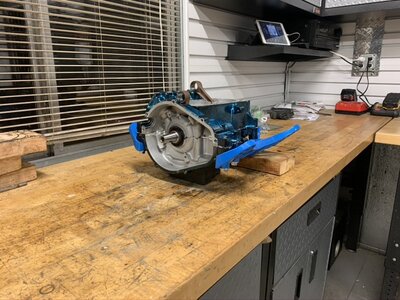
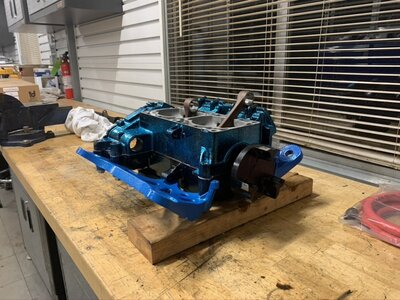
Hey everyone. A few months ago a friend gave me a powder coat gun since he bought a new one. Initially, I just was going to coat small parts like carb covers n stuff. But as soon as the coronavirus started taking hold I figured why not go all the way, not like I'm gonna run out of time here. I just had the motor apart last August, due to me hydrolocking the rear cylinder and destroying it. (it ran about 15 minutes back to the boat ramp on only my front cylinder, which I thought was pretty impressive.) I tore the entire thing down to the crank in my quest for uniqueness. Anyways, I set my sights on a color combo so here we go, I'll update as I get more parts done. I think the cylinders and exhaust powder coat will hold up, since with dual cooling I can touch the cylinders right after running. I also run my chamber a bit cooler than most people do, so I can touch it as well. Powder coat holds up to 450 degrees ish.
Before
C2284242-0ED3-41D8-82F7-A6DE3502E66B_1_105_c.jpeg
Bed Plates
CC6E9A2A-AD89-44F5-9840-B6B84F69148E_1_105_c.jpeg9895FAB9-FDC0-47A7-8D76-9973BC927B55_1_105_c.jpegAA373DDE-7DEA-482C-B5D2-735FF5B895EF_1_105_c.jpeg
Manifolds (Blew out head pipe gasket and all I had was gasket maker, so thats what that is.) Haven't done the exhaust manifold yet.
28CAAB84-4838-40CB-87A0-1996E6632CBA_1_105_c.jpegCB7DFDD7-2F3C-47D7-8B3B-A8CC113A64AB_1_105_c.jpeg0BC44D0C-EDD0-4E7F-BCDB-6F89C20AB1D6_1_105_c.jpeg


FYI: These are the first things I have ever powdercoated, so my coverage is a little uneven but I am getting better.
 
Last edited:
Location
Oregon
Made some more progress today now that the rain finally went away. Got the final coats done on the cases and cylinders. Still need to clean up all of the sealing surfaces, I was just anxious to see it set together.

Planning on assembling it tomorrow. On top of all of the powdercoating, I'm doing the 07 steering conversion, beefing up my CATS, Jet Maniac big bore throttle cable, SS bolts for my headpipe and a set of destroyers.


EC0E3448-0EDB-4C25-A00A-365E9B68C31B_1_105_c.jpeg
A70DB62D-EB3A-41F9-AF65-28DB68457817_1_105_c.jpeg
 
Location
Oregon
Got a little bit more done tonight. Hopefully tomorrow I can get the motor fully assembled and finish getting the hull ready for parts.
 

Attachments

  • E025EA10-9098-49EB-875F-2CFFD48423A2_1_105_c.jpeg
    E025EA10-9098-49EB-875F-2CFFD48423A2_1_105_c.jpeg
    155.9 KB · Views: 68
  • AF7DD2E7-1F36-4914-B1E1-4ADC06C5C6EC_1_105_c.jpeg
    AF7DD2E7-1F36-4914-B1E1-4ADC06C5C6EC_1_105_c.jpeg
    170.6 KB · Views: 70
  • 82CA4B79-D99E-4925-845A-EEE3E2D8DCA0_1_105_c.jpeg
    82CA4B79-D99E-4925-845A-EEE3E2D8DCA0_1_105_c.jpeg
    171.5 KB · Views: 89
Last edited:
Location
Oregon
Took my time putting the jugs and head back on today, was super paranoid about messing something up and having it die way out from the boat ramp. Also just fyi, don't buy blowsion one piece heads if you're going to do a girdle kit on it. When they were being designed in cad the hole for the front left bolt is waaaayyyy offset from the stud that the girdle bolt threads into. I ran without the girdle kit last summer because of it, ended up taking a very good sized drill bit and a lot of grease to get it to not cross-thread. I have a picture of it below. From what I understand it was just the first batch of the one piece heads that had that issue, but I haven't been in contact with them since last summer so I'm not sure if its been fixed yet. Also got the inserts installed for the left side destroyer, so hopefully I can get the other one done tomorrow to get them bolted on.

183F50B2-3097-44FA-934D-E42D6ACA6085_1_105_c.jpeg2E31D142-5021-4673-8750-DE663E0C47B5_1_105_c.jpeg

Here's the offset bolt. I hate looking at it but I'm not going to go complain to them about it, not sure if I would gain anything from it knowing the way they work. Guess it'll just have to stay until I can justify buying an ADA from JM.
CD3554EB-A3F0-4CFB-8B54-19D2825A603F_1_105_c.jpeg
 
Last edited:
Sounds a little like China when you buy something that nobody ever tried assembling during development because nothing lines up and would have been obvious.
 
Location
Oregon
Sounds a little like China when you buy something that nobody ever tried assembling during development because nothing lines up and would have been obvious.

Oh yeah for sure. Funny part is though that they were fully aware of it not lining up correctly, so their solution was to keep the entire bad batch on the shelves and tell whomever had an issue with them to drill it out like I did.
 
Oh yeah for sure. Funny part is though that they were fully aware of it not lining up correctly, so their solution was to keep the entire bad batch on the shelves and tell whomever had an issue with them to drill it out like I did.
Now that is great quality control and customer service. It would have been fine if it was disclosed upfront and discounted.
 
Location
Oregon
Anddddd still super slow progress. Now thanks to the COVID-19 I have no way to get it in the water. But anyways, I got the destroyer inserts cleaned up then cleaned out the inside of the ski for later. Destroyers are now 100% on and ready to go. I finished the steering conversion with @JetManiac conversion plate. I knew the 08 cable was shorter but wow, it didn't really click until I compared them side by side. Really hoping it helps as much as everyone says it does. Hoping to get it ready to accept the engine at some point today, but I sort of doubt it.
F2567519-6851-4501-89FD-274751B78BBC_1_105_c.jpeg
Yes, I had a very slight exhaust leak. Not enough to choke the ski out though, so I didn't know about it until now.
F34F947E-C07B-4F24-B3B9-A03B82854428_1_105_c.jpeg
8BFBF7CE-1940-4C0B-83F3-37031946B4EE_1_105_c.jpeg
I ran out of dremel bits, so the pole isn't as ground out at it should be. I ended up getting it to work.
A857C739-5591-4B17-A231-050F73AB5B55_1_105_c.jpeg
8978E82B-69B5-4A4E-937E-8FCFE39CC3EE_1_105_c.jpeg
 
Last edited:
Location
Oregon
Got a good chunk of work done today, doesn't look like much but I'm hoping it's all worth it when it's back together. Started by freshening up my ebox. Got the old plug wire wrapping/protectors off and put blue wire wrap on them. I managed to break a plug boot terminal when I took the boot off, but luckily for me summit had the plug boot kits for dirt cheap. The positive battery cable got wrapped in the blue stuff as well, my goal is to not have any bare wires/cables visible. Trim cable is all routed as well as possible. Also started to plumb my hot feet up, which is definitely a necessity before the river gets warm.


2074935A-0B43-4F3F-B1D4-073CFCAE848D_1_105_c.jpeg
CC269155-7442-461A-9D3A-22C69690BCCB_1_105_c.jpeg
(Bilge wiring)
B7F94ABC-3D77-4FF6-9C8C-3E36D0CB36A9_1_105_c.jpeg
The adhesive cable guides are killer. FRI sells them but I found them for way less and in bulk on amazon. I just took some sandpaper and then acetone to where I was going to stick them to make sure that they stay. https://www.amazon.com/gp/product/B07WKCXQTD/ref=ppx_yo_dt_b_asin_title_o04_s00?ie=UTF8&psc=1
95EF5AB2-CED8-4DFB-9537-C6670B8A2E19_1_105_c.jpeg142DED6F-1D8A-4FCB-A62F-379C97E97692_1_105_c.jpeg
When blowsion rips stock mats off they normally put a bolt in the hole where the dash rivets on. I took the bolts out and drilled the holes out to fit pissers, which are fed by the rear fitting on the head. I have a restrictor in line so that they just barely squirt out water and the entire bottom mat fills. There is also an outboard pisser plumbed into that circuit that excess water can escape from after the hot feet pissers have gotten the water they need when the valve is opened up. The pissers actually fit perfectly under the hood with a stock hood seal. I can't even see them unless I really look when the hoods on.
 
Last edited:

yamanube

This Is The Way
Staff member
Location
Mandalor
The steering cable definitely helps a ton, make sure you are getting full throw with your steering system. Cutting the rideplate flush with the hull helps too.
 
Location
Oregon
After much fighting, I've made more progress. For whatever reason, the powder I was sent wouldn't cure correctly onto a bunch of my parts. That left me spending $100 in aircraft stripper and two days stripping everything I tried coating with the bad powder. Got it all sorted today though and made some very good progress. Now that the motor is back in my goal is to have the engine compartment all buttoned up tomorrow, except for the chamber and headpipe. They are both still marinating in aircraft stripper at the moment so I'm not quite sure when I'll be able to get those in.

9F624EE3-66EE-4C26-9E35-4459C4FC9E06_1_105_c.jpeg 017320EB-F30E-4244-9B23-17F5DD06E906_1_105_c.jpeg 09B4BEFF-D91C-445E-B2B1-73AB76B716FD_1_105_c.jpeg CC00916A-F1F1-4708-ABA7-7B02FDEE9BED_1_105_c.jpeg B7D1E0D3-061B-46AF-9F9E-AEB3F1F40201_1_105_c.jpeg
 

yamanube

This Is The Way
Staff member
Location
Mandalor
Sorry to tell you now, but you are going to want to grind down the top corner of this bed plate or risk it putting a hole in your chamber.

20200420_072102.jpg
 
@yamanube What, I haven’t heard that before. I just powder coated my bed plates as well. My ski has had a b pipe for at least 10 years and there aren’t any signs of rubbing there. But I’ll definitely check clearance on it once the exhaust goes in.

Powder looks nice. I feel you on the aircraft stripper, the stuff is useless now that the epa mandated no methylene chloride last year. If you need to remove powder again, get some Benco B-17. It’s relatively expensive at 150 delivered for 5 gallons, but it’s like magic. Dip the part for 10 minutes and the work is done for you. Just pull it out and rinse it off.


Sent from my iPhone using Tapatalk
 
Location
Oregon
@yamanube What, I haven’t heard that before. I just powder coated my bed plates as well. My ski has had a b pipe for at least 10 years and there aren’t any signs of rubbing there. But I’ll definitely check clearance on it once the exhaust goes in.

Powder looks nice. I feel you on the aircraft stripper, the stuff is useless now that the epa mandated no methylene chloride last year. If you need to remove powder again, get some Benco B-17. It’s relatively expensive at 150 delivered for 5 gallons, but it’s like magic. Dip the part for 10 minutes and the work is done for you. Just pull it out and rinse it off.


Sent from my iPhone using Tapatalk

I'll check out the B-17, I didn't know about that stuff. And yeah the aircraft stripper sucks now, it takes forever and is still a pita to get the powder off.
 
Location
Oregon
Today actually went how I planned it to go. Crazy, never had that happen before during a build. Got fuel all plumbed and ready to go, took me forever to get them all organized but I got it done and it looks awesome in my opinion. The water inlets are all routed and hidden so that they are pretty much invisible once the coupler cover is on. I hid the start/stop wire, throttle cable, steering cable and stator wires right up underneath the exhaust tube, it looks infinitely better than everything just laying on the hull or running through the massive wire loom that hides the fuel lines stock. Right before I started routing the fuel lines I pulled all of the stock fuel and water line guides off because they're ugly once all of the stock lines and looms are pulled out and rerouted. Last but certainly not least I got the first water outlet circuit all finished. This is the one that I have my hot feet ran and connected to, so I picked up a valve from home depot and ran the restrictor in between that and the outlets. I have an exterior pisser on the other end of that circuit for the excess water pressure to exit. The other head outlet runs to my pipe. Next is stripping my exhaust the rest of the way and coat it again. Once all of that's done I'll get the pump in and back it into the river to make sure all is well.
37D02C8B-5DEB-47D1-BB71-885D680ABD84_1_105_c.jpeg4F85F7FE-D61A-4ED9-B648-AAC1F8F10B41_1_105_c.jpeg24B23BBC-47BC-420D-B403-0EE48E91A0D8_1_105_c.jpeg7CBE80DE-7136-4CFB-9525-2EA0A81E916F_1_105_c.jpegBC57804F-365D-4C5A-A90F-ED1EA0D174B9_1_105_c.jpeg
 
Top Bottom