550sx to 750 "All or Nothing" build

WFO Speedracer

A lifetime ban is like a lifetime warranty !
Location
Alabama
To everybody watching thats tired of "watching paint dry".......I'm sorry but it just HAS to be done to get it RIGHT.

Stick with me......we're getting REAL close to the good stuff!
Yep trying to rush paint work is a good way to flush a lot of time and money straight down the toilet.
 

Myself

manic mechanic
Location
Twin Lakes AR
85* with only 40% humidity this afternoon. I stopped regular wrenching early and laid down final paint this afternoon. I literally just finished cleaning out my gun and moving parts to the other side of the shop to dry. I was able to get a tack coat to cover anything I wet sanded through, then a medium wet coat. This time I waited about 30 minutes to lay another medium wet coat. I think it really helped the paint stick without runs or sags...............at least I don't see any right now. I'm going to let this cure up for seven days before trying to cut-n-buff anything.
.........new pics later.......of watching paint dry LOL!!
 

WFO Speedracer

A lifetime ban is like a lifetime warranty !
Location
Alabama
85* with only 40% humidity this afternoon. I stopped regular wrenching early and laid down final paint this afternoon. I literally just finished cleaning out my gun and moving parts to the other side of the shop to dry. I was able to get a tack coat to cover anything I wet sanded through, then a medium wet coat. This time I waited about 30 minutes to lay another medium wet coat. I think it really helped the paint stick without runs or sags...............at least I don't see any right now. I'm going to let this cure up for seven days before trying to cut-n-buff anything.
.........new pics later.......of watching paint dry LOL!!
Yeah I was supposed to paint the Seadoo hood today but due to a confluxation of pure idiots today , it did not happen , one idiot pulled right out in front of me, I had to swerve and go through someones yard to avoid hitting them, I missed them by maybe a foot , then in the car another idiot pulled out in front of me less than a hour later , the drug store lost my prescription , the hardware store didn't have our light bulbs we ordered almost a month ago and lost the package with the part number for the bulbs and the watermelon guy wasn't at his truck selling , he was in the shade across the street eating you guessed it, --------------------------------- , nope you are wrong he was eating Cantaloupe lol.
 

Myself

manic mechanic
Location
Twin Lakes AR
Time to watch the paint dry!! And it looks like it's drying out nice. Here's the final paint job.
 

Attachments

  • IMG_2845.JPG
    IMG_2845.JPG
    78.9 KB · Views: 25
  • IMG_2853.JPG
    IMG_2853.JPG
    51.2 KB · Views: 20
  • IMG_2850.JPG
    IMG_2850.JPG
    120.1 KB · Views: 21
  • IMG_2851.JPG
    IMG_2851.JPG
    82.3 KB · Views: 19

Myself

manic mechanic
Location
Twin Lakes AR
Man, it's SOoooo hard to get any good pics of white. I came up with a plan to get a few "reflection" shots for you guys.
 

Attachments

  • IMG_2861.JPG
    IMG_2861.JPG
    70.5 KB · Views: 22
  • IMG_2857.JPG
    IMG_2857.JPG
    88.2 KB · Views: 19
  • IMG_2862.JPG
    IMG_2862.JPG
    93.3 KB · Views: 17
  • IMG_2856.JPG
    IMG_2856.JPG
    97 KB · Views: 21

Myself

manic mechanic
Location
Twin Lakes AR
I'm watching more paint dry........ I had just a bit of paint left over. I flipped it upside down and scuff sanded the bottom outer edges into the first chine. And from the rear up to the pump. These seem to be the areas that take the most wear. I went ahead and used up the paint in those areas. I figured, no sense in throwing it away!! Now we have a bit of extra bump protection I guess. LOL!
 

Myself

manic mechanic
Location
Twin Lakes AR
I spent about 3 hours gathering various bolts out of marked zip-lock bags and painting some misc parts today. Then about 2 hours mounting the 750 pump. WELL....it doesn't just BOLT RIGHT UP with the kit. As expected, I had to fine tune the bolt holes to get the pump lined up nice with the conversion shoe. I also got the steering cable put back in. Then I spent about another hour trying to get the conversion driveshaft in so I could get a good engine alignment. The NEW driveshaft only slides maybe 3/16" into the new impeller (see pic) then sticks HARD. I pulled the pump back out, checked with the old driveshaft....fine. So anybody ever run into a SUPER tight new driveshaft fit into the impeller splines before?? I sent a message to Watcon cause that's where the parts came from. Maybe he has some guidance for me. Until then here's a pic of the pump mounted up. It required one shim on each rear bolt to get a nice tight fit with the shoe. Then I'll make the engine line up nice with that.
 

Attachments

  • IMG_2906.JPG
    IMG_2906.JPG
    97.7 KB · Views: 17
  • IMG_2907.JPG
    IMG_2907.JPG
    74.4 KB · Views: 17
  • IMG_2908.JPG
    IMG_2908.JPG
    109.1 KB · Views: 17

Myself

manic mechanic
Location
Twin Lakes AR
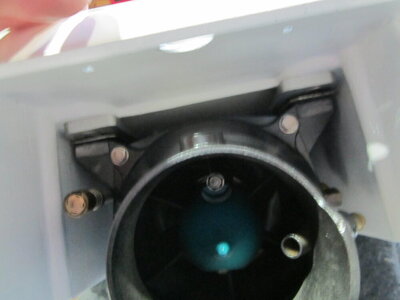
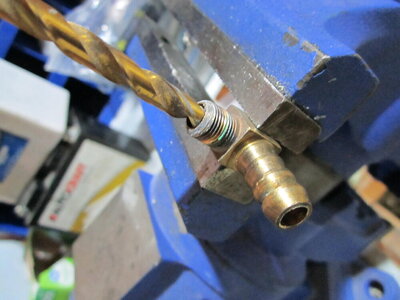
Also noteworthy is that I drilled out the stock brass water fitting in the jet pump. I could just barely shove a 7/32 drill bit into the fitting. There's plenty of material there to take it out to a true 1/4" i.d. Hmmm, 7/32 to 8/32 sure doesn't sound like much.....it can't possibly make any difference in cooling water flow CAN IT?? Well, here's the math for you..... drilling it out only equates to a 3% larger hole!! BUT,....when we're talking fluid dynamics and gallons per minute of cooling water flow......that's HUGE! I used a water velocity of 10ft per second. I would guess the cooling water is moving that fast, at least under throttle anyway. With the stock fitting that's a bit over 11 gallons per minute of water flow. Bored out to a true 1/4" is almost 15.5 gallons per minute. That's over a 22% increase in cooling water flow to your engine!!! Everybody should do this to the stock water fitting!!
 

Attachments

  • IMG_2903.JPG
    IMG_2903.JPG
    104.6 KB · Views: 16
  • IMG_2905.JPG
    IMG_2905.JPG
    116 KB · Views: 18

Myself

manic mechanic
Location
Twin Lakes AR
Ok, so I've been fighting with this thing all morning. I'm VERY frustrated at this point. I need to get this project done so I got my fancy measuring sticks out came to the conclusion the driveshaft seemed to be about .002" to big, at least towards the end of the splines. I marked it up with a sharpie and bumped it in and out of the pump a couple times......YEP, you can see where the sharpie is rubbed off. Too tight
 

Attachments

  • IMG_2909.JPG
    IMG_2909.JPG
    91.7 KB · Views: 15
  • IMG_2910.JPG
    IMG_2910.JPG
    99.5 KB · Views: 17

Myself

manic mechanic
Location
Twin Lakes AR
I chucked up a coarse rotoloc disc in the die grinder and "filed the spline edges. I also took a small triangular file to the inside edges of the splines as they appeared "off" a bit. Call this poor workmanship, dull cutting edges at the factory, a Friday afternoon, WHATEVER, but the shaft now fits a bit snug and goes all the way in.
 

Attachments

  • IMG_2911.JPG
    IMG_2911.JPG
    115.9 KB · Views: 17

Myself

manic mechanic
Location
Twin Lakes AR
Great! Now I can align the rest and bolt the engine in.......NOPE!! I spent the next couple hours trying to do just that. Motor in and out, driveshaft support hanging there ready to be siliconed and bolted up. I'd have good alignment.....then I wouldn't. Try again, motor out, motor back in, re-shim pump, try again.......I just COULD NOT seem to get good alignment, felt like sometimes it was binding up or something. Finally figured it out, check out the video.........YES, the driveshaft is straight and true. The splined bore of the NEW impeller it totally OFF CENTER!!! Now I can't install or align ANY of the driveline until we get another one.
 

Myself

manic mechanic
Location
Twin Lakes AR
Wow I have never seen that one before , congrats most guys don't even check stuff like this .
I know right? I've had hundreds upon hundreds of jet pumps apart and hundreds of new impellers installed and NEVER seen this one either. Imagine trying to align an engine to that...... If there was a problem YO I'll solve it.....
 

Myself

manic mechanic
Location
Twin Lakes AR
I just came in, I'm just exhausted. Temp in my shop.....in front of fans..= miserable! Anyway, I got some brackets screwed down. I got some pads cut and glued down. I marked and V cut the center pad under the gas tank so it would sit flat in the hull. Got the waterbox strapped in and exhaust hose run. Also got the pole bracket and fuel neck installed. Now I pretty much can't do anything until the driveline is installed. DANGIT!
 

Attachments

  • IMG_2920.JPG
    IMG_2920.JPG
    118 KB · Views: 15
  • IMG_2914.JPG
    IMG_2914.JPG
    98.4 KB · Views: 13
  • IMG_2915.JPG
    IMG_2915.JPG
    110.3 KB · Views: 16
  • IMG_2917.JPG
    IMG_2917.JPG
    92.2 KB · Views: 18
  • IMG_2918.JPG
    IMG_2918.JPG
    73.2 KB · Views: 18

Myself

manic mechanic
Location
Twin Lakes AR
Thanks @john zigler for great customer service. I e-mailed him yesterday about this issue and he called me first thing this morning to take care of it. New impeller is on the way! I assure everybody watching.......if there's a 1 in a million chance of getting a bad part.......I'm the guy that ends up with it. If it weren't for BAD luck, I'd have NO luck at all ! :D:D
 
Top Bottom