You are using an out of date browser. It may not display this or other websites correctly.
You should upgrade or use an alternative browser.
You should upgrade or use an alternative browser.
927 Blaster 1 Project
- Thread starter neariah
- Start date


- Location
- sunbury ,ohio
Man thats looking sweet ! on the vents ,I would possibly enlarge the holes between the seat and the hood before making any new holes in the hull . just a thought .. PS : mine is still stock purple gelcoat by choice , I use it pretty hard and dont have to worry about scratches that way. more of a sleeper !
Thanks for the compliment. I can't believe it's finally painted. I'm sure you know the feeling.
Hey, that's a great idea on enlarging those 3 holes. I forgot that it also breathes thru there.
I was thinking of putting atleast 1 (if not 2) of those vents, on each side, where the choke & fuel valve USE to go. Since I eliminated them anyways.
I don't think they'll look that bad? I know it'll give it away, that there's a monster underneath, but the only way my ski's gonna be a sleeper, is when it's OFF.
Thanks again for the suggestions.
- Location
- Warminster PA
That looks fantastic! Can't wait to see the finished ski.


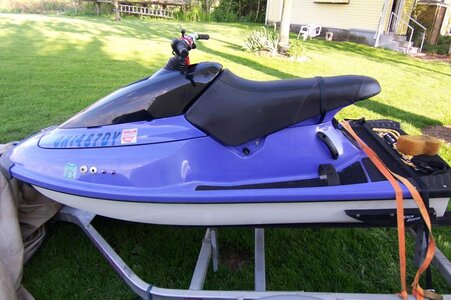
Couple of pix of the 99% finished product. Still need the Hydro Turf mats & rear corner plastics.
But besides that, I'm pretty much finished.


Here's my attempt to compensate air flow to the motor, since I eliminated the top vents with the dash.
Don't think I'm starving the motor, cuz it really is running nice. Still breaking it in, but incredible acceleration.
And the best part of all.... THIS THING TURNS ON A DIME, with the sponsons.

And finally, here's what the inside looks like.
I'm really happy with the finished product. Lord willing, I'll be able to enjoy it for years to come.
Last edited:
- Location
- sunbury ,ohio
- Location
- Key Largo
Gill, you made that ski look beautiful bro, i wish i could of contributed in the paint , dude you should of told me earlier i would of painted it for you, but anyways the paint job came out awesome, the whole job came out awesome : great job brother. you know me i know nothing bout skies, how fast is it?
Danny
Danny
Thanks Danny. Hope you get to ride it some day. It rides even better than it looks. Not sure on the top speed yet. I just installed a speedometer on it, but haven't taken it out yet. Plus, I also JUST got the new prop in the mail today. Which I took to my friend to repitch. I'll let you & everyone else know where I'm at with the speed, as soon as I ride it. Hopefully this w/e.
Love you in Christ,
Gil.
Love you in Christ,
Gil.


Here are some more pix of this "snowball" project. It's my version of a "reverse" quick trim.
I need the nozzle to aim down most of the time anyways, to control the porpoising.
I used a U.M.I. throttle lever a very nice customer gave me, an old choke cable from a Jetboat I had, & a reverse gate spring off a WaveVenture.
Took me nearly all day, but sure beats spending $500 on a kit from Riva.
And here's my effort to adapt a speedo on a Blaster.
Will try it out this w/e & let you guys know if it worked.


Also had to shave down the front of the Ocean Pro ride plate, to eliminate the step it brought.
And also had to use different bolts, & grind a couple of them so they wouldn't protrude down.
I was wondering if anyone had any experience using an extended nozzle? Is it worth the $100?
Last edited:
- Location
- Hutchinson, Kansas
sweet build, nice job
- Location
- Reno,NV
why you sellin.. ??