BA Freak (155 conversion) & carbon circus

DylanS

Gorilla Smasher
Location
Lebanon Pa
Here it is, finally, after over a year of mental anguish.. a new ski for me to sink :)
I actually purchased this carbon -4.3 Badass Freak a few months before they found my sunken Ariel 8 because I had finally lost hope.
Originally I had intended on throwing a coat of paint on it and calling it a day but after recovering my dasa 1200 motor from the depths I decided I did not want a sad little 144 pump shoe In the picture.

Pics of the ski as I received it, came from a gentleman in Cali off Facebook.
Came with everything besides motor and pump. EE5875B8-701A-463C-9BAE-347D0A382FC6.jpeg
 

DylanS

Gorilla Smasher
Location
Lebanon Pa
First things first I hacked a rough hole into the tray to see what I was working with.
To my surprise everything looked mint and dry.
179CA547-AA4F-4B3C-A292-E02BA8FC56BC.jpeg

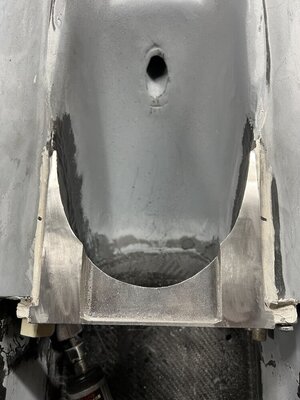
I would end up cutting a much larger hole so I could reinforce the inside of the pump tunnel and relocate the steering cable/cooling lines to clear the 155 shoe.
 

DylanS

Gorilla Smasher
Location
Lebanon Pa
I used a hammer and flat head to chip the plastic 144 shoe out, went fairly smooth.
Highlife helped the process along89A87C98-BD2D-4D52-A23E-00AA0190B5D1.jpeg4041EF89-447D-47DF-BC2D-E0E91F02EF56.jpeg


Next, I spent about 3 days reading every possible thread on converting a BA to a 155 pump and the general consensus was the “pump tunnel wouldn’t support it” and “lots of grinding on the shoe was required”.
So i made up my mind, the world is my oyster, I’ll give it a shot. If anything I’ll just destroy my hull so no big deal :)

I ordered a RRP shoe and after knocking out the steering cable fitting and coolant line I was able to notice just how far I would have to grind the shoe. Even then i would never be able to grind the shoe enough to clear the ski as it sat. Even better a oem 155 pump sat about 2” too high due to the top hitting the bottom of the tray.
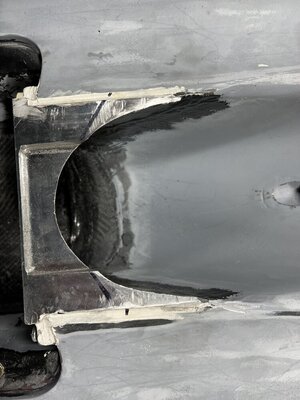
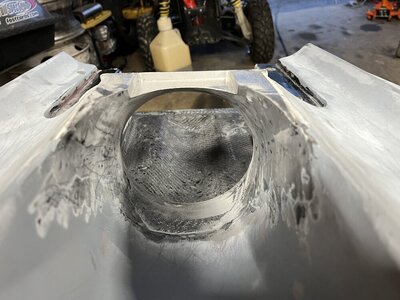
I would have to get crazy. Real crazy. Like eating Gas station sushi crazy. I cut a rectangle from near the front of the shoe to about 3” from the back of the tray. I got my rough measurement by using the slightly recessed edges of the bottom of the tray and went to town with a grinder. Looked terrible. The pump? Fit like a glove. 0C7B0BDD-ED42-4907-AE42-1363F82B09ED.jpeg2741EBC5-5C79-4B49-8479-1037A313846C.jpeg
 
Last edited:

DylanS

Gorilla Smasher
Location
Lebanon Pa
I ended up hand sanding and using a airsaw to clean up the lines on my cut. I tapered the edges hard at about 45*. I mocked up the pump and shoe and made sure the pump feet sat flush to the ski and cleared the tray. I left myself about 1/4” to play with between pump and ski.
I checked alignment with a CF tool about a million times.
I finally was somewhat satisfied with the fitment and so it was onto the carbon.
9189335A-6537-4C98-BD8C-77693BA5BE8C.jpegF9B8BEAB-68A8-4341-8189-93B842A6D6A1.jpeg


I ended up cutting a plastic hand towel container inhalf and duct taping it to the bottom of the tray to form myself a mold. I of course prepped the areas and decided to go with 4 layers of 5.9oz carbon on the top and 2 on the bottom. Slapped some mold release on my plastic and went to town. Let it alll set up.
BD4CEA82-B859-45E6-9931-0A3F91F3714E.jpeg8A709C17-3327-434C-96FF-472D14D2CEB2.jpeg

Fortunately the paint will cover the ugly patchwork I did on the bottom !
 

DylanS

Gorilla Smasher
Location
Lebanon Pa
I ended up having a major issue with the angle of the shoe and getting the pump to seal correctly. When pushed flush to the ski, there was at least a 1/4” gap at the bottom of the seal. Unfortunate. I also had to patch the holes left by the tubes but I couldn’t get behind them to fix them properly so I sent my 20th question of the week to @Sanoman and he steered me in the right direction. I cut up some strands of carbon and mixed them into epoxy and ended up with a peanut butter like paste. I put a piece of tape on the outside of the hull, packed the holes from the inside, and covered them from the back the best I could with a strip of carbon.
Once that setup I tackled the shoe angle. I decided to mock up the pump, get my perfect alignment, and angle the shoe with spacers to seal properly to the pump. I used small stainless washers to space the shoe correctly then bungee corded the pump to the shoe and applied some 5200 to get her set. 2F78447A-DDD1-4AD8-9E10-CE485B289108.jpeg1C8BBACF-A78A-4062-84B9-8486D1238857.jpeg
 

DylanS

Gorilla Smasher
Location
Lebanon Pa
I used a layer of 3m panel bond to fill the voids and ridges between tunnel and shoe. D032D8D2-C717-46C6-BD38-F25A7D0B10E1.jpeg

I then decided to take on the harsh angle of the shoe. Did not want the drag messing with the ride and wanted zero chance of me slamming the shoe into a rock. I spent about 2 hours hand filing the edges down then polished them up with a sanding wheel. I gradually tapered the edges into the hull and left some material incase I decided to grind more later.
C793C2A6-91C5-4EB2-903B-1DD4C8E45E49.jpeg362B06A2-7953-441B-8CD4-BAB256C79E38.jpeg
A3FA686B-481D-4DA6-A925-30AAE218684E.jpeg6AEDDD0F-1069-4DDC-A21F-0014427F0E5C.jpeg
 

Attachments

  • F2A73040-C5AC-4005-877D-8A0E9FED6E8F.jpeg
    F2A73040-C5AC-4005-877D-8A0E9FED6E8F.jpeg
    124.9 KB · Views: 52

DylanS

Gorilla Smasher
Location
Lebanon Pa
I spent a hour or two sanding on the tunnel to clean up some of that thick layer of panel bond and the edge of where I laid my carbon. Unfortunately I somehow missed a edge of the carbon (that I intentionally did not epoxy) when I was trimming and had to dig it up out of the ski. I prodded my edges to make sure I wouldn’t have anymore surprises. This is about as far as I got, you can see how the tunnel is slightly smaller at the sides than the shoe but overall I’m happy with the fitment. It’ll get some final touch filling and sanding before I lay my final carbon.
Ski goes in for paint tomorrow.
Im sure some of the methods I used are a bit unorthodox but it’s my first pump shoe conversion rodeo so we learn as we go. View attachment 423365C6269798-3CB7-438F-A234-8610134147D5.jpeg4D712720-DC6A-4372-AE3D-E3C53B60071B.jpegA75715F3-0400-402B-AC16-97C2935D2B64.jpeg
 

Attachments

  • 601E06EF-105B-4338-9577-AEA697698317.jpeg
    601E06EF-105B-4338-9577-AEA697698317.jpeg
    125 KB · Views: 60
Last edited:
Location
Argo, Al
Swapped to a 155 shoe when I bought my KDX. Had to do a lot of grinding, sanding, filling, as well as shim the shoe also. Have you checked your ride plate? Mine didn’t hit the hull like yours but it did hit the ride plate pretty bad.
 

DylanS

Gorilla Smasher
Location
Lebanon Pa
Swapped to a 155 shoe when I bought my KDX. Had to do a lot of grinding, sanding, filling, as well as shim the shoe also. Have you checked your ride plate? Mine didn’t hit the hull like yours but it did hit the ride plate pretty bad.
Oh it’s going to hit the ride plate big time, im going to make a mold and lay up a new one that contours to the new pump hopefully!
 
Location
Argo, Al
Good deal! I ended up grinding on mine because it had already been done some previously. I still had to shim the back of the plate as well. I need to just make a new one. We swapped my brother in laws BOB to a 155 and the same issue with shimming the plate. He ended up losing his ride plate in the lake last year and hurricane industries is no longer so I made him a plate to clear the pump.
e95f0425eae30a530fb78e789ec27101.jpg
 

DylanS

Gorilla Smasher
Location
Lebanon Pa
Good deal! I ended up grinding on mine because it had already been done some previously. I still had to shim the back of the plate as well. I need to just make a new one. We swapped my brother in laws BOB to a 155 and the same issue with shimming the plate. He ended up losing his ride plate in the lake last year and hurricane industries is no longer so I made him a plate to clear the pump.
e95f0425eae30a530fb78e789ec27101.jpg
Very nice, how did you go about making a mold?
 
Location
Argo, Al
Haha don’t make fun of me, this was done as quickly as possible. No mold was made. I used the ride plate off of my hull to start since they had the same general shape. I laid up one piece of 1708 on the outside of my plate. Once cured, I pulled it off and marked it and trimmed it. It was really close but I noticed I had to slightly squeeze the sides of the ride plate and it fit perfect with the correct shape and height. So I compressed the side of the plate (see the 2x4s on the sides) and laid up more glass.
12795f8019652e93b9733a2617df031c.jpg

After that, I trimmed it again and it fit.
1133d69ea660767d0bd688d7cea34e76.jpg


Was going to just finish it with black paint but I had some leftover carbon so decided to make it a little pretty. I sanded it to flatten it some but didn’t get crazy since it’s a ride plate. Overlayed with carbon and trimmed. Then laid more resin, sanded, and cleared.
 

DylanS

Gorilla Smasher
Location
Lebanon Pa
Haha don’t make fun of me, this was done as quickly as possible. No mold was made. I used the ride plate off of my hull to start since they had the same general shape. I laid up one piece of 1708 on the outside of my plate. Once cured, I pulled it off and marked it and trimmed it. It was really close but I noticed I had to slightly squeeze the sides of the ride plate and it fit perfect with the correct shape and height. So I compressed the side of the plate (see the 2x4s on the sides) and laid up more glass.
12795f8019652e93b9733a2617df031c.jpg

After that, I trimmed it again and it fit.
1133d69ea660767d0bd688d7cea34e76.jpg


Was going to just finish it with black paint but I had some leftover carbon so decided to make it a little pretty. I sanded it to flatten it some but didn’t get crazy since it’s a ride plate. Overlayed with carbon and trimmed. Then laid more resin, sanded, and cleared.
Trust me man I won’t make fun of anyone I’m in the same boat lol. Looks like it worked pretty well to me! I’ll most likely do the same thing!
 
This is awesome, I almost bought that ski before I bought my titan pro! I wish they all would have came setup to run a 155, especially with the later model badass/titans...also wish I would have looked further into this before finishing my ski but I wouldnt have the guts to cut into it like you did! Nice job!
 

DylanS

Gorilla Smasher
Location
Lebanon Pa
This is awesome, I almost bought that ski before I bought my titan pro! I wish they all would have came setup to run a 155, especially with the later model badass/titans...also wish I would have looked further into this before finishing my ski but I wouldnt have the guts to cut into it like you did! Nice job!
Thanks man! I really wanted a circus but I couldn’t pass up on the deal for that price. The paint was horrendous (although it was all airbrushed I’m sure it took months). There was a fair bit of cracking on the hood but so far everything else was only paint deep.
I was very hesitant to hack it up but I’ve seen people go a lot crazier on hulls. We’ll see how it runs with a skat 155 mag and a 1200, I’ve seen 1200 freaks do crazy stuff with 148’s.
It should clean up very nice, I’ll be brushing on black gel coat to the tunnel specifically once I’m done.
Paint showed up today.. 11985794-FFAF-4BDA-91AC-A8E021570245.png94C9DC28-DC85-40A9-ABD0-CD8A46E05219.jpeg
 

DylanS

Gorilla Smasher
Location
Lebanon Pa
Love this ski nice work, also love that color!
Thanks, I was anticipating the color to be a bit grayer than it is but it should still turn out pretty cool!
Doing too and bottom deck in one color and think I’m going to sketch up a graphics package that includes purples, whites, and blue shades to have printed out. Then maybe “Casual in the streets Freak in the sheets” for the bottom :)
 

DylanS

Gorilla Smasher
Location
Lebanon Pa
Anyone know what length shaft the BA uses? I’m assuming standard SJ length?
I forgot to measure before sending it out for paint and I’d like to get one ordered now so I can have it ready to rock when the ski comes back. I’ll be using a skat 155 mag setback but I’m not sure with skat if the shaft will work at roughly the same length as oem.
 
Top Bottom