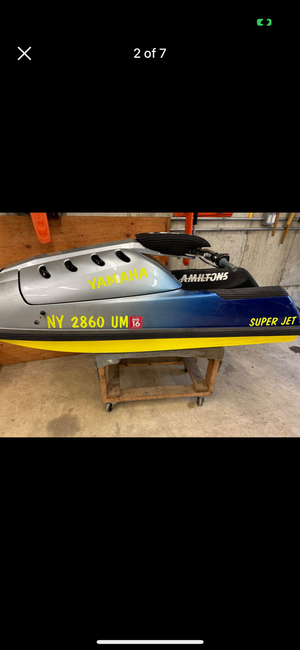
Freestyle Carbon Kevlar Rickter FS-2

Several months ago I picked up a Carbon Kevlar Rickter FS-2 hull from Freestyle Connection. I figured I'd start this thread to document the build and to solicit advice from those who have more experience building skis than I do. I believe this used to be Taylor Curtis's old hull. I'm not sure if anyone else besides Taylor owned this hull prior to Chris. I'm assuming so based on the 2019 registration sticker.

To make a long story short, I've been mulling over picking up an aftermarket hull to replace my beat up round nose Superjet for some time now. Personally, I enjoy the way the Superjet hull rides and I'm usually on the lake chasing boats so I didn't want a hull that was too flat water focused. I would day dream about buying and building a ZaxJet 2Ride but I could never bring myself to spend the money considering I really don't ride too terribly often.

My brother and the friends I ride with all called me dumb for wanting an aftermarket Superjet hull; so I went and bought a Rickter FS-2. When I was younger my brother had a Rickter FS-2 that he absolutely loved and raves about to this day. Unfortunately I never had the chance to ride it before it was sold so I'm going in blind here. Fingers crossed I don't end up regretting this purchase, though I don't believe I will.

My plan is to take the guts from my Superjet and transfer them over to this hull. I'll be running the following:

- 61x / 62t - Ported 718cc - built by @Jr.
- Factory B-Pipe W/ ported manifold
- Aftermarket Head + Pump Gas Domes
- OEM SBN 38s + VForce 3 Reeds
- MSD Enhancer
- 148mm Torrent Setback Pump


g2philh.jpeg

KrQ6xRc.jpeg
 
Once you ride an aftermarket ski and get comfortable on it you won't ride a superjet for rec riding anymore.. I'm not very familiar with the fs-2 i know it was an earlier model. It will still be a very solid upgrade from the superjet hull. I bought my superfreak as a project and completely restored it. Never rode one before buying this one. I could not believe how much better it is than my superjet. My superjet was shortened and rockered as well and the superfreak was 10x better in my opinion. Youll get the same feeling with your fs-2. personally get rid of the 38s in favor of a set of 44s or 46s. You have a ported cylinder and cases, the carbs are now your choke point. Unless you want fuel economy
 
I love my FS-2. Rides really well I prefer it over a lot of others. It’s a great Superjet replacement, but it’s always good to still have a superjet.

That's also the first time I've ever heard anyone on these forums wanting a Zaxjet 2Ride. I'm pretty curious how those are or if anyone state side has got one.
 
Last edited:
Once you ride an aftermarket ski and get comfortable on it you won't ride a superjet for rec riding anymore.. I'm not very familiar with the fs-2 i know it was an earlier model. It will still be a very solid upgrade from the superjet hull. I bought my superfreak as a project and completely restored it. Never rode one before buying this one. I could not believe how much better it is than my superjet. My superjet was shortened and rockered as well and the superfreak was 10x better in my opinion. Youll get the same feeling with your fs-2. personally get rid of the 38s in favor of a set of 44s or 46s. You have a ported cylinder and cases, the carbs are now your choke point. Unless you want fuel economy
I was also eyeballing Superfreaks as well for an AM hull. I've always liked the way they looked. Never ridden one either but always read they were great all around hulls. Its a shame TEM stopped producing them. Do you really believe it's worth bumping up to 44s + aftermarket manifold over the OEM 38s? I've heard that on a 718 going to 44s only makes a negligible difference. If I was running a 780+ I feel like that's when I should really bump up to 44s.

I may just say F-It and buy a pair of 44s once I get the FS-2 together just to try it out and see what it's like.

I love my FS-2. Rides really well I prefer it over a lot of others. It’s a great Superjet replacement, but it’s always good to still have a superjet.

That's also the first time I've ever heard anyone on these forums wanting a Zaxjet 2Ride. I'm pretty curious how those are or if anyone state side has got one.
I've also never seen anyone on these fourms, or even facebook groups mention ZaxJet. Their only real presence from what I can find is on Instagram but they're constantly posting content and responding to messages. I had inquired about buying a 2Ride via Instagram but if I remember correctly shipping to the states from Dubai (IIRC) was going to be somewhere from $1000-$1500.

Their hulls look solid.
 
Yes i absolutely think you will notice an increase in power going to 44s. If you run a stock 44 manifold then be sure to fill the crossover tube..760 carbs will work fine but mikuni 44s without chokes will be easier to tune. The only benefit to the 38s is negotiably better off idle throttle response depending how you set the 44s up with jetting, and better fuel economy. If you're riding a rickter of any type, the last consideration should be fuel economy. They make an improvement on even a completely stock 701 with a pipe.
 

Roseand

The Weaponizer
Site Supporter
Location
Wisconsin
I've run 38s on a 781 with a PFP and had great results. Ski flatwater flipped no problem. Plenty of people running 38s on 701. Sure, you might make more power with 44s but unless you're trying to flatwater flip which isn't what you're doing I'd stick with 38s. Now, if you're not happy with the power and really want more then go for it.
 
Thanks to everyone whos taken the time to post in this thread thus far. Now that we're nearly through October I decided it was time to put an end to my season and get this show on the road. I suspect with the work I have ahead of me I wont get this ski up and running for several months, so I best get started now.

First set of tasks on the to-do list is to clean the hull up to my liking. I'd like to start with the following:
- clean the dirt and debris out of this hull as its obvious its been sitting for some time.
- Remove the existing UFO mounts from the hull as I won't be using them for my setup.
- grind out the leftover and excess epoxy throughout the hull and laydown carbon sheets to cover up the affected areas.
- There's also some holes throughout the hull I'd like to patch.


Below you can see the UFO mounts and excess epoxy I need to remove from the hull.

ugzeOQW.jpg

xSaQlkR.jpg


My plan is to take an oscillating tool to the UFO mounts to remove them from the hull. Once the old UFO mounts are removed my plan is to use a small 2in pneumatic orbital with 120 grit (or less) sandpaper to remove the leftover and excess epoxy.

Is there a better way I should go about removing the UFO mounts and epoxy from the hull? Should I use a stripping disk or fiber wheel, would that work better?

Here's where I need to start asking questions because I know poop about licorice when it comes to working with composites and epoxy. I've done some reading of existing threads here on the X to get an idea of what I should be doing but unfortunately I haven't had enough time to become well versed.

Since my plan is to lay down cosmetic carbon fiber patches to cover up the areas I've ground down I don't believe I'll need a high weight heavy cloth? Could I get away with an 11oz 2x2 Twill Weave? Epoxy Wise I've read good things about US Composites 635 Thin Epoxy System mixed at 3:1. Am I on the right track here?

Technique wise, is the idea to mix the epoxy, soak the cloth, lay down the cloth, and squeegee out the excess epoxy? Youtube video as an example.
My humble opinion is for COSMETIC 11oz is too heavy. 5.7 oz 2x2 twill will give you the carbon cosmetic look, conform better and actually still offer some structural benefits. I’ve used gallons of US Composites resins, 3:1 is more structural, not the best choice for laminating. It has zero UV resistance and will yellow within days of curing. Depending on temperature , the warmer it is, 3:1 will trap more bubbles as is it cures faster. Slower non-blushing 2:1’s with UV inhibitors are a better choice for surface laminations especially if you intend to leave clear for that carbon look. The longer cure time allow bubbles to rise to the surface where you can flash them with a torch. Squeegeeing is not gonna be a good idea with 2x2 twill, it’ll just pull apart. As little handling as possible with twills. 2:1’s epoxies can be fussy though, make a small part like a battery tray or something and laminate it if you’ve never worked with them, long cure times and mixing is critical. You wouldn’t want to learn what you did wrong on entire engine compartment layup.
 
Last edited:
Thank you for taking the time to write all of that information out @mikesx. You've given me quite a bit to research. I had no idea epoxy that wasn't UV resistant would turn yellow after curing. I always assumed that was caused by long term exposure to the sun and wouldn't be an issue for composites in low exposure areas such as interior of a jetski hull.

Based on your experience, do you have any recommendations for epoxies? Doing some quick googling for UV resistant epoxies returned a lot of results for epoxies designed to be used for art and woodworking (epoxy tabletops...etc.). I did find West Systems 105 Epoxy Resin which looks like it can be combined with West Systems 207 Special Clear Hardener to achieve the desired results.

I'm definitely going to take your advice on trying to laminate a test part before I try this in my hull. I've watched a few Youtube videos on making composite molds. I'd like to give making a chinpad a whirl though even that may end up being a little too advanced.

I feel like what I'm about to ask is rhetorical. When shopping for fabrics should I look specifically for a 5.7oz 2x2 weave (this one is biaxial)? Or would I be safe rounding up to a 6oz 2x2 weave?
 
Go to US Composites site and just start reading, they gotta lot of good info on there. I like them for the one stop shopping, carbon , glass , epoxies, fillers and additives. I use their 3:1 and 2:1 635 for everything I’ve built except for final clear. I use SC110 for final , great UV resistance. The way I make most of my parts is without a mold, buck and build up, kinda freestyle building what I need. Not worth the time OR more like I don’t have the patience to build molds for one off pieces. I say 5.7 2x2 carbon because that’s what they have. When it comes to fillers my advice is stick with West Systems stuff, also available at US Composites, though I do use US’s cabosil.
Here’s a build where I freestyled some carbon parts:
 
Last edited:
When it comes to hand laying glass or carbon, I also agree that using multiple layers of a lighter cloth will get better results than trying to use a heavier cloth or twill..6-8oz is ideal. When I first tried doing glass work, I made a few bad decisions due to lack of experience and ended up doing a few jobs twice because of it. One thing that made it much easier was doing just that, using more layers of say 6oz vs 1 12oz piece. The lighter weigh cloth lay down much easier over the work surface. One other thing that saved lots of time was after my final lsyer was putting a layer of peel ply as it helped keep the cloth down and also removes the anime blush that is left with the curing process. Also greatly reduces sanding afterwards. West systems sells a book that goes in great detail all of the different uses and products for composites that will help you tremendously in the beginning stages of learning glass work. https://www.westsystem.com/instruction/instruction-manuals/fiberglass-boat-repair-maintenance/ here is a free download.
 
Can't believe It's been a over a month since my last post. Life gets in the way. Don't fret though, I've made progress. First task on the list was to push the Rickter hull out of the house and into garage. It's sat in my storage room since I took delivery of the hull on August 22nd of this year. To make room in the garage, I said sayonara to the Superjet.

I left the hull as complete as possible to make my life that much easier if I ever decide to build it up again. All it needs to be complete is a motor and electrics. If this project ends in success I may consider tackling installing RRP foothold buckets + defoam + refoam. As I put the hull in storage I wondered to myself if I would ever ride this hull again.

28Vv5bB.png

9EcR1gt.png

Rh9Myux.png

Rc9XvXz.jpeg

91CjXD1.jpeg
 
It took some time but eventually I was able to get the FS2 stripped down to the bare hull, nuts & bolts, including the pole. Overall the hull is in relatively good shape for its age. As everyone knows though, the best part of buying anything used and tearing it down to it's individual components is you typically more reveal issues and imperfections you hadn't noticed before. Again though, nothing that's devastating for a hull that's ~10 years old and been ridden hard.

The hardware was relatively easy to remove from the ski though a few bolts did have their challenges. Most of the bolts had red Loctite on them and minor corrosion on the threads. Only a single pinch bolt in the bottom half of the handle-pole refuses to budge. I've tired all manner of heat + pb blaster + uggaduggas with no luck. I'll have to visit a machine shop to have it removed.

While removing the pump and rideplate I nearly had a panic attack while attempting to thread the hardware back into the hull so I didn't lose it. One rideplate bolt & one pump bolt refused to re-thread fully into the hull. For a few minutes there I worried I would be cutting the tray open to replace the threaded inserts in the hull or having to thread in a helicoil and pray.

Thankfully I was able to run a Harbor Freight M8 x 1.25p thread chaser through all of the inserts in the hull (pump, rideplate, midshaft, motor mounts...etc.) and chase the threads clean of the leftover Loctite and corrosion. Now all of the threads on the hull are buttery smooth. Needless to say, I'll be putting grease on all of the hardware when it's reinstalled. There's nothing worse than fighting with stuck hardware when you go to disassemble something.

ahGw9tN.jpeg

6ZHhj8T.jpeg


I also discovered something I've only read about but never encountered before, drain screws. There are small Philips head screws at the bottom of the chines on the rear of the hull. I've read mixed things on drain screws and I'm curious if anyone knows if they're truly required on this hull. From what I understand they're used to drain all of the water that is potentially trapped within the foam underneath the tray. I do believe there is foam in the rear of this ski as I accidentally took a small core-sample of some while chasing the threads in the pump tunnel. It did not come out wet.

PYNjbcN.jpg


I did order some Versiplug Micro Small Balls to replace the screws in the bottom of the hull. After seeing how much of a hole I actually have to drill to install them, and considering the placement of the existing screws I'm curious if I should just leave the screws as is, or remove them and fill the holes with epoxy.
 
I've read Rickter's hoods during this time period were known for being relatively soft. Unfortunately mine has some damaged areas as well. I don't think the damage is anything too serious but I've also never repaired anything like this before.

The area of the hood along the hood-seal where the two halves of the hood are bonded together is starting to separate. I was thinking of trying to lay a thin bead of epoxy or possibly inject a thin-ish epoxy into the areas that are beginning to separate. Somehow I don't think injecting a thinned epoxy would work as I couldn't apply any real clamping force to bond the surfaces together without damaging the outer shell of the hood.

mmmmn finger hair.

3eAN6FU.jpg

YB1pfph.jpg


The next area is a chip on the corner of the hood that appears to be the result of a drop. I don't know if this is worth tackling but if I do I was brainstorming using a thickened epoxy (Cabosil) or structural putty (Polyester Structural Marine Putty) to reconstruct the corner. I'm sure if I did that though there would be no hope of making it look OEM? Or maybe I lack the ability to make it look OEM.

g0Y6t6C.jpg


Anyone have any suggestions or tips on how I should repair this hood?
 
Last edited:
It took some time but eventually I was able to get the FS2 stripped down to the bare hull, nuts & bolts, including the pole. Overall the hull is in relatively good shape for its age. As everyone knows though, the best part of buying anything used and tearing it down to it's individual components is you typically more reveal issues and imperfections you hadn't noticed before. Again though, nothing that's devastating for a hull that's ~10 years old and been ridden hard.

The hardware was relatively easy to remove from the ski though a few bolts did have their challenges. Most of the bolts had red Loctite on them and minor corrosion on the threads. Only a single pinch bolt in the bottom half of the handle-pole refuses to budge. I've tired all manner of heat + pb blaster + uggaduggas with no luck. I'll have to visit a machine shop to have it removed.

While removing the pump and rideplate I nearly had a panic attack while attempting to thread the hardware back into the hull so I didn't lose it. One rideplate bolt & one pump bolt refused to re-thread fully into the hull. For a few minutes there I worried I would be cutting the tray open to replace the threaded inserts in the hull or having to thread in a helicoil and pray.

Thankfully I was able to run a Harbor Freight M8 x 1.25p thread chaser through all of the inserts in the hull (pump, rideplate, midshaft, motor mounts...etc.) and chase the threads clean of the leftover Loctite and corrosion. Now all of the threads on the hull are buttery smooth. Needless to say, I'll be putting grease on all of the hardware when it's reinstalled. There's nothing worse than fighting with stuck hardware when you go to disassemble something.

ahGw9tN.jpeg

6ZHhj8T.jpeg


I also discovered something I've only read about but never encountered before, drain screws. There are small Philips head screws at the bottom of the chines on the rear of the hull. I've read mixed things on drain screws and I'm curious if anyone knows if they're truly required on this hull. From what I understand they're used to drain all of the water that is potentially trapped within the foam underneath the tray. I do believe there is foam in the rear of this ski as I accidentally took a small core-sample of some while chasing the threads in the pump tunnel. It did not come out wet.

PYNjbcN.jpg


I did order some Versiplug Micro Small Balls to replace the screws in the bottom of the hull. After seeing how much of a hole I actually have to drill to install them, and considering the placement of the existing screws I'm curious if I should just leave the screws as is, or remove them and fill the holes with epoxy.
If the construction of that FS2 is similar to my FS1 you’re gonna need those drains. Where the bolts pass thru the sides of the hull to hold the plates for the foot hooks, on my boat at least it’s double wall with a gap between inner and outer wall and there’s just no practical way to completely seal those pass thru holes. I had at least a gallon of water after each ride when I ran plugs, so I switched to drains. Also pressure check your cooling lines/trim tube. Here’s everything I went thru with an old Rickter, and always use a rethreader to straighten threads, taps are for cutting threads.
 
Last edited:
I've read Rickter's hoods during this time period were known for being relatively soft. Unfortunately mine has some damaged areas as well. I don't think the damage is anything too serious but I've also never repaired anything like this before.

The area of the hood along the hood-seal where the two halves of the hood are bonded together is starting to separate. I was thinking of trying to lay a thin bead of epoxy or possibly inject a thin-ish epoxy into the areas that are beginning to separate. Somehow I don't think injecting a thinned epoxy would work as I couldn't apply any real clamping force to bond the surfaces together without damaging the outer shell of the hood.

mmmmn finger hair.

3eAN6FU.jpg

YB1pfph.jpg


The next area is a chip on the corner of the hood that appears to be the result of a drop. I don't know if this is worth tackling but if I do I was brainstorming using a thickened epoxy (Cabosil) or structural putty (Polyester Structural Marine Putty) to reconstruct the corner. I'm sure if I did that though there would be no hope of making it look OEM? Or maybe I lack the ability to make it look OEM.

Anyone have any suggestions or tips on how I should repair this hood?
I absolutely LOVE the look of that Kevlar, the strength of it , and the flexibility of Kevlar.
I ABSOLUTELY HATE that Kevlar when it comes to working with it.
Kevlar does not cut clean , even when it’s encapsulated in resin epoxy. It was properly applied in one of my builds in the tray area, perfect area to use it, lots of flexing going on in the tray. I had to cut thru it to install footholds, and even with a cut off it doesn’t really cut, it more like burns. And it doesn’t sand for chit. If I were dealing with that hood I’d probably just lightly sand a little around the chip, you don’t want to fray that Kevlar, and lay some UV inhibited 2:1 clear on it, buff it and polish it in, and call it good. Cured 2:1 is pretty flexible, should stay attached while preserving the original look.
 
I've read Rickter's hoods during this time period were known for being relatively soft. Unfortunately mine has some damaged areas as well. I don't think the damage is anything too serious but I've also never repaired anything like this before.

The area of the hood along the hood-seal where the two halves of the hood are bonded together is starting to separate. I was thinking of trying to lay a thin bead of epoxy or possibly inject a thin-ish epoxy into the areas that are beginning to separate. Somehow I don't think injecting a thinned epoxy would work as I couldn't apply any real clamping force to bond the surfaces together without damaging the outer shell of the hood.

mmmmn finger hair.

3eAN6FU.jpg

YB1pfph.jpg


The next area is a chip on the corner of the hood that appears to be the result of a drop. I don't know if this is worth tackling but if I do I was brainstorming using a thickened epoxy (Cabosil) or structural putty (Polyester Structural Marine Putty) to reconstruct the corner. I'm sure if I did that though there would be no hope of making it look OEM? Or maybe I lack the ability to make it look OEM.

g0Y6t6C.jpg


Anyone have any suggestions or tips on how I should repair this hood?
Didn’t see that last pic, maybe some chopped carbon, epoxy and cabosil. Build it bigger , sand it back, flip it so it’s hanging down , clear UV resin build up hanging off the corner for a finish.
 
I’m building my first “flat water ski” or just reck ski also. It’s an old wammer hull that was abused and needs a lot of work. Not trying to jump your post but just gunna follow along to get tips for carbon and Kevlar repairs!!!IMG_0225.png
 
Top Bottom