Completed 650SX Build - From 50Hp to 60+

Thanks bro, I want to make sure that anyone trying these mods can see exactly what it looks like and how it was done. There's nothing worse than a good build with missing info. As an update to my thread though since I'm here, I made a carb adapter for my Mikuni SBN44 to fit the stock manifold and I must say that I'm sold on the Mikuni's. I messed with jetting, pop-off pressures and mixture screw settings with the Keihins but never could get them to dial in just right. They always ran rough unless the ski was left untouched from stock.

From my own experience, the blue 42mm Keihin carb was by far the worst investment I spent on that ski. It may have everything to do with the fact that the carb came from a seller with a reputation for selling junk, or the fact that I had to make a fuel line fitting for it as it came broken from the seller like that, or the fact that the seller didn't send the original fuel pump body with it even though it had a broken fuel hose fitting. Either way, it was a terrible purchase and I strongly believe that these carbs are no good for these skis. They were probably designed more for the exhaust set-ups on X2's. Correct me if I'm wrong but a recent thread I was reading somewhere suggested that the exhaust set-up for an X2 uses a silencer in the rear exit hose routing whereas the 650sx muffles through the waterbox.

Either way, Mikuni has a permanent place on my manifold. Anyone that uses this thread to help them out with doing their own mods should keep in mind that if you have a Mikuni SBN44 and a manifold adapter, have your manifold bored out to match to the adapter I.D. I bored my manifold a long time ago to 42mm and never bothered with it since, after putting the SBN adapter on, looking down into the I.D. I see a very noticeable ledge from the smaller bore of the manifold compared to the adapter. I bet that hurts the air flow pretty good so you want to have your manifold bored out to match the adapter I.D. Also, the stock F/A can be modified slightly to fit the Mikuni, it's just a matter of oversizing the bolt holes by one or maybe two drill bit sizes larger. The stock holes are only out by about 0.100" so it won't take much. Right now I'm using an OceanPro Vortex F/A just because I had two of them on my Sea-Doo and recently replaced them with one solid one to cover the two carbs. I'm not too sure if the stock F/A with that big scoop hood will allow enough airflow to meet the demands of the big Mikuni but it might be worth a try, definitely better protection from water ingestion. Lastly, the SBN44 is much better on fuel than the Keihin 42. I get about 2 hours out of a tank with the SBN, the blue Keihin guzzled a tank in about an hour. More mods will be posted as I acquire them...the next one will be going from a stock impeller to a Solas stainless one.

Something I forgot to mention, in the past when I was getting most of my mods done around the same time I was having issues with keeping my ski running. I checked into everything from throttle shaft bushings, to crank seals to gasket leaks. The symptoms were that if it sat for a week or so it would run fine for about 45 minutes then shut down as if I touched the stop switch. Then when re-starting it, it would do it again but anywhere from 10 minutes of run time to as little as 10 seconds. I replaced everything mentioned above with no changes, I finally decided to change out the CDI/Coil pack (Kawi calls it the igniter) and that was the cure, just a little something to keep in mind if you run into a similar problem.
 
Last edited:
im actually doing the same thing to my ski right now because i saw this thread about 2 months ago... and since u posted up about the mikuni sbn 44 i am about to get the carb... my exhaust and intake mani are at the machine shop as we speak getting bored out... i also have a stock exhaust laying around that im gonna hack off the stinger to make my poor mans b pipe.. lol.. i started a thread in ski buildups because im also flat decking my ski and reinforcing the hull.. eventually id like to find a 750 motor and put in there... thank you for this thread!!! its awesome!!!
 
December 11 - 2010 Update:

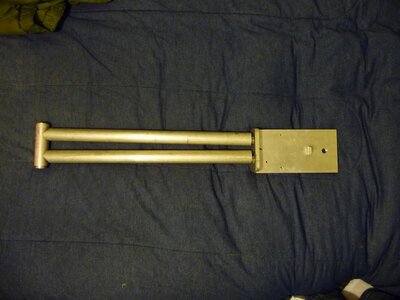
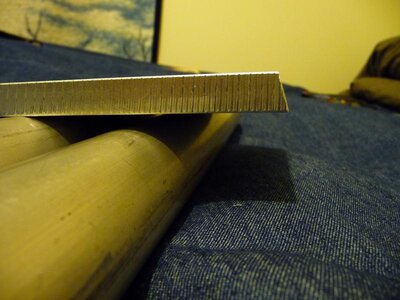
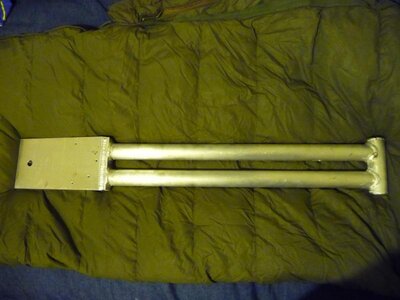
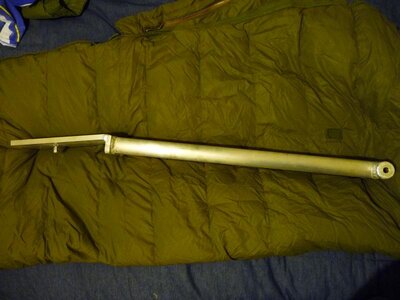
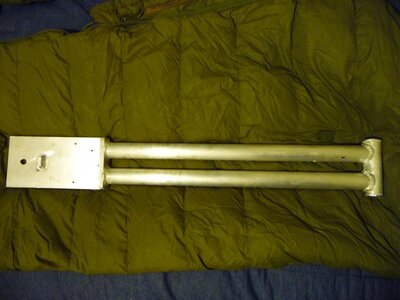
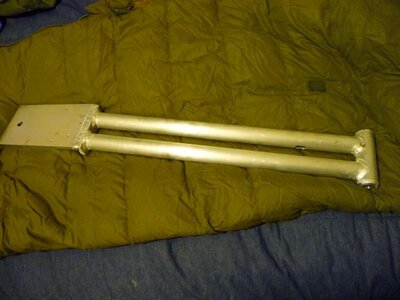
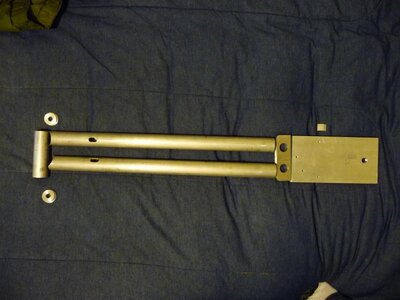
Today was fab day at a buddy's work. Over the last couple of weeks I put together a basic concept aluminum handlepole. Through the course of today, my buddy and I went to his work (which is a welding and fab shop) and we welded up all of the parts. The overall length is about 38 inches and about five inches wide. I drilled holes in the plate where the tubes were to be welded so I can run my cables through. Then finished the tubes off with two holes drilled near the bottom and cut the remaining material out of the centers making ob-longed holes. It should be big enough to allow the cables through. Once routed, I plan to just leave the cables in the stock through hull set-up since it seems to be pretty water tight. I measured all of my threaded hole locations from the stock set-up so I can mount my steering plate and cable guides to maintain smooth corners and prevent any cable binding. Added in a little steering stop and next time I work on it, I plan to paint it a nice metallic blue with a good clear coat and that should look quite nice.
 

Attachments

  • P1000296.jpg
    P1000296.jpg
    51.8 KB · Views: 184
  • P1000297.jpg
    P1000297.jpg
    72.9 KB · Views: 154
  • P1000298.jpg
    P1000298.jpg
    51.4 KB · Views: 145
  • P1000299.jpg
    P1000299.jpg
    72.1 KB · Views: 143
  • P1000300.jpg
    P1000300.jpg
    77.8 KB · Views: 145
  • P1000301.jpg
    P1000301.jpg
    58.2 KB · Views: 146
  • P1000302.jpg
    P1000302.jpg
    49.5 KB · Views: 143
  • P1000303.jpg
    P1000303.jpg
    52.5 KB · Views: 147
  • P1000304.jpg
    P1000304.jpg
    50.4 KB · Views: 151
  • P1000305.jpg
    P1000305.jpg
    49.8 KB · Views: 167
Thanks matt, I just finished making a new extension chamber for my Westcoast exhaust. Hopefully it will hit just as good if not better than the stock mod set-up. The handlepole has been painted too and pics will be up shortly.
 
Location
NW PA
you could have saved substantial weight where it's important on that pole by using thinner aluminum. Great budget mods, how much do you have in it now excluding labor?
 
you could have saved substantial weight where it's important on that pole by using thinner aluminum. Great budget mods, how much do you have in it now excluding labor?

Yes I know, but we didn't have any thinner material at work than that and what you see there was free so I'm not complaining. The weight of it is actually not too bad. It still weighs less than half of the stock pole. I figure the new one comes in at about 13lbs where the stock pole was something like 34-37lbs. If I had to guess at how much I paid out for everything, I would think somewhere in the neighborhood of about $125.00 to $185.00 The only parts I bought before I went outside of the stock set-up were rubber couplers for the B-pipe, fuel lines, a copper elbow for the waterbox, stainless gear clamps, stainless bolts, a small assortment of pilot and main jets, paint, and some consumables such as brake clean, gasket sealant, and cold weld. In my honest opinion, the B-pipe mod is most likely the most important mod that anyone would need to do if they can't get around to the other mods before the season starts.
 
Who's up for some old school eye candy? In the pic you have my modified and re-painted Westcoast exhaust, mostly D-cut stock ride plate...the details of why it turned out like it did aren't important :biggrin: ...my re-modified stock intake manifold and the new handlepole with some color on it...finally.

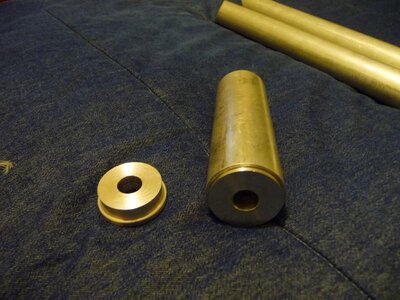
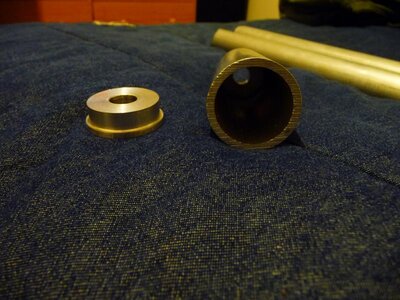
The exhaust was the way you find most Westcoast pipe set-ups, short expansion chamber and all tailored for top end. The pipe worked fine that way but it was lacking substantially in bottom end so I added the straight piece in the middle hoping to get the same result if not a better one as my stock pipe mod. I was fortunate enough to find a 4-7/8" I.D., heavy walled piece of aluminum pipe at work. Then turned it in the lathe to get my 5" I.D. to match the Westcoast. I turned a small shoulder into the inside diameter a 1/4" deep bringing the wall thickness to about 0.150" and slipped it onto the pipe and stinger. Now there won't be any exhaust leaks since this one liked to leak at the rubber coupler and the extension is welded onto the stinger side. I also re-bored the intake manifold to match the Mikuni SBN44 to an I.D. bore of 44mm. Hopefully this set-up will be a step in the right direction for more bottom end. I'll post an update when the lakes are good to go.
 

Attachments

  • P1000413.jpg
    P1000413.jpg
    95.2 KB · Views: 291

jeremy chambon

Need more power
Location
rockford MI
that pole is awesome i was thinking about building one i going to school for welding and my friend works at a machine shop. any advice and how much did u end up having in to the pole?
 
All my materials were free for everything I made. The pole, the pipe extension tube for both the stock pipe and Westcoast pipe, the short pump cone, and all the labour that went into it was all free. I made the cone, but I don't know too much about the CNC machines so I had a couple of guys do the bore work here and there when the time permitted. The welding work was all done by a buddy of mine in another machine shop so that was free too. As for suggestions with modifying the Westocast pipe, I really don't have any proven suggestions as to what works yet. I just measured the length of the expansion chamber from the stock pipe with the added 4 inch center section, and used that as my targeted length. It ended up being about 14.5 inches. If it runs like a dog then I know I need to start cutting an inch at a time off until I get similar performance and feel as the modified stock pipe.

But if the extension works out well as it is right now, then the only thing I would say is to make sure you put a shoulder on the inside of the extension. I have noticed that not only with mine, but a lot of other Westocoast pipes for this ski leak exhaust and water quite a bit around the rubber coupler. So I made my extension have a 1/4 inch deep shoulder on both sides so the main portion and the stinger will have to fit inside the extension. I also had to take the main portion to the belt sander and get the outer edge of it ground down just enough to squeak it into the extension. This will give you a lot more insurance of having a well sealed assembly. Your extension might not need to be as long as mine had to be either, it all depends on how many rings are on your pipe. Mine only had 7 and the expansion chamber was too short. It worked well enough to run alright on top end but I'm not looking for top end, I want to do some freestyle so I needed to lengthen the pipe for maximum bottom end. I just hope it works out lol. Here are a couple of pics showing what I mean with the shoulder and ground down main pipe. Also, I did have to turn the inside of the extension, it was a pretty heavy walled piece of pipe...something like 3/8" wall thickness. The I.D. was under 5 inches and the O.D. was somewhere around 5-1/16". Anyway, here are the pics.

Forgot about the pole lol. It wasn't too technically involved so I guess my only thoughts are to maybe try and keep it 2 or 3 inches shorter than the stock one. I will draw up a pic showing measurements because I did them on the fly and I don't remember them.
 

Attachments

  • P1000415.jpg
    P1000415.jpg
    46.3 KB · Views: 147
  • P1000416.jpg
    P1000416.jpg
    61.4 KB · Views: 140
  • P1000420.jpg
    P1000420.jpg
    57.7 KB · Views: 155
Last edited:
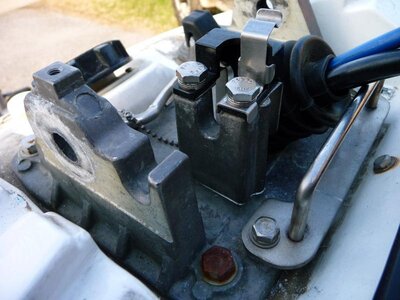
I ran into one small problem with mounting the new handlepole. That little tower at the base of the pole which has that pin on the ball chain for propping it up is interfering with the new pole. It won't allow the new one to lay flat so if anyone does make a similar pole, you will either need to get another mounting plate and cut off that pin tower, or cut it off of the plate already on your ski. I would rather keep a stock plate than cut up my only one just encase I needed to go back to the old set-up. Something to keep in mind.
 
I had to delete my last posting which had a diagram of my custom made handlepole. If anyone grabbed a copy of it hold off with the fab work and most importantly for now, DON"T CUT OFF THE PROPPING TOWER!!. I ran into a few problems that ended up temporarily costing me a top mounting plate...good thing I already had another on order as I was anticipating this might happen. I'll post pics of the custom pole shortly when I come back but basically, I figure that if I had 2 inch diameter tubing which is what the diagram I found used, I might have been ok. But because there wasn't any at work I went with heavy walled 1.5 inch. I may have even been ok if I didn't get forced into heavy walled but the end result is that the steering cable will not squeak into the tubing at the ob-longed holes near the base and the two tapped holes for the cable bracket didn't align at all which makes me think I mapped them out from the wrong side of the plate. Either way, the stock pole will be going back on for now and I will continue to toy with what I have and see how I can modify it to work. Pics will be up soon...oh and remember that gargantuan beast of a modified Westcoast pipe? Well it's not so gargantuan now lol. I had to part 3 inches off tonight because it used ALL available room inside that exhaust pipe area. Pics of that will be posted too.
 
Last edited:
Ok, so the propping tower that I mentioned...the last pic, don't do this until you have every possible issue and detail worked out with your design lol. The other pics are pretty straight forward. Check out that pipe...oh yeah, too bad it left no room for engine movement, hull and gas tank clearance, or smooth exhaust tube angles. The handlepole does look good though, maybe later this summer some bugs can get worked out. Also you see that I had to part off 3 inches of pipe, hoping that it fits tomorrow and I figured I would show how I mounted up my throttle cable to work with the Mikuni SBN44. Basically it's just a stainless piece of thin plate, about 1/16" thick if I remember correctly, bent and twisted using a bench vise and adjustable wrench, and a hole drilled at both ends matched to fit the case stud and throttle cable sizes. Then a little slot cut out to the left of the throttle cable hole so it can be slipped into the bracket quickly and secured into place. Enjoy.
 

Attachments

  • P1000426.jpg
    P1000426.jpg
    70.9 KB · Views: 229
  • P1000429.jpg
    P1000429.jpg
    70.9 KB · Views: 268
  • P1000422.jpg
    P1000422.jpg
    105.1 KB · Views: 249
  • P1000430.jpg
    P1000430.jpg
    66.6 KB · Views: 218
  • P1000428.jpg
    P1000428.jpg
    71 KB · Views: 250
  • P1000425.jpg
    P1000425.jpg
    85.6 KB · Views: 247
  • P1000423.jpg
    P1000423.jpg
    107.7 KB · Views: 269
Last edited:
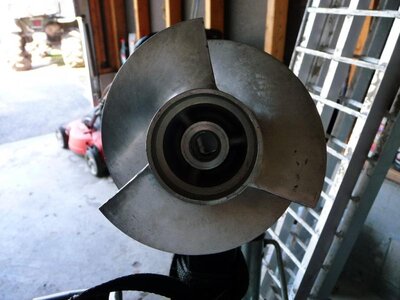
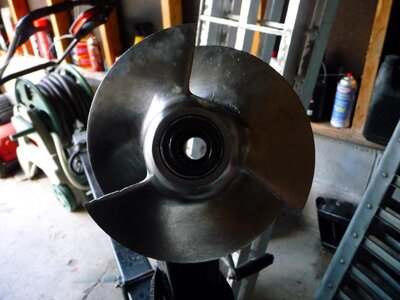
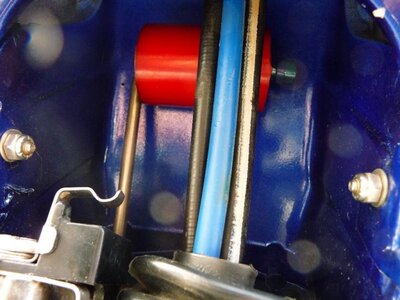
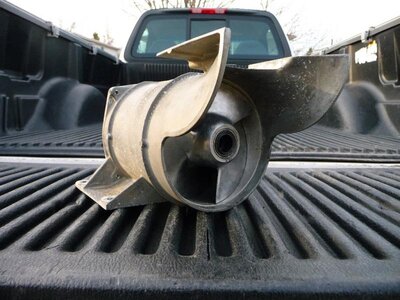
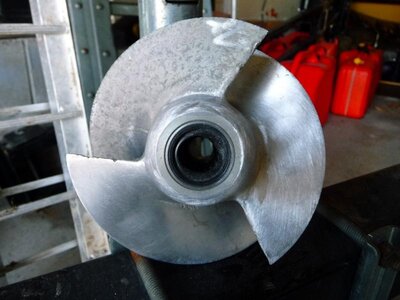
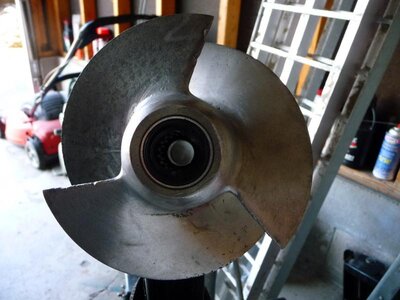
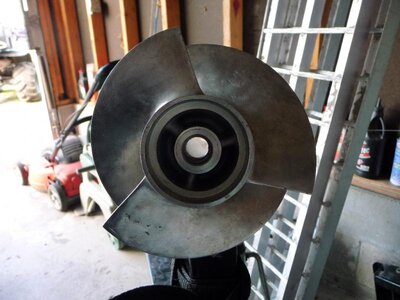
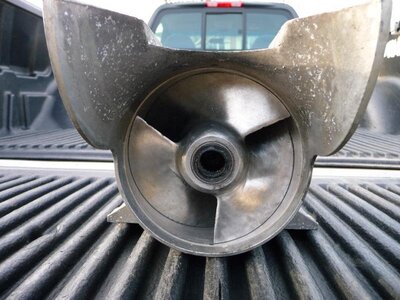
I figured out a fix for my propping tower. I drilled out the holes on the top where the two stainless M6 bolts are, and oversized them to be just slightly larger than 1/4". Then I placed the tower back onto where I cut it off of, dropped a punch into the holes and started setting up for drilling. I drilled the corresponding drill for a 1/4-20 thread pitch about 3/8 to 1/2" into the plate, tapped it and picked up a couple of 1/4-20 bolts 2 1/2" long and blue Loc-tite and secured the tower back in place. It worked very well and held the pole up with no troubles. I worked on re-installing the stock pole and some other things for about 6 hours and all is good. I also thought about trying to polish the stock impeller for some fun. I figure there must be a legit reason why all the Solas impellers and pro powerboat props are polished. So, my stock aluminum impeller seen some shine. I didn't think about pics at the time though, so at the last minute I grabbed a camera and was able to give you one blade untouched and the rest was well under way. I also thought I would add a little piece of oversized rubber dowel in place of the little stock black thing on the pole spring to get the spring actually working. Last season I noticed that my spring was so compressed that didn't make any contact with the pole until it was half way down.
 

Attachments

  • Polish 3.jpg
    Polish 3.jpg
    56.2 KB · Views: 156
  • Polish 5.jpg
    Polish 5.jpg
    58.5 KB · Views: 150
  • Pole Spring Mod.jpg
    Pole Spring Mod.jpg
    61.9 KB · Views: 166
  • Propping Tower Repair.jpg
    Propping Tower Repair.jpg
    63.2 KB · Views: 162
  • Polish 8.jpg
    Polish 8.jpg
    75.4 KB · Views: 149
  • Polish 1.jpg
    Polish 1.jpg
    53.7 KB · Views: 151
  • Polish 2.jpg
    Polish 2.jpg
    57.4 KB · Views: 145
  • Polish 6.jpg
    Polish 6.jpg
    59.1 KB · Views: 142
  • Polish 7.jpg
    Polish 7.jpg
    76.3 KB · Views: 160
I decided to re-modify the Westcoast pipe again. After installing it from the first mod in my previous posting I reconsidered taking more off of the overall length of the stinger. I found that there was still not enough room for comfort between the hull and the shoulder of the pipe just before it tapers down into the cone. At the time I could only fit a tie-strap in between the pipe and the hull, now I can see about 1/4" of space. I figure that should be adequate allowance for any torque movement and sideways motion from bouncing around off of the waves. Additionally I decided to reduce the wall thickness of the extended chamber portion to match the rest of the pipe before the new material was added on. I also cleaned off the shoulder just before the cone not only to look more like the cone but to follow the contour of the hull to maintain clearance. After re-assembly and a quick start-up everything sounded good and looks nice too.
 

Attachments

  • P1000500.jpg
    P1000500.jpg
    73.1 KB · Views: 119
  • P1000480.jpg
    P1000480.jpg
    88 KB · Views: 139
  • P1000506.jpg
    P1000506.jpg
    85.8 KB · Views: 183
Last edited:
Time for an update, today was my first time back out on the water with the new pipe set-up. It is better than I remember it being with the first Westcoast set-up, but honestly, still not as good as the modified stock pipe. Because the Westcoast pipe is so much larger in diameter, it really takes away from making it longer to the point of yielding good bottom end gains. From what I have experienced, a set-up like mine requires a smaller diameter pipe with a long expansion/stinger chamber combination. The bottom end was better than when the pipe only had the 4 rings but because it is so limited to how far forward the chamber can go due to reasonable hull and gas tank clearance requirements, I would say that this pipe is about as modified as it can get from a dimensioning perspective. I suppose some calibrating of water flow and engine temp could offer some improvements but I am going to say that overall, this pipe is basically maxed out and would be a good mid to top range class pipe. The top end was great, the ski had lots of straight line power and was able to walk away from my friend's Sea-Doo which GPSed at somewhere around 45mph. So I would guess and say that this pipe helped to gain somewhere in the neighborhood of 3.5-5mph. The reason why I say 3.5-5 is because with my stock B-pipe mod, I was just barely able to creep by him and keep pulling away, this pipe let me come up beside him and pull away with ease. But because I want as much holeshot as I can get, I am going to be moving back to the stock-modded pipe and will be having the stainless extension welded on. This way I will not be worrying about blowing a coupler when I am away on vacation with it. So there you have it, a great top end performer but still weak on the holeshot when compared to the stock-mod B-pipe.

One more thing, I noticed that the polished aluminum impeller also seemed to help with a smoother power output and transition through the entire powerband. Before, the stock impeller did work well for general purposes but seemed to lack a little in response when hitting the throttle. Almost like a slight delay. Polishing and balancing the shape of the leading edges to match each other (rather than all of them being different such as shape, thicknesses, and angles), seems to have helped gain in responsiveness and overall performance. That may have helped give .5-1mph of the gains I noticed, but that's all for now until the next mod turns up. Thanks for reading.
 
Last edited:
After having the modified Westcoast pipe on last weekend and comparing it to the modified stock pipe, as mentioned in my previous posting I decided to go back to the modified stock pipe. The differences are minimal regarding measurements but the powerband is quite a bit more noticeable between the two. In overall length, the maxed out Westcoast pipe came in at 22.5 inches. The stock pipe with the B-pipe mod measured up at 24.5 inches...not much but it is all the difference. Initially I thought the oversized I.D. of the WC pipe (being 5 inches I.D. versus the stock pipe at 4 I.D.) would compensate for the shorter length of the expansion chamber. But the stock pipe with all the mod work done to it has clearly proven to be the better pipe for the bottom end gains I want. All I would need to do now if I want more is look for a performance head and raise the compression to around 180 psi. Here are a few pics to show two pipes, I had the B-pipe welded onto the stock pipe too because one coupler cut open on me last year so I didn't want that thought haunting me anymore while out on bigger waters. I replaced the coupler with another one last year and believe that the additional gear clamps (from 2 to 4) I used probably was the cure for cutting couplers. I just think there was too much flexing going on over the distance between the 2 clamps. But now after being all welded up it looks more like a 2 piece PJS pipe, anyway here are a few pics.
 

Attachments

  • P1000723.jpg
    P1000723.jpg
    80.3 KB · Views: 192
  • P1000722.jpg
    P1000722.jpg
    77.3 KB · Views: 186
  • P1000719.jpg
    P1000719.jpg
    73.7 KB · Views: 241
  • P1000717.jpg
    P1000717.jpg
    51.4 KB · Views: 187
Last edited:
Top Bottom