Finally a Carbon/Kevlar Mod Blaster

It's been a long time coming but, we are only a few weeks away from finishing 2 Carbon Blasters.
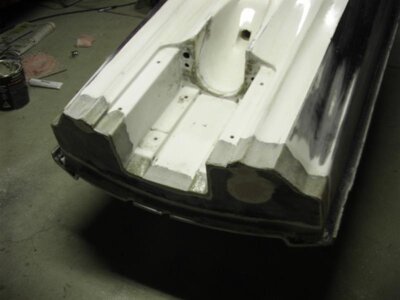
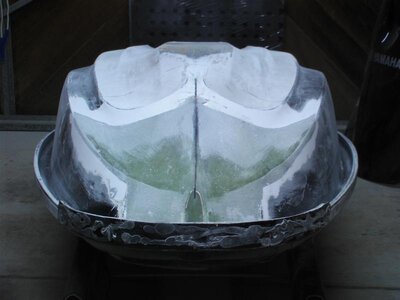
Our company has been working for the last 12 months modifying a stock ski, making molds, templates, jigs, carbon parts & puting them all together.
Some parts were reshaped from the stock piece, while others were made from scratch.
The parts we made in carbon/kevlar were:
Hull
Topdeck
Hood
Hood Hinge Bracket
Airbox & baffles
Seat Base
Bulkhead
Engine Mounts
Fuel Tank Mounts
Battery Base
Ride Plate

The weight difference between the stock Blaster & the carbon/kevlar Blaster will be just shy of 40KG but have have about twice the strength as stock.
I'll post pics of the build as it's taken about 1500 hours of work from the start till now.
Like any story, the best place to start is at the beginning, so I'll post some pics tonight from when we first started going mental with jigsaws & anglle grinders.....
 
Last edited:
These are pics of lengthening the hull by 40mm, cutting off flat nose & making a "v" nose, cutting out the pump housing & moving it back 100mm.
 

Attachments

  • 15.jpg
    15.jpg
    50.7 KB · Views: 249
  • 18.jpg
    18.jpg
    34.4 KB · Views: 187
  • 20.jpg
    20.jpg
    36.2 KB · Views: 255
  • 25.jpg
    25.jpg
    41.8 KB · Views: 357
  • 33.jpg
    33.jpg
    47.2 KB · Views: 208
  • 51.jpg
    51.jpg
    46.2 KB · Views: 215
A few more pics of the hull mods - start to see carbon soon! <dl class="thumbnail"><dt> </dt><dd> Starting work on reshaping chines, ride plate surface, leveling & truing all surfaces.
Re-made pump area to take Raider tilt trim system. Starting to mod intake area</dd></dl>
<dl class="thumbnail"><dt> </dt><dd> Made prototype ride plate to match hull.
reshaping intake area</dd></dl>
<dl class="thumbnail"><dt> </dt><dd> Mod prop shaft outlet</dd></dl>
<dl class="thumbnail"><dt> </dt><dd> Intake & prop outlet nearly finished</dd></dl>
<dl class="thumbnail"><dt> </dt><dd> More intake work</dd></dl>
<dl class="thumbnail"><dt> </dt><dd> Intake from inside pump area</dd></dl>
 
Some more pics just before molding starts...
Next post we will see some carbon <dl class="thumbnail"><dt> </dt><dd> Solid carbon ride plate made</dd></dl>
<dl class="thumbnail"><dt> </dt><dd> Another angle of the ride plate</dd></dl>
<dl class="thumbnail"><dt> </dt><dd> Hull going in for molding</dd></dl>
 
Now time for some carbon! <dl class="thumbnail"><dt> </dt><dd> The mold for the hull is finished & the materials are being placed in.
Three different types of carbon fibre plus kevlar is placed into the mold as dry cloth.
As all the materials are placed in dry, you can take as much time as you need to get everything positioned perfectly where you need it.
Extra layers are sandwiched in the bottom of the hull & around the pump to give added strength & create a strong support along the complete driveline (pump to engine).
After the materials go in, consumable materials such as flow mediums, release films, vacuum lines, resin lines are position in place.
A vacuum bag then covers the complete job & vacuum is applied.
All the materials are repositioned while under vacuum & a vacuum test is performed.
When a job is vac bagged, the vacuum doesnt need to be as precise as it's main job is to hold the materials in place & soak up any excess rein until the resin cures.
With our process we are resin infusing & relying on the vacuum to both hold the job in place, remove any excess resin & draw the epoxy resin into the job.
This means you need an excellent vacuum on the job surface, not just an ok one.
Many times you can chase minute air leaks with ultra-sonic leak detectors for hours until you pull a perfect vacuum.
Once the vacuum is acheived, a very thin high quality epoxy resin is drawn into the job. The carbon absorbs only the amount it needs to wet it out.
resin infusion when done right gives the best "resin to cloth" ratio of all processes, which means maximum strength.
Once the resin has absorbed into the complete job, the vacuum is held to the resin cures</dd></dl>
<dl class="thumbnail"><dt> </dt><dd> Hull cured & popped out of the mold</dd></dl>
<dl class="thumbnail"><dt> </dt><dd> hull with ride plate</dd></dl>
<dl class="thumbnail"><dt> </dt></dl>
 
Some pics of the Topdeck & Bulkhead <dl class="thumbnail"><dt> </dt><dd> Cutting out the round fire exstingisher compartment</dd></dl>
<dl class="thumbnail"><dt> </dt><dd> Reshape to follow natural lines of the ski plus true the complete topdeck, before mold is made</dd></dl>
<dl class="thumbnail"><dt> </dt><dd> Carbon/Kevlar Topdeck released from mold & trimmed.
Oil inspection area totally removed</dd></dl>
<dl class="thumbnail"><dt> </dt><dd> Carbon/Kevlar Bulkhead in mold
Reshaped bulkhead: Holes both side for choice of exhaust
Repositioned holes both sides for steering & trim cable & twin cooling hoses.
Holes are positioned to have cables as straight as possible - makes cables move much smoother
Cut-aways in base to allow water in hull to move to rear transom quicker.
Bracing molded in to make strong but much lighter than oem boat ancher smc bulkhead.
Large cut-away at top to open up back of ski to allow more air volume in hull</dd></dl>
<dl class="thumbnail"><dt> </dt><dd> Bulkhead out of mold & trimmed</dd></dl>
<dl class="thumbnail"><dt> </dt><dd> Adding machined stainless inserts</dd></dl>
 
Last edited:

godocgo

sport
Location
s. fla
my carbon hulls have a moveable bulkhead, it is bolted in. so you can move it where you want depending on motor choice. they are esentially just a flat piece with opening at the top and bottom.
but mine have something i have never seen on any others including wammers version. i have aluminum stringers from front to rear on both sides so you can bolt motor mounts or anything you want anywhere you want.
 
Top Bottom