Custom/Hybrid Hull Building: USS-ROOSKI

Flash-FX

No Square..No Round..FX-1
First off, great job Roo!! Keep up the good work!! We need more progress pix!!

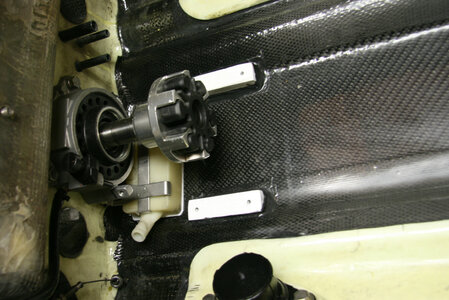
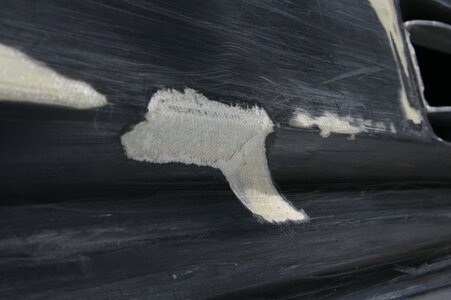
2nd, before everybody condemns Coremat, here's the issue I had with my FX. The factory bilge, (siphon pump) has 4 little stubs for standoff legs, those little "tits" wore through the 2 top layers of carbon and glass to let water in. It only took a ounce or 2 to start the breakdown. See, I don't store my ski in a heated garage during the winter, that little bit of water froze, it expanded to make room for more water...and more...and more. After a few freeze/thaw cycles, the "sponginess" had propagated all the way up to the space between the flywheel cover and the fuel tank.

I first realized the problem, when I went fishing for a bolt that had been dropped down in front of the motor, during the SJ tank mod. The flat section of the bottom was actually flexing up and touching the bottom of the flywheel cover, and wearing through a spot. It was a easy fix, trimming around the soft spot, grinding out the coremat, then glassing in a couple new layers of 11oz carbon. I used a piece of 1/8" polyethylene sheet stock for the bilge to rest on. No more issues there. All in all, the bottom is holding up well for the abuse it gets.

The next one will be better.....

The core material, really adds stiffness without the added layers of glass and weight. Just don't use core on the bottom of your boat!

IMG_0378 copy.jpgIMG_0413 copy.jpgIMG_0390 copy.jpg
 

tomski

X
Location
LHC
Save the coremat for the mold. It's mainly used to build up the laminate quicker and print control.

Although it stiffens the part and keeps some of the weight down; no way I'd use it on the bottom. Just not worth it.
The tray area and sides would be about the only place.
 

Roo

it's all good
Site Supporter
Gordon - thanks for chiming in man and sharing the pictures! You explained it to me but never sent those before.

THIS PROJECT IS ALL YOUR FAULT! haha


my rickter fs2 has coremat in sides and tray that i know not sure where else
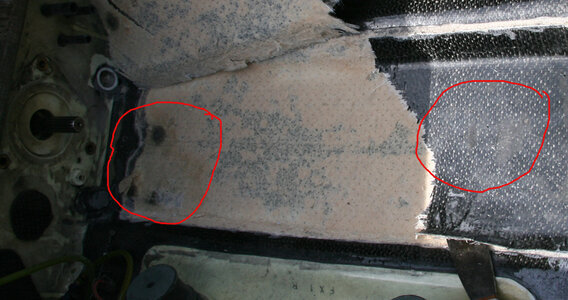
are you sure about this (that it is coremat, or another core material)? is your fs2 are carbon or glass version?

i will be doing some tray cutting soon as well - curious to see the layers.

Save the coremat for the mold. It's mainly used to build up the laminate quicker and print control.

Although it stiffens the part and keeps some of the weight down; no way I'd use it on the bottom. Just not worth it.
The tray area and sides would be about the only place.

i have some 1/8" Divinycell i was going to eventually "try" in those areas when i get a little better at the final part layup.

talking to a boat builder here, he was telling me coremat is best / mainly uses when balsa wood core is being used, and in preventing print through or something along those lines.

i have a bunch of coremat laying around that i will ONLY use on the mold - nothing else.
 
Last edited:

Roo

it's all good
Site Supporter
some progress...

I sanded through the Duratec in spots, but that's ok - everything polished up nicely and is consistent to the touch. Stopped at 1000 grit (wetsanding) and put down 4 coats of wax total.

IMG_3961.jpg


IMG_3962.jpg


Then the few coats of PVA (green looking film below), which drys and is a thin film that will help the mold pop off the plug easier. Good with the bad, leaves a texture and will need to be sanding from the mold. Cheap insurance of the parts separating though:

IMG_3978.jpg


Time for Tooling Gel Coat:

IMG_3985.jpg


An "ACTION" shot, haha

IMG_3982.jpg


Then 2 layers of chopped mat about an hour and a half after letting the Gel Coat dry and pass the "brush test" (gel coat is tacky but does not distort by running a brush over it):

IMG_3991.jpg


IMG_3992.jpg


Hopefully tomorrow I will put down a few more thick layers and build some bulk to this mold... then hopefully by the weekend... POP IT OFF.

then flip the hull over and start on the top :Eyecrazy: ugh shoot me now :Banane36:
 
Last edited:

Matt_E

steals hub caps from cars
Site Supporter
Location
at peace
You animal! :bigok:

This is impressive.
How long did the layup process take you?

Is the plug pretty much a one-time use part?
 

tokarzl

itching my arms
make sure you brace the on the exterior of the mold before separating the plug from the mold so that the integrity of the mold is not compromised. great work though that plug looked amazing the mold should turn out really good
 
Last edited:

Roo

it's all good
Site Supporter
You animal! :bigok:

This is impressive.
How long did the layup process take you?

Is the plug pretty much a one-time use part?

once the gelcoat was laid down and setup, it took about 5 hours to lay down the 2 layers of chopped mat (working solo and TIRED). i made the mistake of spraying the gelcoat at around 10pm. the first layer took awhile, as i took my time to make sure there was zero air bubbles or gaps between the glass and gel coat. the second layer just dragged on... it was 5am when i finished. needless to say, i was exhausted. it would have taken half the time with a helper.

as long as the mold pops off and doesn't stick to any areas, yes, i could reuse the plug to pull another mold (then off any pva, wax and go again). or are you asking if the hull is now junk (no longer usable)? the plug could be turned back into a ride able hull with some work. i'm either going to sell it to recoup some cash, or keep it to modify/mold again... we'll see.

This thread is giving me nightmares. The smell of Styrene perm imbedded in your skin yet? Great progress Roo!

dude... you have no idea! heh (actually I know you do...)

i have had a headache for 2 days - the gelcoat process was the worst. my eyes burned SO BAD during the spraying process. my eyes were watering like crazy. next time, i need to get a full mask. for anyone that has not used gelcoat - IT IS WICKED STUFF! ventilation, eye protection and a good respiration are a must!

make sure you brace the on the exterior of the mold before separating the plug from the mold so that the integrity of the mold is not compromised. great work though that plug looked amazing the mold should turn out really good

for sure - planing on incorporating some kind of wood bracing / structure after i get a few more layers of glass down. i want this mold to be SOLID.

Now that is nice. When you going to need some help?
I have 10 days off here soon.

can always use a second set of hands! when do your 10 days off start?
 
Last edited:

tom21

havin fun
Location
clearwater FL
you definitely need a helper, or 3. layer after layer it gets worse the longer you do it. a little alcohol helps. not be be a prick but you realize you are not even half way thru? get help now!! more help means you cut down layup time. imagine hitting that hull for 30-40 minutes vs 5 hours??? at a point though when we were doing my mold I would just walk by and lay up on it and walk away. and any chance I had I would prep the material and just keep mixing up resin and laying up as I had a second. much easier to do it hit and run style.

lookin great! when you figure out what you may want for the hull if/when you are done with it lemme know, i could deal with riding a heavy ski.
 

Dirtybird

Ex*ta*ski
Location
St. Clair, MI
Working the 29,30,31 on nights then i have 3 days off. Go to work on the 4th and then i have the next 10 off. So from the 5th to the 14th. Give me a call and put me to work! LOL.
 

Roo

it's all good
Site Supporter
you definitely need a helper, or 3. layer after layer it gets worse the longer you do it. a little alcohol helps. not be be a prick but you realize you are not even half way thru? get help now!! more help means you cut down layup time. imagine hitting that hull for 30-40 minutes vs 5 hours??? at a point though when we were doing my mold I would just walk by and lay up on it and walk away. and any chance I had I would prep the material and just keep mixing up resin and laying up as I had a second. much easier to do it hit and run style.

lookin great! when you figure out what you may want for the hull if/when you are done with it lemme know, i could deal with riding a heavy ski.

thank you captain obvious - i know there is a lot of work ahead :wiggle: sometimes just can't get help to commit. its ok - still cold as hell here and lake is frozen over.

now that the 2 layers of glass are on the gelcoat, i can use the lay-some-and-walk-away approach as you stated. as you know, gelcoat has to be stabilized with glass shortly after being put down. i made the mistake of doing it so late when i was already exhausted.

Working the 29,30,31 on nights then i have 3 days off. Go to work on the 4th and then i have the next 10 off. So from the 5th to the 14th. Give me a call and put me to work! LOL.

i will call you this evening after work - need to come up with a game plan.
 

Roo

it's all good
Site Supporter
Progress has slowed, but that's ok, I won't be missing any riding time :sneaky:

FINALLY popped the bottom mold :Banane25:

It was a pain in the ass - broke off most of the flange from the plug in the process but that's OK - needs to come off anyway for the top portion. Took Tru and I a solid hour to get this thing it pop beating the CRAP out of it with a rubber mallet.

Couple small flaws but nothing that cant easily be repaired. I plan on waiting my final parts, so any of these "small" flaws that carry over to the part, I am not going to stress it.

First picture shows the PVA film which most of it I was able to peal up. Rest washes away easy with water.

More later :naughty:

IMG_3998.jpg


IMG_4001.jpg


IMG_4002.jpg


IMG_4004.jpg


IMG_4006.jpg
 
Top Bottom