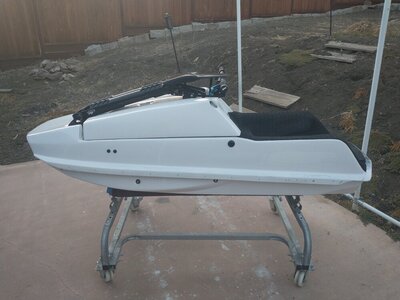
- Location
- Bay Area, CA
You are using an out of date browser. It may not display this or other websites correctly.
You should upgrade or use an alternative browser.
You should upgrade or use an alternative browser.
My First Stand-up - The story of a 38year old man who makes poor financial decisions.
- Thread starter GRiN
- Start date
- Location
- Bay Area, CA
Ok, so when I tore down my eBay 61x it turns out it has a ported or at least port-matched cylinder...
OEM
Ported? (Before blasting water jacket and exterior)
Thoughts? Other than "looks like it needs a hone!" Haha we're running it as is boys...no time.

"Had" to powdercoat the last of the little bits, so I decided to recoat some of the bigger pieces that had some thin spots...happier now.

OEM

Ported? (Before blasting water jacket and exterior)

Thoughts? Other than "looks like it needs a hone!" Haha we're running it as is boys...no time.

"Had" to powdercoat the last of the little bits, so I decided to recoat some of the bigger pieces that had some thin spots...happier now.


- Location
- Bay Area, CA
Got over my fear of turfing and just dove in... Admittedly this took way longer than I hoped, but I'm pretty happy with the results so far ...
Defined lines

Masked inverse

First side I taped and clamped in place as I molded it around the foothold and made my one seam inside the hold... Pretty frustrating as molded turf is pretty rigid.


For the second side I bonded just the outer inch along the top rail and let the glue be the clamp... Way easier, but still kind of a pain trimming and slicing for a butt jointed seam inside the hold.

Sides are done.
I have 1" underpad for the tray and some 3/8 thick underpad to make heel cups and fill in the gaps on the sides of the ffh.

Defined lines

Masked inverse

First side I taped and clamped in place as I molded it around the foothold and made my one seam inside the hold... Pretty frustrating as molded turf is pretty rigid.


For the second side I bonded just the outer inch along the top rail and let the glue be the clamp... Way easier, but still kind of a pain trimming and slicing for a butt jointed seam inside the hold.

Sides are done.
I have 1" underpad for the tray and some 3/8 thick underpad to make heel cups and fill in the gaps on the sides of the ffh.

Big Kahuna
Administrator
- Location
- Tuscaloosa, AL
I lay turf out in sun before sticking. It makes it really soft and plyable.
- Location
- Bay Area, CA
I got my front foothold trimmed up and drilled for mounting, and also added some foam so it fills between the gunwales.. before I turf/bolt it in place I switched gears and put down a few coats of Total Bilge epoxy paint in the engine bay...very close to assembly time! Still need my Wax head-pipe to show up and I need to decide on a tank/battery setup and decide if I'm going to spring for an actual waterbox and hope it fits inside the rockered nose or use my westcoast "silencer"... So close, but still so far away lol


- Location
- Bay Area, CA
Started some assembly this weekend. Other than a SJ manual, is there a quick-reference guide somewhere for what fasters get grease/anti-seize or blue loctite etc?
Also, I am struggling to pressure test my motor because the blowsion block off plates are so thin that even with a rubber gasket I'm getting some leaking from the B-pipe manifold. The three bolts seem to have slightly bowed the thin metal plate and I get bubbles towards the center of the plate when I do a spray test... I get no bubles from the crank seals or case seams...run it? Or make a thicker block-off plate and get a confirmed test result?

Also, I am struggling to pressure test my motor because the blowsion block off plates are so thin that even with a rubber gasket I'm getting some leaking from the B-pipe manifold. The three bolts seem to have slightly bowed the thin metal plate and I get bubbles towards the center of the plate when I do a spray test... I get no bubles from the crank seals or case seams...run it? Or make a thicker block-off plate and get a confirmed test result?

E350
Site Supporter
- Location
- Sacramento Delta
It may not be the right way to do it, but what I did for block offs was to take both manifolds off, cut a rectangular sheet of rubber for each of the manifolds, and drill holes in the rubber to slide the rubber sheet over the bolts, then bolt up the manifold to the engine to hold down the rubber in place (basically sandwiching the rubber between the manifold and the engine.) Yes, the rubber slightly expands under air pressure because it has no solid plate surface to stop it from expanding, but it still holds the air to show whether air is leaking at the crank seals or not.
Last edited:
- Location
- Bay Area, CA
I wish I thought to do that before installing my manifolds and compressing my gaskets lolIt may not be the right way to do it, but what I did for block offs was to take both manifolds off, cut a rectangular sheet of rubber for each of the manifolds, and drill holes in the rubber to slide the rubber sheet over the bolts, then bolt up the manifold to the engine to hold down the rubber in place (basically sandwiching the rubber between the manifold and the engine.) Yes, the rubber slightly expands under air pressure because it has no solid plate surface to stop it from expanding, but it still holds the air to show whether air is leaking at the crank seals or not.
- Location
- Bay Area, CA
Well this is depressing... I clamped a bar across the top of the B-pipe manifold block off plate and stopped getting bubbles, but was still very slowly losing pressure somewhere... I did some spot spraying and found a small leak between the case halves between the crank and the starter.... I went very light with the 1184 gasket sealant and it appears there is a spot where it wasnt evenly applied or something and didn't squeeze out.
So, should I just flip the engine upside down, split the cases, clean the surfaces, and use a little more sealant? I know that area would be air tight once the cover is installed, but that seems sketchy to run it... What do you guys think?
So, should I just flip the engine upside down, split the cases, clean the surfaces, and use a little more sealant? I know that area would be air tight once the cover is installed, but that seems sketchy to run it... What do you guys think?
- Location
- Bay Area, CA
Unfortunately I don't know the history of the cases, but they didn't appear to have any damage inside and the mating surfaces looked ok.That is a bummer but at least you found it before it was fully assembled in the ski or worse you had a burn down. Should be able to pop the cases and re-seal relatively quickly.
Did a crank let go previously in these cases?
DylanS
Gorilla Smasher
- Location
- Lebanon Pa
how light on the sealant did you go?
Pull it apart, clean it, cover both halves in a light layer and send it.
Pull it apart, clean it, cover both halves in a light layer and send it.
- Location
- Bay Area, CA
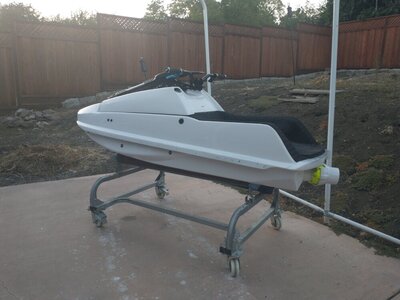
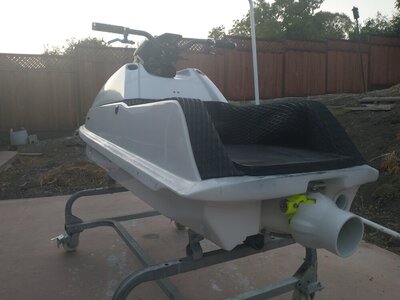
I mocked up my pole and pump to give me some more motivation to keep pushing. It's been really hot here and working long hours and commuting takes a lot out of me.
I have finished turfing the gunwales and dash+ffh and am now playing with ideas for more padding/contours/kicker in the tray.. I made the mistake of leaving my beautifully templated 1" tray padding out in the sun one day and it shrunk! Lol it originally spanned all the way to the rear edge of the tray ..I will be adding more padding before turfing over it. After that I still plan to turf the side rails and the rear of the hood. So much left to do... At least it will be hot here until December


I have finished turfing the gunwales and dash+ffh and am now playing with ideas for more padding/contours/kicker in the tray.. I made the mistake of leaving my beautifully templated 1" tray padding out in the sun one day and it shrunk! Lol it originally spanned all the way to the rear edge of the tray ..I will be adding more padding before turfing over it. After that I still plan to turf the side rails and the rear of the hood. So much left to do... At least it will be hot here until December


Attachments
Quinc
Buy a Superjet
- Location
- California
Looking like it's going to be a really fun hull!
- Location
- Bay Area, CA
Bit of a good news bad news situation here...
Split the cases and there was definitely thin spots in the sealant (I think I only applied it to one half of the case the first time)... I cleaned everything up and applied a thin layer to each case half and then re-mated them...
Pressure still dropping, but much slower... I couldn't find any leaks around the crank seals or case seams with the spray test so I grabbed some silicone plugs and closed off the water in/out barbs...
Licorice.
Pressure drops even slower, but more notable is when I pull one of the silicone plugs I hear a bust of air released.. So it would appear the long block is leaking into the water passage and also very slowly somewhere else (if I plug all 4 barbs, it still leaks very slowly).
Now I need to figure out if it's my ex manifold, an o-ring issue with my ADA head, or if my cylinder is cracked.
Any advice on how to troubleshoot methodically from here?


- Location
- Bay Area, CA
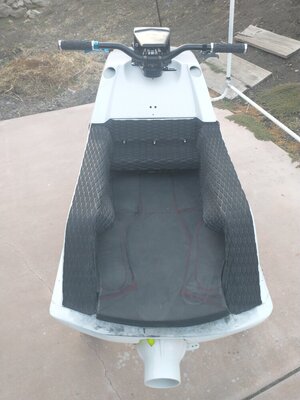
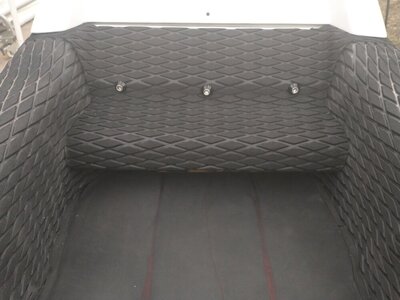
On a brighter note, I finished turfing my tray and I'm really happy with how it came out!
The tray is wall to wall with 1" underpad plus an extra 1" at the rear which I shaped into a kick tail. I made a template using cardboard for the flat area painters tape for the compound curves.

After peeling up the tape and making relief cuts so it would lay flat, I traced it onto the turf and followed the outer radius ignoring the relief cuts.

I covered the sides and ffh with tape to protect them and then after pre-molding the turf around the kick tail, I practiced how to lay it down (without help) before applying glue.

I ended up doing it in two stages, because I just couldn't keep the "ears" and the rear from dropping and touching stuff as I tried to navigate the front edge under the foothold and the flaps into the side holds.
I think it turned out legit!


I still need to turf the rails as well as the back of the hood (Rickter style), and my chinpad, but I think I'm over my anxiety about turfing so hopefully I can knock them out before the long weekend.
The tray is wall to wall with 1" underpad plus an extra 1" at the rear which I shaped into a kick tail. I made a template using cardboard for the flat area painters tape for the compound curves.

After peeling up the tape and making relief cuts so it would lay flat, I traced it onto the turf and followed the outer radius ignoring the relief cuts.

I covered the sides and ffh with tape to protect them and then after pre-molding the turf around the kick tail, I practiced how to lay it down (without help) before applying glue.

I ended up doing it in two stages, because I just couldn't keep the "ears" and the rear from dropping and touching stuff as I tried to navigate the front edge under the foothold and the flaps into the side holds.

I think it turned out legit!


I still need to turf the rails as well as the back of the hood (Rickter style), and my chinpad, but I think I'm over my anxiety about turfing so hopefully I can knock them out before the long weekend.
Last edited:
DylanS
Gorilla Smasher
- Location
- Lebanon Pa
Looks awesome, very nice job.
You can use a block off plate instead of the exhaust manifold to see if your issue was the gasket/manifold. You can also pressurize the water jacket and pull the plugs to lsiten for leaking at the o-rings.
You can use a block off plate instead of the exhaust manifold to see if your issue was the gasket/manifold. You can also pressurize the water jacket and pull the plugs to lsiten for leaking at the o-rings.
Quinc
Buy a Superjet
- Location
- California
That is an impressive turf job!
- Location
- Bay Area, CA
Thanks bud! and thanks again for bringing the limited slip tank down last weekend. It's going to work out great.That is an impressive turf job!
I got my wax-headpipe shipping notification this morning boys! it is almost GO-TIME!


