Pimp My Superjet - MSRP Build

The fun begins...

About to pull er outta there
engine ready to come out.jpg

Engine bay is pretty clean
20200520_215550.jpg

When tearing stuff down that I don't intend on scrapping I've learned to keep track of all the bolts in my older years...
20200520_201605.jpgengine spacers.jpg
Kept track of the engine shimz and their orientation in the engine bay (FR, FL, RR, RL) Interestingly the rear left had the thiccest shimz.

After getting the engine out of the bay I gave the midshaft a spin... doesn't really feel too solid - feels like some radial play - is the midshaft suppose to feel very tight in tolerance or does it have some slop? First time playing with a superjet setup.

midshaft.jpg

But after that I started tearing the engine down to the core.


20200520_215227.jpg
20200520_215252.jpg

Pretty fresh water-ish lookin! Previous owner said they acquired it from their friend that owned it in Wyoming so still not much beach front there.

Ebox lookin pretty fresh as well
ebox.jpg

And stator lookin fresh from what I can tell... This ski is pretty damn fresh all around - if someone has a link to the ohm values for each coil I can check that for a go/no-go.
20200520_213511.jpg

And finally - 20 year old stainless reeds. Very Sano. Much Fresh.
20200520_213702.jpg

Got a few tools coming to start the next stages - I guess I should probably get a re-manufactured mid-shaft for ease of mind since I'm in this far. Is it worth looking into billet couplers or are they just unnecessary bling with a mild build like I'm doing? The stock coupler rubber damper is also lookin pretty fresh but is that considered a standard wear item that should be replaced in this scenario? I figure while it's apart - it's a good time to replace stuff.

But I ain't touchin no fiberglass - no dewey cox you don't want that...
 
Some progress!

I've switched my pipe I'm gonna use from the Riva Red to the Riva Freeride (similar to Type 4, Dry style). Began refurbing it and getting it ready for a new life on this ski.

First I had to do a little welding to patch up a pin-hole leak near the stinger. The outer jacket was leaking slightly outside. To verify this I put 10psi in the jacket with a little water and sloshed the water around till I heard a pronounced 'Hissss' - this was partially to visualize the leak and partially to confirm there was no inner-chamber leaking going on.

After that, I had the pipe and header glass bead blasted to prepare for some color.
20200529_161420.jpg

They looked pretty good after this actually!

Next I fixed the flanges to be more 2020-ish - i.e. reduced the overall diameter at the bead and rounded it nicely with 400 grit sand paper then 000 scotch bright.

20200530_141346.jpg

They worked really well with the silicone coupler I'm going to use - I'm able to gently push the coupler over each bead and with a T-bolt style pipe band it will hold them perfectly.

Next I wanted to get some color on them - I decided to go with dupli-color's engine paint series - I figure it's a nice high quality enamel rated for 500*F - it should hold up for a few days under the hood for this fresh water queen.

3 coats of primer, 4 coats of gloss black and 3 coats of gloss clear to finish it off. All rated for 500*F and all oil and gas resistant.

20200530_231824.jpg

For the pipe chamber I had to do something cool. For the JetManiac 718 motor I got - I originally got it with a red ADA head for some bling with the Riva Red pipe. With the Red pipe off the list for this build I had to make my Freeride chamber look pimp...

20200530_231801.jpg

For the chamber I went with 3 coats of primer, 3 coats of dupli-color MetalCast silver base, 3 coats of MetalCast Red Anodized and then 3 coats of Gloss Clear on top. Tons of coats - all engine paint rated surprisingly. We'll see how it holds up - photos can't really capture the color but it looks pretty close to a red anodized aluminum finish. Also resembled the "candy apple red" colors common in the auto world.

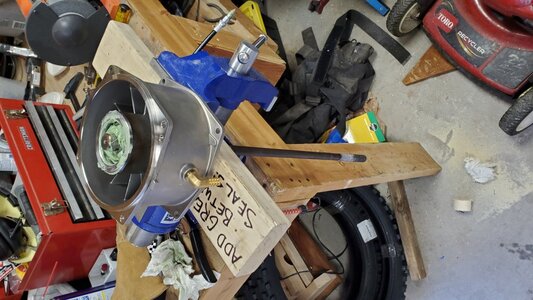
Started working on the pump. Knocked the shaft outta the old 6-vane stator and working on installing it into the 12-vane tomorrow. Got OEM bearings and seals from JetManiac to keep it spinnin purdy. Hooker showed up too! The ski came with a small hub 9-17 skeet trak - Not sure what it's worth on the classifieds but it's in pretty good condition.

20200525_112231.jpg

Also ran the dual cooling stainless 3/8 tube - drilled it perfectly if I do say so myself. Some water in the foam but nothing crazy - typical old superjet with the stupid stickers in the engine bay falling off. I don't know if I'm going to go through the hassle of defoaming this hull. It's overall in really good condition - I think I'll wait a year and pawn it off and swap the good parts over to a AM hull or mint 08+ hull.

Pole shortened 2.5" for now - along with the KP steering plate I'm about -3.5"

20200530_232023.jpg

By the time it hits the water I'll have a blue hull, white hood (with mint 97 graphics - courtesy of @wydopen ) and a black pole (I actually have had the black pole for like 2 years now - I was going to do a RN pole swap when I had my SN). I like the generational mash up!

Total project cost just breached $9000. Might have to re-phrase the title as "Out-The-Door" Cost Build. Shoulda bought a [insert new/used AM ski here]? dammit haha
 
Last edited:
Momentum....

Well today was good. Got probably one of if not the most daunting tasks done... The pump.

First off - I just gotta say this video was awesome. It's very similar to the method recommended by Watcon but the millennial in me loved the fact that it was a video.

Things started out cool...

20200531_153440.jpg

I hit the bearings with a nice acetone bath and blew them clean. Torched em a bit less than in the video (they were no where near changing color) and they popped on nicely!

20200531_211241.jpg

Chilled the shaft, bearings and grease wad for a little over an hour. Around the 30 min mark started cooking the stator at 250*F for 30 min (maybe a few less - started to smell like solvents a tiny bit and didn't want my fiance to kill me - she'll never know it was in there hopefully haha).

Brought the shaft out first and got it ready, then pulled the stator outta the oven and, as the 2x4 with a 2" hole says - shot grease in between the spring seal and the double lip seal to pack it in there before dropping the shaft in.

The shaft, surprisingly but unsurprisingly as well did exactly what you would see if you watched the video up top... fell right in and only required a tiny push to overcome the grease pressure. Phew! That was the most nerve racking part of the day.

20200531_203057.jpg

Packed grease into the tail cone and played around with leaving enough of an air bubble so it would push on, but not too much grease so that it would pop the front seals out.

Threw the hooker into place with a 2.0 mm spacer (OEM, but new from JetManiac). Played around with .8mm and 1.5mm - just didn't seem like enough of a gap. With the prop cranked onto the shaft there's barely enough room for a finger nail now.

It looks pretty damn good if I do say so myself - spins super smooth but there is that 'just assembled' feel where it doesn't spin like a top but rather something that probably needs to get spun at 7000rpm a few times to spin super free.

20200531_203146.jpg

Got the pole bracket hogged out (not nearly as fun as I thought it would be haha) and prepped both the pole and bracket then laid in some quick cure epoxy. After an hour I drilled out the holes and put 10-24 x 3/4" stainless button heads in the rivet holes with nyloc nuts and wide flange stainless washers. I stood on the ski a few times to get an idea of what length I wanted to shorten it too - this gets me into a pretty neutral position but slightly forward - not overly forward but good for all around hopefully!

20200531_204216.jpg

Pulled the painted parts outta my 'spray room' - aka 3rd bed room that's not done yet. mask peeled off nice and the paint is pretty firm. I know enamel can take 2-7 days to cure sometimes with all the factors involved so it's nice to have a little while until the engine arrives for it to fully harden.

Next up I'll probably start to tackle re-installing the pump (shimming and making sure it's centered for when the re-built midshaft arrives), 5200'ing the dual cooling line and bulkhead holes and drilling some more bulkheads for the 2 extra pissers and bilge outlet. Gotta rebuild the carbs and install the MSD Enhancement medication too so a few good small jobs for the week.

For those with the stock 38mm dual carbs - can you installe a carb throttle linkage (and get rid of the set screw stock coupler deal) or is that only for larger carbs? I have an 8mm x 30mm flexible shaft coupler (similar to the thrust carb linkage) but it looks like the master carb doesn't have enough extra shaft to bite onto...
 

Attachments

  • 20200531_191221.jpg
    20200531_191221.jpg
    130.7 KB · Views: 28
Last edited:
When you're over budget you gotta get creative! Home fab'd ETX12 AGM batter holder.


20200602_173233.jpg
20200602_181219.jpg

20200603_094721.jpg

20200603_094735.jpg
It ain't all that purdy but it should hold. I'm thinking maybe 2x notches at the bottom on each side that flair out to hold the OEM rubber straps now - sorta like the blowsion battery box. The benefit would be that it could also let trapped water out.

blowsionbox.png
 
Last edited:
Unless you have to replace the throttle shafts because its worn, then definitely just leave stock linkage. You can remove the rear carb throttle spring and move it to the front carb for easier pull.
 
Good progress overall this weekend - engine is in, shimz are stacked, pipe is fitted. Now just need to give everything the final bolt up and torque down.

Started the day out remaking a gasket I fubar'd
20200621_132409.jpg
20200621_134653.jpg
After I got it cut out I put a little blue gasket compound on it and the other gasket to seal up the intake sandwhich.

Next I tackled the pipe. I've heard stories about mounting this dry pipe. They aren't pleasant. My experience wasn't much different - but I decided to dry fit it outside the engine bay so I could access it easier - this helped a ton!

To start I torqued the header down - the bottom two bolts are a PITA! Had to make a custom 12mm 12-point combination wrench to get to those bolts. It's possible to get to them from the top, but the left one is really tricky and basically I had to get 1/6th of a turn from the bottom, then another 1/6th from the top, etc.
20200621_202149.jpg

In the end it did mount up nice.
20200621_195955.jpg
20200621_154449.jpg

After all the talk of o-rings I ended up using @hornedogg79 's approach and got some 2.5" silicon exhaust tubing. I cut it 1" long and beveled both sides. This proved to provide a good snug fit on the inner chamber to header seat. I still used the bottom-out o-ring on the factory groove. The silicone hose I ordered for the outer connection worked great and the T-Bolt clamps are trick.

20200621_205108.jpg

At the end of the day, the engine is in, a 2mm shim fore and aft on the exhaust side gets the coupler outer faces damn near perfectly parallel & concentric with a 2.5mm gap in the drive coupler.

enginebay1.jpg
 
Mounting that pipe in the hull was every bit as hard as people say it is. There were no hand outs during today's bit of work on the ski.
20200622_232504.jpg

I ended up applying a ring of red rtv silicone on the engine coupler side to hopefully fill any small gaps. Didn't go crazy. The stinger side also threw me off - factory pipe just says to reuse the oem hose and cut it. Well the oem hose has an ID of like 60mm and the stinger is 50mm. So I got another piece of heavy duty boat exhaust hose, this time in 50mm id, 60mm od and it acted as a perfect shim for the stinger into the oem exhaust hose to the waterbox - with a thin bead of red rtv between the hoses.

I really hope there's no leaks in the black hole behind/under the pipe haha. With a fresh gasket in place, I torqued the exhaust header in 2 stages just like the manual said! Been working on it too long at this point so you start to think pessimisticly after the churn feeling sets in.

And of course, red hoses galore. Gotta add that bling. On all the coolant lines I used stainless worm screw clamps.
 
Last edited:
It's Alive!

Without much fanfare it fired right up - no crazy runaway revs or anything. I primed the fuel lines by turning it over a few times and watching the fuel circulate until it went back through the return line into the tank.

That said - I do hear a 'weird' vibration noise. The first video below captures it pretty well - seems to be coming from the pump area. Both the pump bearings and the mid-shaft bearings were replaced. Jetmaniac did the midshaft and I did the pump.

The prop felt warm to the hand after letting it idle for 5 minutes for the break in.

The midshaft however was hot - I can touch it but not for long and without an IR temp gun I can't say how hot - but I know it wasn't Water sizzles off of it hot - I did do a water test and it's not quite that hot.

I can't say I've intentionally let a ski idle for 5 minutes on a garden hose before - Is this normal for breaking in new bearings and seals and while only running it on a garden hose?


Here's a video that show's the midshaft connection - I used a cold fusion tool for the drive shaft and it slide on and off effortlessly about 3/4 of the rotation and then the last 1/4 it just needed the lightest touch - so I think the drive shaft may have a slight bend to it but not much at all - didn't do a run-out test unfortunately. For the coupler alignment I managed to get the faces 3mm apart and perfect as far as I could tell for concentric alignment all around.


So maybe I can contribute the noise to it just free-spinning and not being under any load such as being in the water? Otherwise the engine works great, pipe is probably too cool while running it on the garden hose.
 
Last edited:
You can't do any break-in on the hose. You have to have a load on the engine.

Yea this was more just to get some pre-mix through the engine and into the bottom end, adjust idle speed and make sure nothing is leaking in the engine bay. I'll be going down to the lake this weekend and I'll keep an eye on midshaft temps then - or is it something not to really worry about?
 
Hard work pays off!

IMG_20200627_212909.jpg

In trying to burn through the first tank for break it's pretty obvious this thing is awesome already! Love the sound of the dry pipe haha. Did a few 15 minute laps under 1/2 throttle and would pull up to a shoreline and check stuff... never found anything wrong. Sofar she's a joy to ride and looking forward to many more seasons on this build!

The hookup and bottom end is great. The snap from 1/4 to 1/2 throttle is very entertaining haha. I kept checking the exhaust tube and waterbox for Temps to make sure the stinger water inlet is feeding enough to them - im using a nice quality brass needle valve to regulate flow - only added 1/8th turn of flow and they are nice and comfortably warm to the touch. The pissers are relatively small outlets - i think around 1/4" - and the engine pisser is nice and hot shower warm, pipe pisser is a few degrees cooler

Gotta hand it to @JetManiac, so far I've done nothing to the carb settings besides his recommendations (aside from fiddling with idle speed) and it runs like a raped ape!

Going to finish the break in process tomorrow.
 
Last edited:
Top Bottom