Pro-Tec Exhaust Mounting Vibration

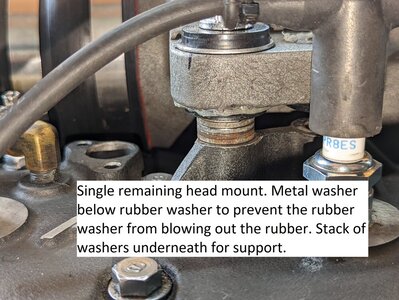
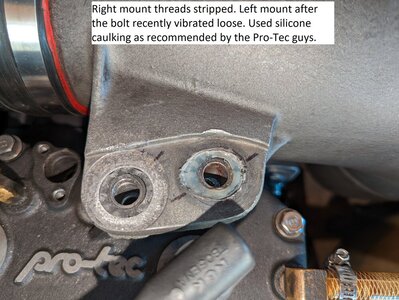
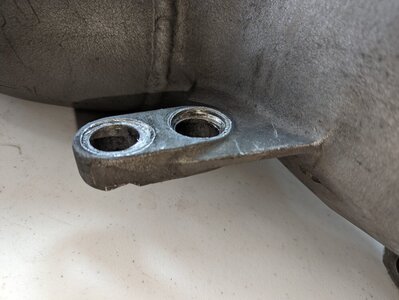
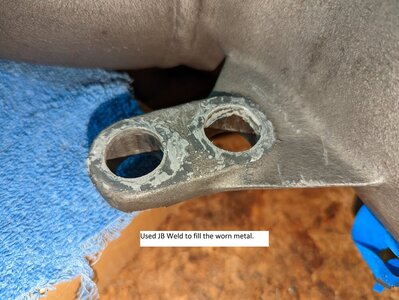
Picked up a 1990 SN Superjet recently and am looking for some recommendations. I believe the engine is a 701 ported to 750 with 135 psi compression on each cylinder. It has the Pro-Tec exhaust with the 4 mount points on the exhaust body. One of the mount points on the engine head is stripped and the other one has some play in it but still holds a bolt with red loctite. I just replaced the starter and in the process worked on the exhaust as well replacing the gaskets, worn water lines, JB weld to fill in damaged metal, new rubber grommets and rubber washers from Pro-Tec. The 3 exhaust body attachment points were torqued till the rubber started to “blow out” the sides. If I go tighter it will probably destroy the rubber. Had the ski out yesterday for a short 20 minute ride and the exhaust body vibrated the single bolt attachment left out. The previous owner just had two bolts in the exhaust body (one on the head one on the engine manifold to exhaust body) to hold it to the engine and they came loose after the first couple of rides with only the rubber wheel insert for vibration reduction (the rubber was mostly useless and worn down. It feels like these rubber inserts and washers are going to continue to just vibrate loose even with red loctite. I could cut off the head of a bolt, insert it into the stripped head attachment, JB weld it in and put a nut on it to get two head attachments again or maybe a Heli-Coil thread insert. I could just drop the rubber washer, use the rubber wheel inserts and just torque it down but then I might risk cracking mount points. I’m wondering if I shouldn’t just abandon this exhaust and pick up something else before it vibrates loose and breaks something else in the engine. What is an acceptable amount of vibration for an engine like this? I don’t see any issues visually with the engine mounts. If I did replace the exhaust is there another one that can handle the vibration? Do I need to worry about the metal shavings from the metal wearing down at the attachment points in the engine? I wipe it up and remove it where it has worn but I'm sure I don't get all of it.

TLDR: Pro-Tec exhaust vibrates itself loose. I have 3 of 4 attachment points in OK shape. I Could probably fix the 4th but it will still just vibrate until the mounts on the exhaust body break. Are my motor mounts going bad, causing the engine to vibrate too much? Is there another exhaust I can put on it that will handle the vibration? Am I doing something totally wrong? If I torque the bolts tighter than the rubber looks like it will fail.

Video link of the engine idling in slow motion:

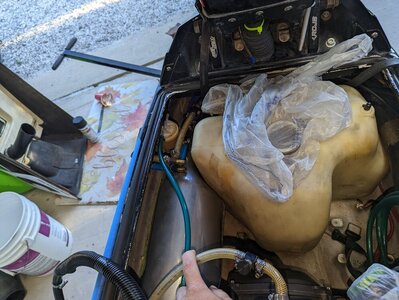
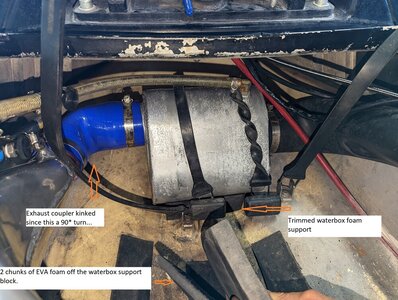
A few pictures of my mounts attached.
 

Attachments

  • Head mount.jpg
    Head mount.jpg
    188 KB · Views: 24
  • Head mount no bolt.jpg
    Head mount no bolt.jpg
    193.6 KB · Views: 17
  • Original Exhaust body wear.jpg
    Original Exhaust body wear.jpg
    123.7 KB · Views: 15
  • JB Weld Fix.jpg
    JB Weld Fix.jpg
    174.7 KB · Views: 23
Thanks, I appreciate the feedback JC. Yeah I figured I don't want to overtorque the rubber but wanted to make sure. I'll see if I can get some inserts in it.

I picked up a compression tester from autozone while troubleshooting starting issues the other day (dirty connector in the stop start switch). Seems to be of decent quality. Supposed to be a recently rebuilt engine but I have my suspicions (when I took apart the exhaust the gaskets had definitely seen a few years of use). Why would you rebuild an engine if your not going to pull the exhaust off and replace the gaskets.... Any thing I should look out for with low compression?
 

smoofers

Rockin' the SQUARE!!!!
Site Supporter
Location
Granbury, TX
Thanks, I appreciate the feedback JC. Yeah I figured I don't want to overtorque the rubber but wanted to make sure. I'll see if I can get some inserts in it.

I picked up a compression tester from autozone while troubleshooting starting issues the other day (dirty connector in the stop start switch). Seems to be of decent quality. Supposed to be a recently rebuilt engine but I have my suspicions (when I took apart the exhaust the gaskets had definitely seen a few years of use). Why would you rebuild an engine if your not going to pull the exhaust off and replace the gaskets.... Any thing I should look out for with low compression?

If both cylinders are within 5% of each other compression-wise, your tester or method may be suspect. Make sure you're testing with your throttle wide open and a spark plug still installed in the hole not being tested. If possible try a different gauge like a loaner from Autozone or O'Reilly.

For the head exhaust mounts, I would try and source new rubber grommets and make sure they have the metal insert. Definitely repair damaged thread with mechanical means like a helicoil or timecert.
 

bored&stroked

Urban redneck
Location
AZ
I had that pipe on a 94. I wanted to run my already modded oem cylinder head, which obviously didn't fit the top mount. And so I cut it off. Yup, strait sawed it away. Only ran the side mount that bolts to the bracket that mounts to the exhaust. It would kill the rubber mounts in one ride, and usually snap the 5/16" bolts too. Bolts lasted longer without the rubber mounts weirdly enough. Finally drilled the bracket out for 3/8" bolts, and didn't run the rubber. Lasted all season after that lol. Ran it for a few years without issues.
 
I had that pipe on a 94. I wanted to run my already modded oem cylinder head, which obviously didn't fit the top mount. And so I cut it off. Yup, strait sawed it away. Only ran the side mount that bolts to the bracket that mounts to the exhaust. It would kill the rubber mounts in one ride, and usually snap the 5/16" bolts too. Bolts lasted longer without the rubber mounts weirdly enough. Finally drilled the bracket out for 3/8" bolts, and didn't run the rubber. Lasted all season after that lol. Ran it for a few years without issues.
LOL that's funny. I'm glad I am not the only one who has been frustrated with this pipe. It would be nice to get a few more years out of this pro-tec pipe if possible. Having already invested 200$ on bolts and stuff makes me wish I had just bought a B pipe when I noticed this would be a long term issue.
 
If both cylinders are within 5% of each other compression-wise, your tester or method may be suspect. Make sure you're testing with your throttle wide open and a spark plug still installed in the hole not being tested. If possible try a different gauge like a loaner from Autozone or O'Reilly.

For the head exhaust mounts, I would try and source new rubber grommets and make sure they have the metal insert. Definitely repair damaged thread with mechanical means like a helicoil or timecert.
I have a metal EZ-Lok insert on the way and I'll have my fingers crossed that it does the trick. I will grab another compression tester and see if I can duplicate the results.

Thanks for all the help guys. I'll update this when I get more information.
 
Welp I had a buddy come into town and decided to take it out for a quick ride with just the two bottom bolts in and we snapped the bottom bracket off the exhaust body lol.

Looks like there is a decent wait time for a B Pipe. Could I even run a stock exhaust with the dual cooling Pro-Tec head?
 
Looks like I got lucky and my B Pipe is on the way. Is there a chance that I won't need to rejet my carbs since I had a pro tec pipe on their before? I will need some new bolts for the exhaust head to attach to the engine. Can I pick those up locally or do they need to be genuine yamaha parts?


My compression gauge was off by at least 15 psi it looks like compression should be near 150. Every thread that says to check your brand new compression gauge is not joking. I can't beleive they are really that commonly junk.
 
Okay making some progress with the b pipe install but ran into some issues getting the fuel tank to fit. I can get the tank in but there is no clearance between the tank and the exhaust chamber. The batter holder will also not slot in. I believe the problem is that the main rubber exhaust hose is preventing the tank from sliding back further in the hood. In order to get the chamber to fit I had to lower the thickness of the waterbox (looks like RRP?) foam support. In doing so this now changes the angle of the black exhaust hose and reduces the volume the tank can fit into.

Looking for recommendations to get everything to fit....

The stock b pipe coupler is bent but with my current waterbox should I instead have a 90* coupler?

It looks like I could get a new exhaust hose but I don't see any that are advertised as longer than the stock one... Is the raddudes one longer perhaps?
 

Attachments

  • PXL_20220917_134259279.jpg
    PXL_20220917_134259279.jpg
    168.3 KB · Views: 15
  • fuel tank fit issues.jpg
    fuel tank fit issues.jpg
    201 KB · Views: 15

WFO Speedracer

A lifetime ban is like a lifetime warranty !
Location
Alabama
Remove the tank. empty it out, run a water hose in it and let it run for a bit, lay it out in the yard and let it dry, Once all that is done get the heat gun out and a thick pair of work gloves, heat the section of the tank where it is hitting at now take you gloved hand and dent the tank in where it hits at, hold it till it cools.
 
Allrighty, I got the tank altered and it fits in nicely. I definitely created some thin spots in the tank because the seam wanted to spread open but it should still hold fuel. Thanks speedracer for the tip.

She started right up and sounds AMAZING.

I sanded the ribs for the install of the exhaust chamber and put some sanded hydroturf down (~1/8" thick) along the gunwhale where the chamber tracks near the hull. This definitely reduces the amount of room that the chamber has to move though. The chamber still moves but not a whole lot. I'm wondering if I should sand down the turf more or just keep an eye on things as I break it in?

 
Top Bottom