Smoofers' Super Chicken Build (Mostly Complete)

smoofers

Rockin' the SQUARE!!!!
Site Supporter
Location
Granbury, TX
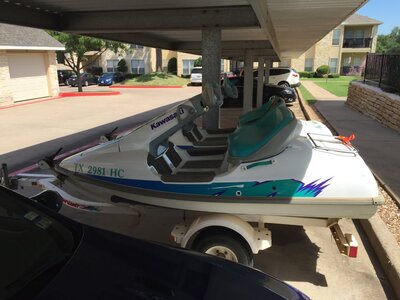
So I bought a pair of '93 super chickens I found on craigslist. The owner said they'd been kept indoors (in a boat house) their whole life and were used by his grand children when they would come to visit. I figured they would be in pretty good shape, the pictures showed them to be. Well, looks can be deceiving, turns out one had a locked up motor and the other had low compression on one cylinder. Good news was that I got them for half of his asking price when all was said and done along with two clean titles.

I've been wanting to do a SC build for ages but just haven't had time/money (it's always one or the other). This thread is documenting the first of the two to get rebuilt.


Here's how they looked when I brought them home.
IMG_3573.JPG IMG_3574.JPG

I don't have any pictures of the underhood as-is, just imagine a ski that hadn't been rinsed out its whole life. Just picture really dirty and covered in black grime.

I just started tearing out components and bagging and labeling bolts. The fuel I drained out was disgusting, not to mention the crud in the bottom of the tank and the condition of the fuel pickup.

IMG_3583.JPG IMG_3584.JPG

Here she sits with the hull emptied:

IMG_3587.JPG IMG_3588.JPG IMG_3590.JPG
 
Last edited:

smoofers

Rockin' the SQUARE!!!!
Site Supporter
Location
Granbury, TX
I started pulling apart the stock 650 to asses its condition. The original goal was to maybe get it bored and rebuild the carb, as well as rebuild the pump and carrier bearing if needed.

IMG_3596.JPG

Notice how clean the stator and bendix are. Then i got to the crank and found a noisy rusty bearing...

At this point, i wasn't about to buy a new crank for a 650, so I started looking at transplant options. Turns out I found a 750ss with no title and in bad shape for $400 bucks. So I snatched it up to yank the motor and anything else useful. The hull instantly went to the dump, sorry I don't have any pictures.

This is the 750 I yoinked.

IMG_3619.JPG

It had dual Keihns (sp) and i figured I would use them. The more i looked into this motor the more I realized it was Frankensteined together. It was a small pin 750 with dual carbs... pretty rare for a 750ss and through my searching it looks like somebody added them to this ski. But I did find one bonus: a good condition Nujet impeller that seems to be the perfect pitch for the SC with a 750 (at least my research made it look that way)

IMG_3618.JPG
 

smoofers

Rockin' the SQUARE!!!!
Site Supporter
Location
Granbury, TX
The 750 had a bad crank (go figure) and needed a bore as well. So while I was waiting for pistons to arrive before I could send off the cylinder, I started cleaning up the engine bay.

I power washed out all of the gunk, but the fiberglass was pretty stained. I bought a quart of white bilgekote and started prepping to paint the engine bay. I sanded all surfaces with 150 grit, vacuumed and blew it out (compressed air), then wiped with acetone and blew it dry again. The pics below show the hull masked up and ready for bilgekote. I have to give credit to my lovely wife for helping out with the sanding and masking, it's great to have a wife that supports my hobby and is willing to spend time getting dirty in the garage!

IMG_3606.JPG IMG_3607.JPG IMG_3608.JPG IMG_3610.JPG
 

smoofers

Rockin' the SQUARE!!!!
Site Supporter
Location
Granbury, TX
I had loaded up all of the 750 parts in my truck to go get a quote from a local powder coat company a few minutes away from my office. Turns out they wanted more than I was willing to pay at this point.

I work for a large (global) Oil & Gas equipment manufacturer and as a result we have a lot of local suppliers. One of our subcontract paint shops is a local family owned business and the owners are super friendly, generous people. I drive past the business on the way to and from work every day. So, i stopped by on my way home from work and asked them if they'd be willing to blast and paint my parts. They said yes and quoted me a price so low i was ashamed for asking. So naturally i had them do the work (I paid them more than they quoted because it was just too cheap).

Since they regularly paint our parts to our customer's specs i already knew what colors they had readily on hand... and I knew exactly the color I wanted. The paint is an industrial poly urethane that is used on oil field parts and holds up in that environment so I know it will work great on a jetski motor.

The manager texted me a photo of the work in progress. They were slow at the time and seemed excited to be painting something that wasn't oilfield equipment.

IMG_3643.JPG

The finished cases.
IMG_3648.JPG
 

smoofers

Rockin' the SQUARE!!!!
Site Supporter
Location
Granbury, TX
I ended up going with a new SBT crank and a pair of Wiseco pistons and said screw it and went 2mm over (for more displacement!). Pictures of the motor build:

IMG_3703.JPG IMG_3705.JPG IMG_3706.JPG IMG_3710.JPG IMG_3711.JPG IMG_3712.JPG IMG_3713.JPG IMG_3715.JPG
 

smoofers

Rockin' the SQUARE!!!!
Site Supporter
Location
Granbury, TX
So I tried pressure testing and had a small leak. Turns out the cylinder had a corrosion hole from the water jacket into the transfer port. Using JB weld and a syringe, I was able to seal it up perfectly (no pics, sorry).

IMG_3746.JPG

I then tore apart the carbs to see their condition and jetting, since they weren't original to the motor. Turns out the Keihins (sp?) were rusty inside and had 3 JETS!!! At this point I said screw it and decided I would go with a tried and true Mikuni 44 single. This would be easy cause I had one sitting in my parts pile. Turns out it had been amateurishly taper-bored and i didn't want to use it.

SO, I said SCREW IT and bought and brand new Mikuni 44 and an R&D 750 single manifold. Notice in the pic, the stator cover is black. I ended up having to use the 750 stator and flywheel due to the way the crank taper was set up (I had originally planned to use the 650 electrics and stator cover). So I sanded and painted the stator cover with black engine paint. I also cut off the old greasy tape and tubing off the stator harness and replaced it with green loom.

IMG_3897.JPG

The above pic also shows the Coffman's manifold that belongs the the complete Coffman's 750ss exhaust I bought of a buddy. Hopefully it will fit in the super chicken!

Bonus pic of the inside of a Mikuni that has NEVER seen fuel.

IMG_3900.JPG
 

smoofers

Rockin' the SQUARE!!!!
Site Supporter
Location
Granbury, TX
Going back to the fuel pickup, i saw a guy on greenhulk do this and I figured it was a good idea. Fixed the fuel pickup by cutting off the old lines and drilling and tapping for 1/8" NPT fittings. McMaster supplied the 1/4" SS tubing and 1/8" NPT x 1/4" compression fittings. Viola, fuel pickup fixed.

IMG_3908.JPG

After the engine turned out so nice I came to the realization that I couldn't leave the outside stock. So I ordered some rubber eraser wheels and got to work peeling the graphics. The wife saw I was having so much fun (?) so she decided she wanted to help. Seriously, she's a beast with the eraser wheel and literally took the drill away from me to go at it.

IMG_3921.JPG IMG_4083.JPG
IMG_4246.JPG
 

smoofers

Rockin' the SQUARE!!!!
Site Supporter
Location
Granbury, TX
Graphics all removed. The eraser wheel is seriously the way to go.
IMG_4247.JPG

Now I needed to mock up the new exhaust, since I got a Coffman's 750ss full setup. First things first I had to bolt in the motor and exhaust to see if it was going to fit and clear in the hull.

Success!

IMG_4209.JPG IMG_4210.JPG

The waterbox for the 750 wasn't going to work so i ordered a SeaDoo waterbox off of ebay. i think this one is from a 95 XP.
IMG_4219.JPG IMG_4221.JPG
 
Last edited:

smoofers

Rockin' the SQUARE!!!!
Site Supporter
Location
Granbury, TX
The exhaust tubing was next. I had a couple of Amazon gift cards laying around and decided to go the easiest (and blingy-est) route: Silicone and aluminum tubing.

IMG_4235.JPG

I used 2" OD 1/16" wall aluminum and cut it on my chop saw, then deburred with a 90 grinder and scotch brite wheel.

IMG_4241.JPG IMG_4242.JPG

Came out pretty nice.
IMG_4245.JPG
I got my flame arrestor and adapter in from @JetManiac so i slapped it on to see how it would look.

IMG_4255.JPG
 
Last edited:

smoofers

Rockin' the SQUARE!!!!
Site Supporter
Location
Granbury, TX
I needed a bead on the exhaust tubing to keep the hoses from popping off. So after a quick search on youtube I found the perfect solution. I bought a set of crimpers at home depot for ~$12 and hacked off the clippers with my dremel.

IMG_4277.jpg

I did a test run on a piece of scrap tubing and it came out pretty nice!
IMG_4244.JPG

I put beads on all of the aluminum tubing but don't have any pics of them or the process.

Now I needed a way to keep the waterbox in place. Ordered some UFO mounts, SJ hooks and an SJ waterbox strap (I measured the length I needed, turns out the WB strap was perfect) from @Jetmanic.

UFO mounts glassed in:
IMG_4263.JPG

Hooks installed:
IMG_4262.jpg

Perfect! I plan to put some turf down to cushion the waterbox when I do the final install.

IMG_4261.JPG

The drain plug on this ski has been seriously bugging me. Why install a drain plug that is an INCH off the floor of the hull?
IMG_4269.jpg

So I figured I'd fill in the drain plug and re-drill a new hole so the ski will actually drain completely and not leave a bunch of water in the hull. The plan is to put in a new drain plug outlet with a versaplug from @JetManiac

Hole prepped for glass:
IMG_4270.jpg
Glass applied:
IMG_4271.jpg
Glass ground down. I plan to go back and fill the screw holes with thickened epoxy.
IMG_4276.jpg
 
Last edited:

smoofers

Rockin' the SQUARE!!!!
Site Supporter
Location
Granbury, TX
Sadly, now the thread is where my current progress sits. The next step is going to be filling in the side handle holes and the start sanding the hull for paint. What wasn't shown that has been done so far:

-Rebuilt pump
-Rebuilt carrier bearing
-Rebuilt & repainted starter
-Disassembled steering assembly and cleaned all parts, then greased and reassembled

Plans moving forward:
-Sand hull for paint
-Have hull painted
-Recover seat
-Figure out electrics and cable setup.
-Turf cockpit and rails

I've already put down a deposit with Exotic Signs for the hull graphics. I won't tell what they are going to look like but I think you guys will enjoy it!
 
Last edited:
This thing is coming out sweet!
I'm surprised you didn't get a 46 carb since you bought new.
What are your plans for the seat?? My seat is thrashed so I will be watching for ideas.
 

smoofers

Rockin' the SQUARE!!!!
Site Supporter
Location
Granbury, TX
This thing is coming out sweet!
I'm surprised you didn't get a 46 carb since you bought new.
What are your plans for the seat?? My seat is thrashed so I will be watching for ideas.

Thanks dude!
I went with the 44 due to price and my research showed no issues with a 44 on a 750. Most of what i saw showed better gains with a 44 over a 46. I could be wrong, but I'll start with the 44.
As for the seat I probably get a local upholsterer to do it. I'm waiting on the graphics to decide on the turf and seat vinyl color.
 

smoofers

Rockin' the SQUARE!!!!
Site Supporter
Location
Granbury, TX
Bilge hole repair filled with epoxy and micro bubbles and sanded smooth.
IMG_4279.jpg

Drain Plug mock installed with Versaplug
IMG_4293.jpg

Shot from inside the hull, now it will fully drain.
IMG_4296.jpg
 

smoofers

Rockin' the SQUARE!!!!
Site Supporter
Location
Granbury, TX
So it's been a while since i gave an update. So far I've repaired some serious cracks on the top side back corners. I started grinding at the cracks and kept grinding out mildewed, delaminated rotten glass. When it was all said and done I had ground out 3 complete sections about 4"x 3" each!

After a lot of sanding and time spent trying to find a (reasonably priced) painter, I dropped it off with the painter 3 days ago. Can't wait to show pics.
 
Top Bottom