Super Jet Swapmeet's "Really?" RN build

swapmeet

Brotastic
Location
Arlington TX
looks like maybe it had paint inside the hull and that could be why all the glass didnt bond. paint is not glue. smc is not the easiest stuff to bond to. epoxy only.

since you got it all cleaned out inside take a look up at the nose and if you see repairs its a good bet that nose is poorly repaired. if its solid maybe they just cracked the rail and the repair wont be so deep. more cosmetic and weight saving.

if you are going all the way something else to think about too, the bondline usually has a weak spot where the glue is letting water in. you may want to fill and reinforce the perimeter of the hull if you are in it that far.

at least after the fx you have the skills now. look forward to a ride report or a build update.

remember riding>wrenching

Intresting questions. I have answers!

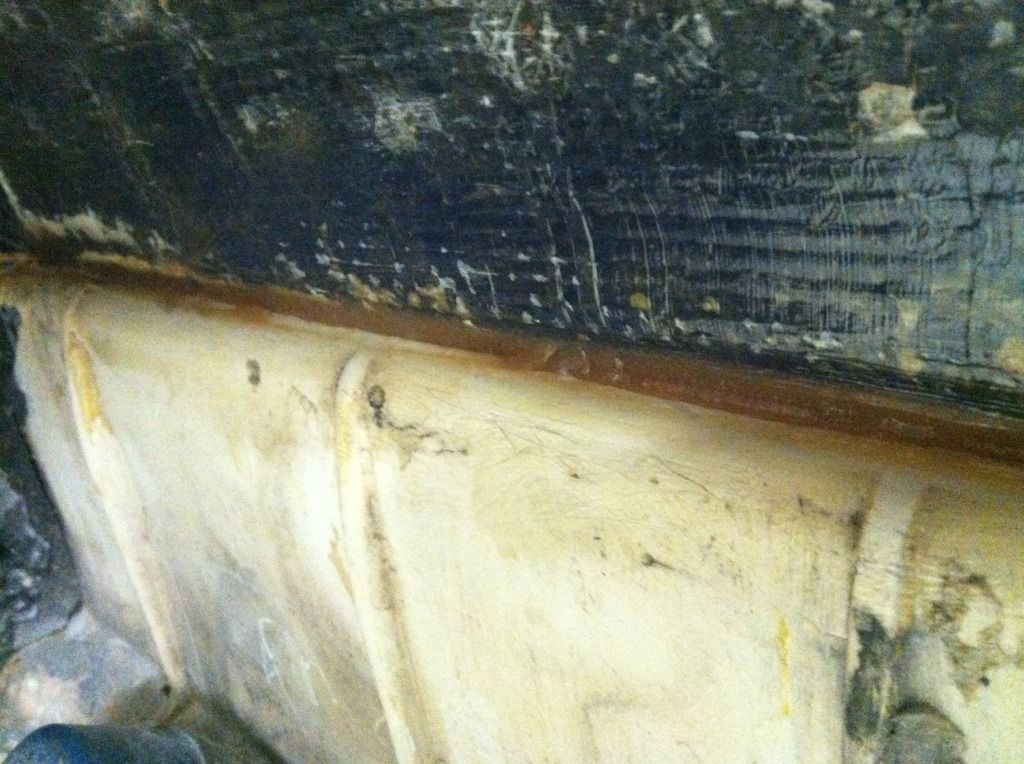
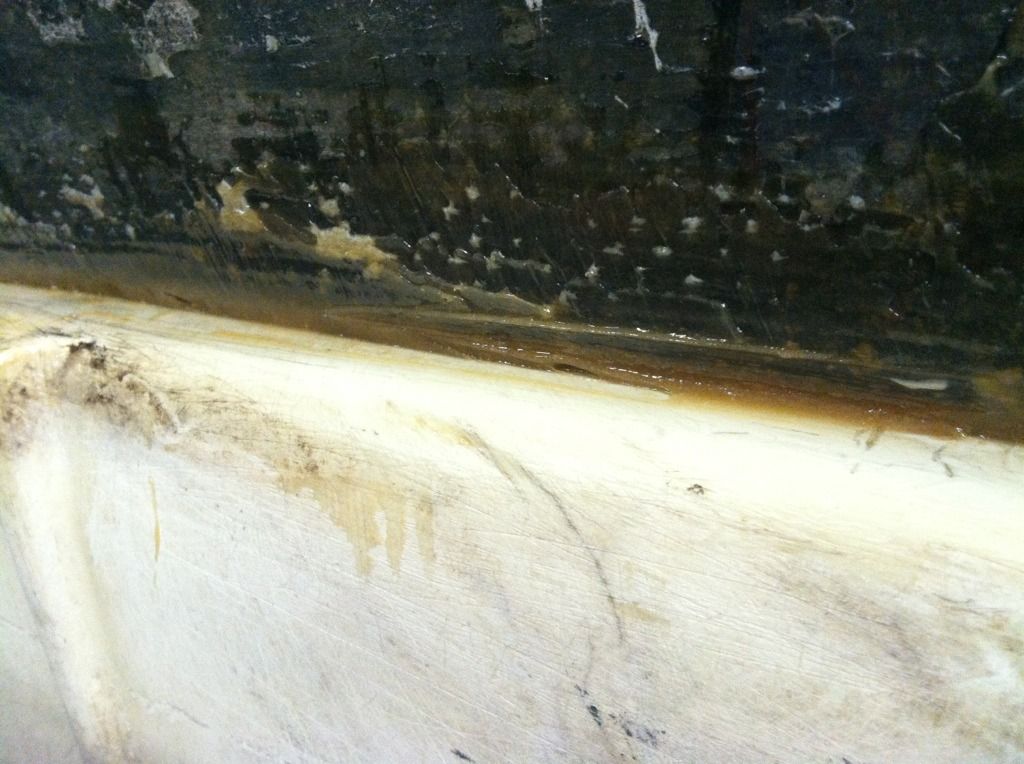
The SMC side of the glass was bare, but the engine side (that the CF laid against) was painted gray. I believe that paint was part of the bonding problem.

I have looked at the nose from the inside and it appeared to be fine, no repairs etc. The stock glue was still sticking out between the decks. I agree that perhaps somebody lawn darted the ski and fixed/ reinforced the nose to stop a future break from happening or fix one that happened.

Concerning the bond line. When it was reinforced, it appears that the green glue has been removed. Unfortuantely whatever was used to replace it did not stick (GASP!!!) and came out with the glass. I was going to wait to put something in its place so that when I did everything, the material used to fill the bond line would make a chemical bond with the fabric layed on the side.

I'm still at a point that I can fill it if ya'll think its better to reinforce it now. My thinking is that I don't ride very hard and i'll probably spend the remainder of this season re-learning how to ride this hull.

Thanks for the feedback Tom.
 
Last edited:

swapmeet

Brotastic
Location
Arlington TX
SO..... I get my package today from JetManiac, as promised. I knew I wouldn't be on the water this weekend, but maybe next.
I install my bored nozzle, and begin to install my pump........................................ One of the GDMF'n pump mounts is stripped and loose.

:aargh4::aargh4::aargh4::aargh4:Reeeeeeeeeeeeeeallly!!!!!!!!!!!!?!?!?!?!?!??!:aargh4::aargh4::aargh4::aargh4:

I'm pretty pissed. I've had a rough day and was looking forward to making some real progress on this thing. FML...
I don't know what to do. From what I understand, I have to dig it out and glass in a new one. I'm assuming thats from the tray? :banghead:

I'm trying so hard to not dig into this ski. I want to, but its bad timing.

Anyhow. I decided that something needs to be supporting the gap in the bond line. Since I know I won't be doing the full reinforce until later (right? right?) I mixed up a little epoxy resin and some cabosil to peanut butter consistency and paddled some in the gap leaving enough room to add more later and create the chemical bond. I think its a good compromise to get me on the water and still keep the ski relatively sturdy.
Open to opinions on that.
Before anyone cracks jokes about my epoxy actually looking like peanut butter (harharhar!!!), its west systems epoxy and thats the color its turned over time, no idea why but it was making me chuckle a little bit when I was mixing it up.

e57acf82.jpg

45e3b237.jpg


And because I haven't take any pics with the handle pole on or the decals removed... (please pardon my messy garage. I don't know how to keep it clean.)
c1777dbf.jpg


And this is where my bars hit the hood.
ae14724b.jpg
 

swapmeet

Brotastic
Location
Arlington TX
Went to the hardware store today, no stainless metric parts to fix my pump mount, but after doing some reading on here I read that people were switching to SAE. The T nut and fastener here are 3/8's, pump mount bolt is next to it.

Do y'all think I can use tooling resin and glass or two part epoxy to mount this in place of the loose pump mount? I would cut and bend the edges to help it grab.
Have I lost my mind?

52a79916.jpg


31eee873.jpg
 
For your bolt issue. i had a similar problem with the midshaft area. i think a tap and dye kit can makr the bolt hole a tad bigger. you end up modding more parts though. i had to open up the bolt hole on the midshaft fpr the bigger bolt. that saved me from having to glass. stripped is one thing but if its loose the only way j have ever seen it fixed was from the inside.
 

swapmeet

Brotastic
Location
Arlington TX
Thanks man. Hopefully someone can help me out without me having to start a thread about each topic.

*edit* just saw your second reply. Yeah it's loose. Unless I can find mount locally, I'll glass in this stainless piece. I have some ideas on how to keep it in place.
 
Last edited:

swapmeet

Brotastic
Location
Arlington TX
Ok thanks to SuperwetBrett or he "how to" on this. Hope it helps someone else.
First, drill a pilot hole from the bottom through the center of the pump mount.

Then cut the turf larger than 2". I cut an irregular shape to make it easier to replace.
faa8513d.jpg

Then I used a 1 5/8" hole saw to cut the tray, using the smaller hole as a pilot.
(side note, that tray looks way too thick IMO)
56ebedbb.jpg

Next I pull out the pump mount and drill it out to the diameter of the stainless Tee nut.
I couldn't find a stainless metric Tee Nut, so I used 3/8" standard, which is almost identical in diameter and has coarser threads. I used a Tee Nut with barbs, you'll see why shortly.
a4e8935b.jpg

4fd17a93.jpg
Next, I score the brass with the barbs, then use a punch to make drilling holes easier. I drilled small holes for the barbs to fit into. The holes are smaller than the barbs.
Then I hammered the Tee-nut into the brass mount.
0db013a4.jpg

I assume because the stainless is thin, it distorted some. I had to run a tap through the Tee to get the bolt to go through smoothly.

5bee7e54.jpg

I bought a few different lengths of bolts so It can reach the threads.

I don't have any 5200, but I'll ger some tomorrow, seal the repaired mount in, glass in the plug from the holesaw, then glue the turf plug back in.

95a04f2e.jpg

What do y'all think?
 
Last edited:

JetManiac

Stoked
Site Supporter
Vendor Account
Location
orlando
Ok thanks to SuperwetBrett or he "how to" on this. Hope it helps someone else.
First, drill a pilot hole from the bottom through the center of the pump mount.

Then cut the turf larger than 2". I cut an irregular shape to make it easier to replace.
View attachment 186450

Then I used a 1 5/8" hole saw to cut the tray, using the smaller hole as a pilot.
(side note, that tray looks way too thick IMO)
View attachment 186451

Next I pull out the pump mount and drill it out to the diameter of the stainless Tee nut.
I couldn't find a stainless metric Tee Nut, so I used 3/8" standard, which is almost identical in diameter and has coarser threads. I used a Tee Nut with barbs, you'll see why shortly.
View attachment 186452

View attachment 186453
Next, I score the brass with the barbs, then use a punch to make drilling holes easier. I drilled small holes for the barbs to fit into. The holes are smaller than the barbs.
Then I hammered the Tee-nut into the brass mount.
View attachment 186455

I assume because the stainless is thin, it distorted some. I had to run a tap through the Tee to get the bolt to go through smoothly.

View attachment 186456

I bought a few different lengths of bolts so It can reach the threads.

I don't have any 5200, but I'll ger some tomorrow, seal the repaired mount in, glass in the plug from the holesaw, then glue the turf plug back in.

View attachment 186457

What do y'all think?


Looks good, but why not just replace the oem brass insert?
 

swapmeet

Brotastic
Location
Arlington TX
You have to ask me that? The same person who cut driveshaft splines by hand because it was quicker than sending one out? LMAO!

yeah, just tired of delaying the build another week, then another week etc. I order something else from You every Tuesday (no offense, you've been great) to get the package on Friday and find out by Sunday that I need something else. Also I enjoy figuring stuff out and learning alternatives to just buying a OEM replacement part.
Tomorrow I get 5200 at lunch and then mount the pump, align the pump, install midshaft. Thursday I'll drop the motor in and tart alignment etc.... Just need to make progress.
 
Last edited:

swapmeet

Brotastic
Location
Arlington TX
The brass will be held in place with 5200, after I pick some up today. I don't know what holds it from the factory, but nothing was there when I opened the tray up. It was loose and would push up into the foam area of the tray and spin when I tried to thread the bolt in. Thats why I had to do all this BS.

Are you asking about the pump cavity hole or that side of the brass mount?
 
on the pump cavity is it the standard hole? or was that modified. The OEM's are glued in place with that nast green glue crap isn't it?

just wondering if 5200 will be strong enough is all.
 

swapmeet

Brotastic
Location
Arlington TX
I already 5200'd it. The way I see it the part will have all the force pulling it down via the bolt. So as long as its sealed I THINK it'll be ok. We'll see. It's all coming apart this winter.
 

swapmeet

Brotastic
Location
Arlington TX
Little update from yesterday. True to my word, mount is 5200'd in place.
Pump is mounted and shimmed (finally!!!!), midshaft is in, and I put the motor in. Its just sitting there, need to grab some hardware for the Ebox mounts.

9cf5162f.jpg

And keeping with the theme.... I found something new last night. If you look at the first pictures, you'll see the super frickin sweet Blowsion Billet exhaust dress up thing on the exhaust outlet. Easily worth 5hp at the sparkplugs...
94b7953d.jpg

I took it off beacuse I didn't think I could handle that level of awesome until I go pro. Well, last night I think I found out why it might have been there. (pardon the 5200 slathered on the exhaust seam, I figure i'm gonna get my money's worth from a $14 tube of 5200 that becomes useless about 3 days after you open it.)
5334f60d.jpg

This was after I started grinding on it, nice long crack... (really.....) I'm on the fence on weather the previous owner knew about this or not. Guess it doesn't matter, its my problem now.
I plan on filling it with epoxy resin and some chopped matt fibers, maybe throwing a layer of glass on top for good measure. I'm more concerned about water ingress than strutural failure.
 
Last edited:
Top Bottom