You are using an out of date browser. It may not display this or other websites correctly.
You should upgrade or use an alternative browser.
You should upgrade or use an alternative browser.
Freestyle The "it sure looks good sitting on a stand" Backie Chan build!
- Thread starter N-D-Red
- Start date
makejetskiinggreatagain
Brandon
Its funny, I hated orange until I got into this sport. Now I love it. I don't know why.Wow I'm not a big fan of orange but that thing looks awesome.
makejetskiinggreatagain
Brandon
Being that its your first build, would you be willing to take as much video footage as possible for those of us who also have never done a build and find it a little intimidating? I think it would be informative to see someone struggle with things that someone new to the process would struggle with and see how they worked through it (your ingenious idea to use the ratchet straps to help with the alignment for instance). plus there isn't a lot of video footage of someone documenting an entire build. I know a lot of you are pros with this stuff, but some of us aren't. Just a thought. anyways, nice ski 
The motor mount to hull bolts use OEM as does the mid shaft. So far seems like only the pump were different.Looks awesome so far, any idea what size the bolts for the motor mounts to hull are?
(your ingenious idea to use the ratchet straps to help with the alignment for instance). plus there isn't a lot of video footage of someone documenting an entire build. I know a lot of you are pros with this stuff, but some of us aren't. Just a thought. anyways, nice ski
The ratchet strap seemed like a good idea until after I watched this video(
Anyways, making a video of me struggling with things and then putting it on here for you guys to see doesn't seem like a good deal for me!! Just joking I'll see what I can do as I get into this MSD instal.
makejetskiinggreatagain
Brandon
Ha ha understandable
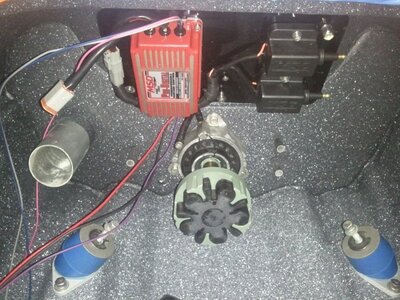
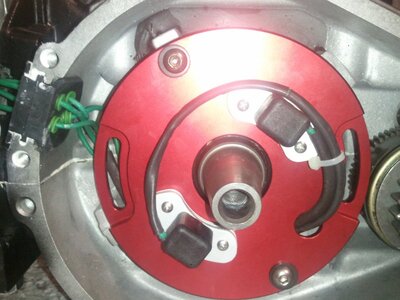
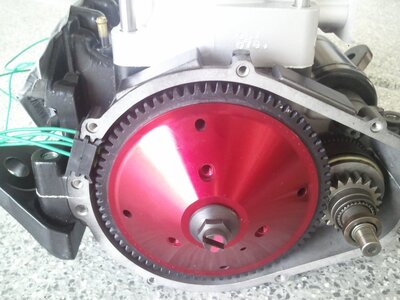
Lots of work over the last few days……kudos to anyone that can build these things in a couple weeks. For me it feels as if time flies by each day and I barely get anything done. Thats mostly because I have to constantly re-do parts of this build to fix mistakes. MSD TL has consumed my thoughts for the last week. Its coming along nicely though. Mounting plate is basically done. The ignition and the coils are mounted. The triggers and fly wheel were installed this afternoon. Of course I had to take it apart and fix some thing after reading Matt E's thread on fool proofing MSD TL. A few words on MSD. The instructions that come with the parts are missing instructions in at least two places. I called and they said they had never heard this. The website instructions are the same way. I let them know that for the price, a guy like me who has never done this before expects complete instructions.
The wires from the triggers seem very fragile. I used heat shrink as Matt suggested to give them a fighting chance in what seems like a brutal atmosphere inside that flywheel cover. The instructions call for using clay to check the air gap between the flywheel and the triggers. I don't have clay but I do have kids and Play Dough worked great. I will say using a caliper to check the thickness of Play Dough was new for me. I won't ramble on too much more. Dual bilges showed up today and that will be the next project. I need to figure out what battery I'm gonna run and where I'm gonna put it. This thing is set up to have it in the stock location but Im gonna run a PFP. My current plan is to put it behind the motor mount on the left side. Not much room there and I don't want to run an Anti-Gravity. Anyways here are some pics.


The wires from the triggers seem very fragile. I used heat shrink as Matt suggested to give them a fighting chance in what seems like a brutal atmosphere inside that flywheel cover. The instructions call for using clay to check the air gap between the flywheel and the triggers. I don't have clay but I do have kids and Play Dough worked great. I will say using a caliper to check the thickness of Play Dough was new for me. I won't ramble on too much more. Dual bilges showed up today and that will be the next project. I need to figure out what battery I'm gonna run and where I'm gonna put it. This thing is set up to have it in the stock location but Im gonna run a PFP. My current plan is to put it behind the motor mount on the left side. Not much room there and I don't want to run an Anti-Gravity. Anyways here are some pics.


Attachments
- Location
- Lake Orion, MI
Man...i couldn't imagine setting up the TL by myself...serious props to you!
I'm to scared and dont trust my skills with anything electrical....so i sent mine to JSS Solutions right out of the box
I will be running the powerfactor as well this year and my battery will be behind the exhaust in the rear corner.

I'm to scared and dont trust my skills with anything electrical....so i sent mine to JSS Solutions right out of the box
I will be running the powerfactor as well this year and my battery will be behind the exhaust in the rear corner.

Byeai
"Cheetos-Man"
- Location
- Melbourne FL
Man...i couldn't imagine setting up the TL by myself...serious props to you!
I'm to scared and dont trust my skills with anything electrical....so i sent mine to JSS Solutions right out of the box
I will be running the powerfactor as well this year and my battery will be behind the exhaust in the rear corner.

How much did they charge u
Sent from my SAMSUNG-SGH-I337 using Tapatalk
849tigerbotkv1
formerly ihate5mphzone
- Location
- where i can ride 2stroke
Ive heard good things about wps featherweight lipo battery (check amazon.com)
- Location
- Ogden, Utah
I've sold a ton of WPS lithium batteries and so far everyone has loved them. Great battery and great warranty.
- Location
- Lake Orion, MI
How much did they charge u
Sent from my SAMSUNG-SGH-I337 using Tapatalk
sent you a pm so we can keep this thread about the build
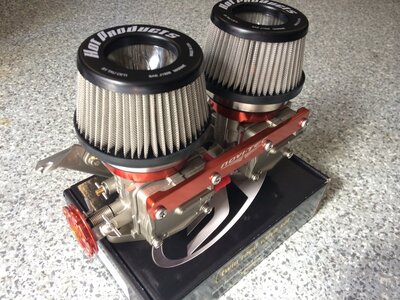
 So this thread has been quiet for awhile but it certainly hasn't stopped. I have been making steady progress with mounting battery boxes and ordering odds and ends while I wait for parts. My hull was set up for a battery to be in the standard location so a plate had to be made and epoxied into place behind the motor and a modified Cold Fusion box was bolted into place with a WPS battery. Today though is big progress. These beauties arrived!! I purchased them from PHP for a few reasons. Zach is a good dude number one and number two he jetted them for my motor combo for me and his price is right on. The box they are sitting on held the new V-Force 3 reeds that are already installed which were purchased from Jet Maniac. I need to install my tank and run some fuel lines and then hopefully within a week or so my PFP will arrive. It won't be long I hope till this Ol' girl gets wet!!
Byeai
"Cheetos-Man"
- Location
- Melbourne FL
Pfp ohhhhhhh awwwwww lol
Sent from my SAMSUNG-SGH-I337 using Tapatalk
Sent from my SAMSUNG-SGH-I337 using Tapatalk
- Location
- wichita, ks
am i the only one that has noticed that your trigger plate is on incorrectly and the bolts go in the sliding holes?? just wanna make sure you r on the same page
Byeai
"Cheetos-Man"
- Location
- Melbourne FL
Oh poop yea they are on wrong I'm almost positive he changed them from some questions he's asked but good catch
Sent from my SAMSUNG-SGH-I337 using Tapatalk
Sent from my SAMSUNG-SGH-I337 using Tapatalk

