What could cause case sealant failure on almost new PV motor?

WFO Speedracer

A lifetime ban is like a lifetime warranty !
Location
Alabama
Was the Loctite 518 the red sealant that only dries when two surfaces are mated? (Air circulation is cut off for no better term).
yes and only Mr Ski still uses that stuff. That sealant looks like black RTV or possibly Right Stuff, neither is Gasoline safe and gas will dissolve either. Right Stuff is more heavy bodied and looks almost like rubber when dried, Silicone dries shiny Right Stuff dries dull.
 

Big Kahuna

Administrator
Location
Tuscaloosa, AL
yes and only Mr Ski still uses that stuff. That sealant looks like black RTV or possibly Right Stuff, neither is Gasoline safe and gas will dissolve either. Right Stuff is more heavy bodied and looks almost like rubber when dried, Silicone dries shiny Right Stuff dries dull.
I was given some of the 518. Used for years with no issues. Once it ran out I went back to 1211. But it all goes back to your prep and proper installation in many cases.
 
Improper prep. I doubt the wrong material was used, but if sealant failed it was either applied wrong or they just didn't clean well enough.
 
The motor is a XS1060 which I bought brand new around this time last year. Everything in it was brand new and it only has a little over 8 hours of ride time on it now. There doesent appear to be any stripped or crossthreaded holes in it.
Oh no. That motor was a total nightmare joke . The guys from Santa Rosa bought one and they had to send it back 3 times with multiple issues. Total pos that was hack built more than once.
 
Location
Stockton
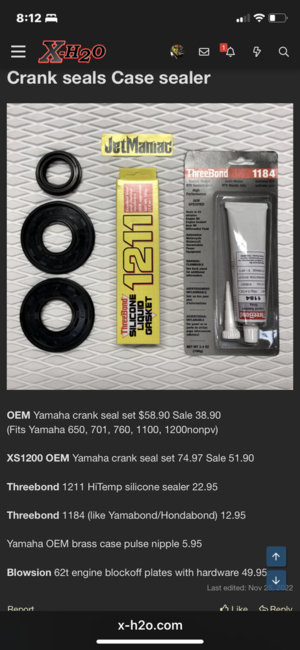
Thats what I though as well. I could pretty much wipe it off with my finger. Yea I used 1211 on my 735 motor and it seems to be working great. What about Threebond 1184? I have a tube of that and I can't recall what I got it for at this point but it claims to be resistant to gasoline.

Jetmaniac has both 1211 & 1184 for case sealing
 

Attachments

  • 1A146252-9F2B-45D9-9340-9D7C57FA8FF0.png
    1A146252-9F2B-45D9-9340-9D7C57FA8FF0.png
    456.7 KB · Views: 33
Oh no. That motor was a total nightmare joke . The guys from Santa Rosa bought one and they had to send it back 3 times with multiple issues. Total pos that was hack built more than once.

Any chance I could get you to elaborate on what those issues were, so I can try to adress them while I have it torn down?
 

Flash-FX

No Square..No Round..FX-1
JK, there might be a couple of things adding up to create this issue. Besides the cases, the crank should be checked in V blocks to make sure it's running true. If things get a little twisted, there will be all kinds of forces working against the bearings. The front and rear bearings (outer shell) of your crankshaft look like they had a hard life for only 8 hrs?? They appear to have been not clamped by the cases 100%. If the crank checks out to not be twisted, you can probably clean things up, check for case half flatness, and use a little bearing retaining compound, (along with the dowel pins that prevent bearing spin).
 

Myself

manic mechanic
Location
Twin Lakes AR
Now if only I could convince the navy to let me buy a cylinder boring setup. Lol
You probably already have one there........a vertical mill (Bridgeport).
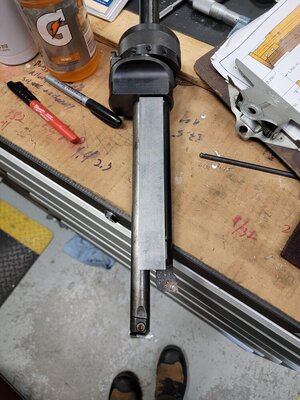
All you need is a boring bar and a cutter. Place the cutter and a piece of bar stock in the boring bar, outer and center hole. Weld them to each other.....this makes the cutter MUCH more rigid and you can still remove it from the tool. MAKE SURE you have the cutter in the right orientation for cutting BEFORE you weld it to the bar stock. You want it at the proper cutting angle. It needs to be an 8" long cutter. Mount the cylinder up above the table an inch or so, and bore your cylinder. IF the mill won't feed down far enough just slowly raise the knee for the difference. Leave yourself a couple thousandths for honing.

Yea we have a couple of them. But I prefer our Haas or Prototraks over the old school Bridgeport. Lol I like the approach though. You mean something like this?? Obviously I would set it up better than that, but I needed a quick visual aid.
 

Attachments

  • 20230411_095344.jpg
    20230411_095344.jpg
    172.8 KB · Views: 30
JK, there might be a couple of things adding up to create this issue. Besides the cases, the crank should be checked in V blocks to make sure it's running true. If things get a little twisted, there will be all kinds of forces working against the bearings. The front and rear bearings (outer shell) of your crankshaft look like they had a hard life for only 8 hrs?? They appear to have been not clamped by the cases 100%. If the crank checks out to not be twisted, you can probably clean things up, check for case half flatness, and use a little bearing retaining compound, (along with the dowel pins that prevent bearing spin).

Well that worrys me a little bit about the bearings.
 

WFO Speedracer

A lifetime ban is like a lifetime warranty !
Location
Alabama
What you are seeing on the bearings and the cases is called fretting and it is caused by the bearings moving around in the cases, you can put the cases together torque the bolts and check the line bore with a bore gauge, then measure the bearings, it may be that the cases are not flat also, in that case to check it use dykem on the mating surfaces with 320-400 grit paper and oil on a surface plate , you make figure eight motions and lightly sand the mating surfaces, any defects in the surfaces will show up immediately., in a pinch marks a lot on the cases and a sheet of glass will work but glass is not as flat as a surfacing plate.

At any rate you need to find out whats going on there before putting it back together and a pressure test is going to be necessary on this one for sure.
 

Myself

manic mechanic
Location
Twin Lakes AR
Yea we have a couple of them. But I prefer our Haas or Prototraks over the old school Bridgeport. Lol I like the approach though. You mean something like this?? Obviously I would set it up better than that, but I needed a quick visual aid.
Yes, you got the idea.
 
Top Bottom