Blaster 200 HP Carbon Fibre Blaster with 155mm Pump

105.jpgiphone pics 283.jpg
The pic of the steering mounting area is a big catchment for water. We have made a water exit at the rear lowest point to evacuate the water in a couple of seconds.
The water runs down a ramp inside the hood & exits at the rear of the hood where the front of the seat sits.
The 2nd pic is of the hood minutes after the final coat of clear was laid down.
The legendary Pooley performed his magic with his spray gun. We had the hull & hood masked ready to go in the spray booth looking grey & boring, Pooley came in & painted the ski in Lamborghini pearl lime green, which Gary chose for his ski, & the parts just came to life!
Pics of the rest of the parts painted & un-masked to follow;
 
iphone pics 295.jpgiphone pics 300.jpgiphone pics 301.jpg
This is the hood with the tacho in place, then handlebars, levers & cables were added ready to bolt on to the ski.
The last pic gives you a bit of an idea what you see looking down at the controls.
 
Love the Whole Carbon Blaster Project, but I Really love your color choices!!! The Lambo Green was my next choice.John

hood 014.JPG
 

Pablo

sqeez bth levrs & lean bk
Site Supporter
Location
georgia
Man, that thing is one gorgeous piece of work. An awesome paint job befits a labor of love like that. Super work guys. I've enjoyed this thread with good pics and descriptions.
 
Man, that thing is one gorgeous piece of work. An awesome paint job befits a labor of love like that. Super work guys. I've enjoyed this thread with good pics and descriptions.
Thanks for the feedback, glad your enjoying the build.
Here's some more pics of the green machine:
iphone pics 3.jpgiphone pics 298.jpgiphone pics 299.jpg
The first pic is of the front tank mounted in position, just waiting for the tank straps to be made.
The other pics are of the billet filler throat screwed into position & attached to to the tank filler neck & also a view with the billet cap.
 
P7204502.JPGP7204504.JPGP7204507.JPGiphone pics 322.jpgiphone pics 323.jpg
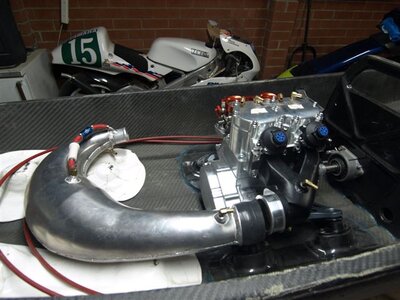
Various pics of the motor & pipe in the hull when we were checking out positioning & working out how to mount/fit pipe & rear fuel tank.
The motor is DASA's 200HP 16mm stroker billet power valve motor.
Most components in this motor are billet including:
Cylinder
Head
Domes
Crankcases
Flywheel cover
Crankshaft
Power valves
The work Dasa has done supplying this motor for us is truely a work of art & looks almost too good to put in a hull, have to admit it did look good sitting on the dining room table!
Puting a billet top end on a set of epoxied/machined 62T cases is still very cool, but it does take things to the next level when you know you have the strength/security of solid billet cases holding everything together. I'd hate to think how long it would take to cnc mill a pair of cases.
The motor is currently setup for 98 octane pump gas & is running 185psi.
We have the option to increase comp if we choose with other domes, but want to run the motor with this setup initially as we're sure the power will still be crazy but on the safer side. It's always good knowing you have options if your chasing even more power.
The cylinder & crankcases are ported.
We are using V-Force 2 reeds in a ported R&D Dominator intake with spacer plate.
The ignition is a Flame Total Loss with a custom curve designed for the extra long stroke, using 28 degrees max advance, (again we wanted to be on the safer side & can have more power with more advance if need be).
We are using ada billet couplers for strength & to reduce rotating mass.
The carbs are 48mm Novi's to finish off the complete package
 

Attachments

  • P7204501.JPG
    P7204501.JPG
    64.5 KB · Views: 157
Last edited:
You guys to great work. Can't wait for the vid!!
Thanks, vid not far away now!
iphone pics 345.jpgiphone pics 344.jpgiphone pics 346.jpgiphone pics 347.jpg110.jpg116.jpg
This was a nightmare, working out how to mount the Power Factor Pipe securely based on the existing carbon fuel tank mounts we already had bonded into the ski.
We eventually came up with this system, it is stainless bar, cut & re-welded to match to the carbon tank mounts.
We mounted an oem engine mount to the bar, then bent stainless bar to attach from the engine mount to the stainless pipe cradle.
Rubber was bonded to the cradle to support/protect the pipe & stainless nuts were welded to the bottom of the stainless bar.
We ended up doing another mod as the engine mount didn't support the pipe enough.
The bolt that holds the cradle was replaced with a longer bolt, the thread in the welded nut was drilled out & the longer bolt was used to screww directly into a second engine mount.
This mount was bolted to an alloy bar that was bonded into the hull.
Strap hooks & rubber straps were used to secure the pipe down.
The system works great, supports the pipe securely, fully rubber mounted & vibrates at the same rate as the motor.
The weight isn't that heavy, as the bar is quite thin, but considering making it all in carbon.
 
Last edited:
You guys do incredible work, best build I have seen thus far!!! Can't wait to see the video!
Thanks for the great feedback, I hope we won't disapoint when the test vid is out!
iphone pics 339.jpgiphone pics 341.jpgiphone pics 342.jpgiphone pics 352.jpg
Here the Power Factor Pipe is mounted, Go-Kart tank base bonded in place, Flame TL Ignition fitted & starting to hook up hoses.
The 2nd & 3rd pic shows there is still plenty of space between the tank & the flywheel cover.
 
013.jpg
Thanks for the great feedback guys, hanging to finish the final tune & testing.
Will measure the go-kart tank for you & let you know!
Here is both tanks mounted, the 9 litre go-kart tank is not connected at this stage, Power Factor Pipe mounted, water & fuel lines attached, hood on with all cables connected - getting close now!
 
Last edited:
Top Bottom