BA Freak (155 conversion) & carbon circus

Onto the rails! It came out good minus a few spots here and there. Oh and you know the left and right side patterns not matching LOL.
Hands down that was the hardest turf work I’ve ever had to do, absolutely hated every second of that lol.
Huge thanks to Don for the tips on working with this hull.
Turf is black just looks gray under the led light. View attachment 426791
Finally. Would sell the ski before I turfed it again. View attachment 426793View attachment 426794
Encouraging words as I'm about to turf my freak haha. I think I'm gonna go with smooth turf on the gunnals so I don't have to worry about keeping the diamonds uniform haha. Yours looks good though!
 

DylanS

Gorilla Smasher
Location
Lebanon Pa
Encouraging words as I'm about to turf my freak haha. I think I'm gonna go with smooth turf on the gunnals so I don't have to worry about keeping the diamonds uniform haha. Yours looks good though!
Thanks!
Good luck!
If I were to do it again I would do like Don did on his red freak and use the smooth turf to do the harder areas and blend it better. I might redo it this winter.
 
Onto the rails! It came out good minus a few spots here and there. Oh and you know the left and right side patterns not matching LOL.
Hands down that was the hardest turf work I’ve ever had to do, absolutely hated every second of that lol.
Huge thanks to Don for the tips on working with this hull.
Turf is black just looks gray under the led light. View attachment 426791
Finally. Would sell the ski before I turfed it again. View attachment 426793View attachment 426794
Looks good! Did you cut templates first or? I have to returf this winter too
 

DylanS

Gorilla Smasher
Location
Lebanon Pa
Looks good! Did you cut templates first or? I have to returf this winter too
Yup, just like Don said, templates first. Three layers of tape minimum or it’ll be hard to transfer from ski to turf :)
I knew I’d mess it up so I actually cut my first template out on a piece of b grade. Just the very top not the whole thing so I could check my fitment. Then I traced it on my good turf and made my corrections plus a little extra.
Once the rail line was stuck on I just worked it down over the sides. I like to really press all my ends down into the edges/corners to get a nice crease so I can cut it a tiny bit too big. Then I use my fingers or a flat edge to work that slight overlap down into the edge of the next piece of turf to get a “seamless” edge to edge fit. If I wasn’t a sped I think it could’ve came out reallly nice but I’ll take it for now !
Nice job! I actually made templates for my superjet and fx1 as I did them, actually kept them in a separate box now just in case I returf in a few years the hard work is done already lol
 

DylanS

Gorilla Smasher
Location
Lebanon Pa
Ok, so good and bad news.
Good news, pump fits awesome, almost better than anticipated. Perfect alignment with the CF tool.
The hood is cleaned up enough for me to send it out for paint; it’s not perfect but I did my best and I learned a lot.

As far as the “bad” news goes I had to fight hell to get the cooling lines on and will have to fight them every single time I go to pull and install the pump. It is tighhht with that 155 in there.
The ride plate of course is giving me issues. I skinned it in carbon and was so excited before I realized that there is no bolt hole recessions. It’s flat lol. Not a huge deal, I’ll just have to pick up some stainless button head bolts tomorrow for a lower profile.
I also had to use mega nuts to space it up off the ski to get a measurement so I can have proper spacers cut out. I could grind the bottom of the pump down to help with fitment but I’d really rather not and the plate itself fits pretty nice to the body line of the ski.
The intake grate also has a large overhang at the shoe. I’m going to have to bring it down with a grinder.
Worst news, my xmetal trim doesn’t fit :( and I even made the ring trick as hell.
Now I have to use my stinky old RRP ring until I can finance a newer system .

Starting to see the light at the end of the tunnel :)

Try not to look to close at the pictures lol, the guy who painted the ski did zero prep work to the parts I patched and butchered the paint. Not sure what he was thinking
For sure redoing the bottom deck myself next year unfortunately
 

Attachments

  • AF708A97-F896-4F29-9A39-14C2B175A425.jpeg
    AF708A97-F896-4F29-9A39-14C2B175A425.jpeg
    173.4 KB · Views: 111
  • 7610B797-7D6D-4EDF-990D-E63DA5E60FB8.jpeg
    7610B797-7D6D-4EDF-990D-E63DA5E60FB8.jpeg
    212.4 KB · Views: 95
Last edited:

DylanS

Gorilla Smasher
Location
Lebanon Pa
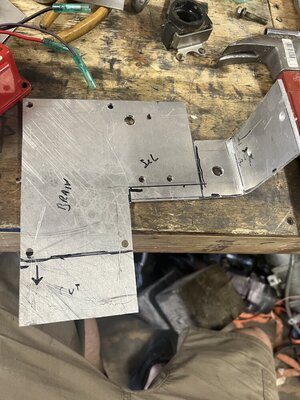
Had to fabricate up a new MSD system mounting plate because my enclosed box doesn’t fit in the freak. I hate to have it all exposed but after having this exact setup sit under water for 18 months and still fire plugs I can’t see it being much of a issue :)
Having multiple good grounds is what’s really important with these things of course.
Went as minimalistic as possible while trying to keep distance between brain and coils.
I used some sheet aluminum I had laying around then laid everything out and went to town.
A little piece of cutdown watcon hood seal functions well as a gasket for the dip switches.
Gave it a brushed finish..
 

Attachments

  • 19B64E18-F152-49CC-B3C8-64B7CE85B8CD.jpeg
    19B64E18-F152-49CC-B3C8-64B7CE85B8CD.jpeg
    186.9 KB · Views: 57
  • CD9F1302-FBC0-4879-862D-CA6ACA5A123E.jpeg
    CD9F1302-FBC0-4879-862D-CA6ACA5A123E.jpeg
    190.3 KB · Views: 38
  • B79AF274-9672-42A4-9EF8-BFC9EDFAB8A5.jpeg
    B79AF274-9672-42A4-9EF8-BFC9EDFAB8A5.jpeg
    175.1 KB · Views: 38
  • CF62B28E-5ACA-4BE2-A75B-1BC362FAD9FA.jpeg
    CF62B28E-5ACA-4BE2-A75B-1BC362FAD9FA.jpeg
    131.3 KB · Views: 41
  • CF0317D3-D62C-4626-9446-28E3987E6449.jpeg
    CF0317D3-D62C-4626-9446-28E3987E6449.jpeg
    221.7 KB · Views: 65

DylanS

Gorilla Smasher
Location
Lebanon Pa
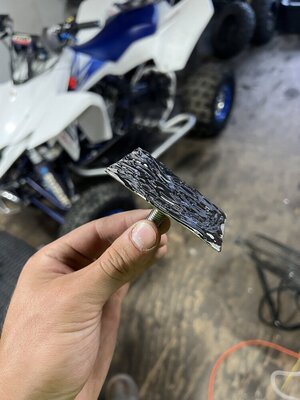
Had a buddy weld up these little stainless doodads and hacked the heads off the bolts and ground them flat. Using 3m panel bond for the backs and hot glue to hold them in position until they set. Then I’ll probably throw about 3 circular layers of 6oz carbon over them and we should be ballin’

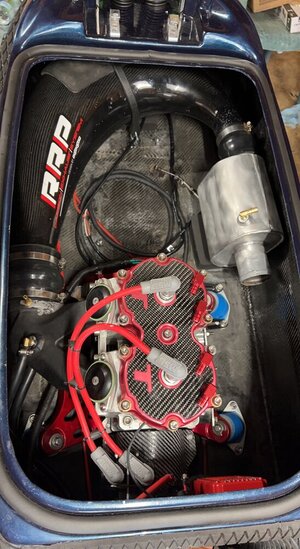
Not posting pics of the engine bay for 2 reasons..
1. I have a nice carbon core head on the way
2. I have the current head on backwards lol, wasn’t paying attention when I pulled head last I guess (these things happen when you’re a little slow)
 

Attachments

  • 2C3D7453-B6F7-4329-A683-60E05F122116.jpeg
    2C3D7453-B6F7-4329-A683-60E05F122116.jpeg
    150.6 KB · Views: 48
  • 0EABD9F4-49AC-4725-AB3C-EEDCE84AD3E3.jpeg
    0EABD9F4-49AC-4725-AB3C-EEDCE84AD3E3.jpeg
    105.3 KB · Views: 46
  • EC4D50AB-BF8F-47DC-A2D9-C49A5B1118ED.jpeg
    EC4D50AB-BF8F-47DC-A2D9-C49A5B1118ED.jpeg
    144.5 KB · Views: 80

DylanS

Gorilla Smasher
Location
Lebanon Pa
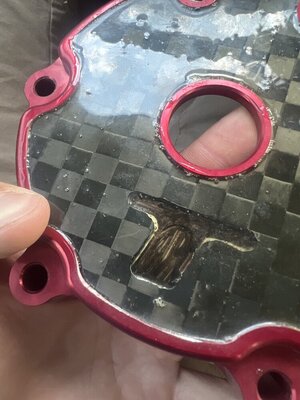
“Nice” carbon core head shows up.. lol.
Nice as in sharpied in letters with the worlds pooptiest epoxy work
Guess I should’ve known better, I fix later
 

Attachments

  • 64BF1F5B-4B02-48A1-830A-A47AFFEA3A7A.jpeg
    64BF1F5B-4B02-48A1-830A-A47AFFEA3A7A.jpeg
    188.1 KB · Views: 58
  • 38667516-E3FA-470B-BF83-AA8BD6857D6B.jpeg
    38667516-E3FA-470B-BF83-AA8BD6857D6B.jpeg
    117.9 KB · Views: 60
  • F6A411DB-7B60-4CDD-A6E1-4CC68F3B4CFF.jpeg
    F6A411DB-7B60-4CDD-A6E1-4CC68F3B4CFF.jpeg
    127.9 KB · Views: 76
Last edited:

DylanS

Gorilla Smasher
Location
Lebanon Pa
Ok, here’s where it’s at, I’ve been struggling to find time to work on it this last week.

Engine is in and shimmed, no major issues there, went with the 30* of timing adv on the stator plate. Waiting on a ACTUAL nice thrust head I bought from @Aquaholic to show up at my door.

I got the plates epoxied in for the Tl system and covered them in 4 layers of 6oz then sanded the edges down. Not the prettiest work but I’ll take it.

I got the pipe situated and strapped down. I use standard rubber straps w/ S hooks because I’m cheap and they’re easily sourced. Just picked up some stainless L brackets and bolted them fast.

Pole tubes are In. I used 1 1/2” subpump tubing it’s like 15 for 10 foot of the stuff. All the cables are routed up the pole and I can see my throttle cable will be short somehow.
Steering system is on and cable hooked up, waiting on new bars.

As of now I need to:
- Finish routing wires/install on off switch
- Install bilge and drill outlet
- figure out battery placement
- exhaust tube from wb to thru hull (waiting on carbs and manifolds still) and possibly strap wb down
- install carbs and manifold
- lines and cleanup
- install bars etc.

Very close.. everything you see in there minus coupler cover/ motor mounts / midshaft sat underwater for a longgg time.
I’m supposed to be going to the lake for a week at the beginning of august so I may be buying a temporary set of carbs and manifold.. :(
 

Attachments

  • 8C549606-F971-43A3-808E-E2C753DCE2A5.jpeg
    8C549606-F971-43A3-808E-E2C753DCE2A5.jpeg
    171.4 KB · Views: 61
  • B339B2EA-F6A4-48E2-B416-D0DBE15670E6.jpeg
    B339B2EA-F6A4-48E2-B416-D0DBE15670E6.jpeg
    211.2 KB · Views: 67

DylanS

Gorilla Smasher
Location
Lebanon Pa
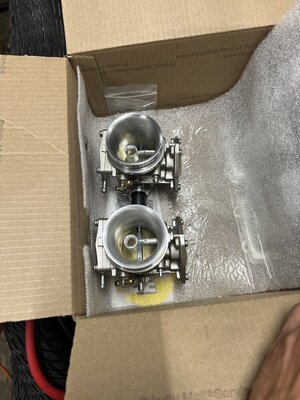
Ed drove out to meet me tonight to deliver me these sexy brand new 50’s, super stoked.
Got to talk with him for awhile, very cool guy, can always learn something new talking to him.
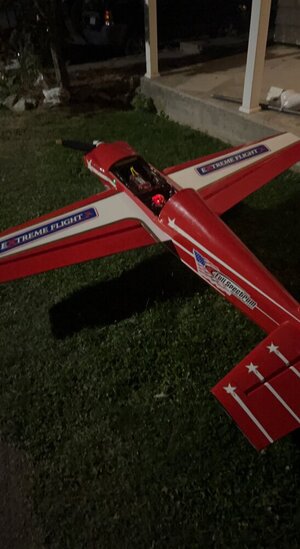
Oh and he showed me his sick ass RC plane lol
 

Attachments

  • BDDA3D72-A4AB-4FAF-A1F6-1168F48308E6.jpeg
    BDDA3D72-A4AB-4FAF-A1F6-1168F48308E6.jpeg
    171.4 KB · Views: 54
  • B35CC440-146E-406D-9C84-5EA3BE8A3E14.jpeg
    B35CC440-146E-406D-9C84-5EA3BE8A3E14.jpeg
    82.8 KB · Views: 55
Top Bottom