FX-1 build

Fro Diesel

creative control
Location
Kzoo
that is one sick ski. makes me lust for an fx1 now. Just a killer compilation of time, talent, and of course tender($).

How's the trim setup working for ya.
 

joe b

depth tester
Location
northfield, nj
Is that Carl laying down on the job?:wave::Flush:

:haha:

Carls got a bigger lap flounder than that:nutkick:

:joke: He's bumming with swimmers ear:toothache: He needs to wait a few weeks for the swelling to go down befor they can operate. Probably won't be ridding until Daytona:crying: Maybe he'll have time to finish that endless project:thinking:

:fart:
 

Odd Duck

Jet Vet
Location
DFW, TX
Great looking ski. :cheer:

I've been following the build, especially since I got my FX1. Some really great tips in here.

Question for you, what kind of paint did you use? I saw a comment about powdercoat on the pole, but did not see what type of paint you used on the rest of the ski (since it's over paint and gelcoat, right?) even after re-reading the entire thread for about the third time. :wink1: [Forgive my pain ignorance.]

Thanks for posting such a great collection of info for my future body work on my FX1, very handy having it all together. :sly:
 
Pete, I don't know if you saw the actual pump mod thread. It shows the Kawasaki pump mount nuts that I used in the tray and gives a pretty good idea of what has to be done to do the mod.

A couple of key things the thread didn't cover well are that the little rib that goes around the perimeter of the Kawi pump shoe needs to be ground off to let it sit into the FX shoe area and you probably need to do a little additional grinding in the shoe area to get it to sit flush with the bottom of the hull. I cut through to the foam in a couple spots when doing mine and I just gave everthing a coat of very fine biax to seal it up.

If you need someone to machine the Kawi bearing housing to fit into the Yami housing, send me both and I'll take care of it.

Here's the thread that details the pump mod: http://www.x-h2o.com/threads/10462&highlight=dang+pump
 

wavehog

X-cellent Smithers!
:haha:

Carls got a bigger lap flounder than that:nutkick:

:joke: He's bumming with swimmers ear:toothache: He needs to wait a few weeks for the swelling to go down befor they can operate. Probably won't be ridding until Daytona:crying: Maybe he'll have time to finish that endless project:thinking:

:fart:

MORE GAY BY THE DAY:1zhelp:
 
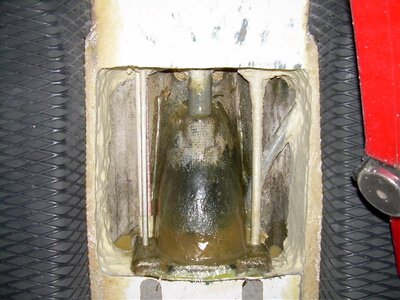
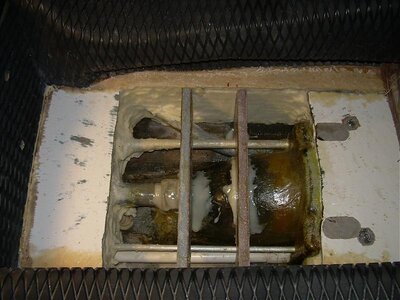
Had to do a little surgery on "Franky" before Daytona. Since this was my first attempt at the Kawi pump mod I had cut way more material out than I needed to and it was time to make it better. I got a whole season out of it with no problems but in October I noticed a portion of the filler I used in the pump shoe area had cracked and was leaking......so it was time to go under the knife (well, ginder at least).

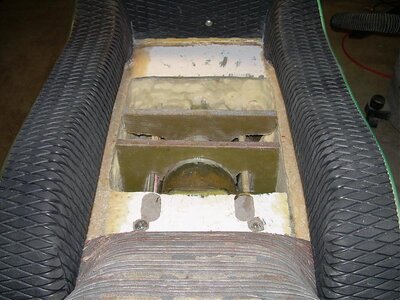
I decided to pull back the turf and remove the deck above the pump and add some glass to beef up the pump chute. When I pulled the turf back I found massive cracks in the deck, so I'm glad I decided to dig into it from the top. I cut a good sized chunk of the deck out and de-foamed the area. It had been leaking water pretty bad, but only a very small portion of the foam was wet (Lucky!).

The cause of the cracking was the huge area of unsupported deck had been flexing and crushing the foam and over time there was a 1" gap between the deck and the foam. With nothing supporting the deck, it sheared where it met the side rails.

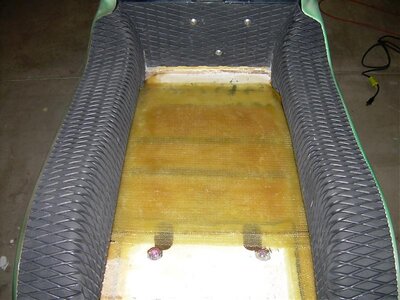
I decided this wasn't going to happen again and while I had it ripped apart I made two structural ribs to support the deck. I stole this idea from "Wavehog" and I think it's a great idea (Thanks Carlito). The ribs are made from 1/2" divynacell laminated with bi-di on both sides and then epoxied to the pump hump and bottom of the hull. Once they setup, I re-foamed (with foam I bummed from Flash-FX...Thanks!) and then laid up multiple layers of bi-di to restore the deck. It's solid as sh*t now!:saevilw:

Just need a little glue and Daytona here I come!!:Banane35:
 

Attachments

  • DSCN0113.jpg
    DSCN0113.jpg
    78.9 KB · Views: 96
  • DSCN0115.jpg
    DSCN0115.jpg
    73.1 KB · Views: 108
  • DSCN0116.jpg
    DSCN0116.jpg
    88.1 KB · Views: 112
  • DSCN0117.jpg
    DSCN0117.jpg
    75.4 KB · Views: 98
Top Bottom