Modified X2 build (stripped the hull)

Vumad

Super Hero, with a cape!
Location
St. Pete, FL
I have a few ideas for building an X2. The modifications I am talking about concern the hull only at this time. Here's what I have in mind.

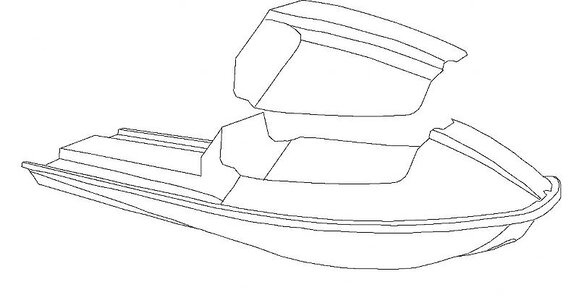
- Completely redesigned hood. Hood taking after the Stand up/new X2 design.
- Shaved fuel fill. Keeping external fill, but modifying the nose for a cleaner look and no fuel door.
- Custom tray. idea is to chop the seat down to the lowest possible point (can't cut it flat because of the pump). Make removeable trays to fit into the current foot wells, and a removable seat. The ski would be set up to be convertable b/t a flat deck and a normal X2 seating position. Recessed hood latches would hold these parts in place. Fire extinguisher and dry compartment will be worked into the seat.
- Tubbies w/ exhaust outlet moved up to waterbox
- Possibly a hull modification like what Crab's build
- Possibly shorten the hull a currently undecided amount for carving and surf slashing

Things to take into consideration...
- A custom hood bracket will have to be made.
- E-box would be mounted on the back wall of the engine compartment, cables will be moved to the bottom using longer stand up cables freeing up this real estate
- possibly upgrading to 6 gallon high capacity fuel tank after E-box has been moved
- 750 twin carb with stock air box, stock waterbox, westcoast pipe, stock electronics
- Need to determine locations for things like bilge outlets, bilge switch, primer valve, fuel toggle, etc.

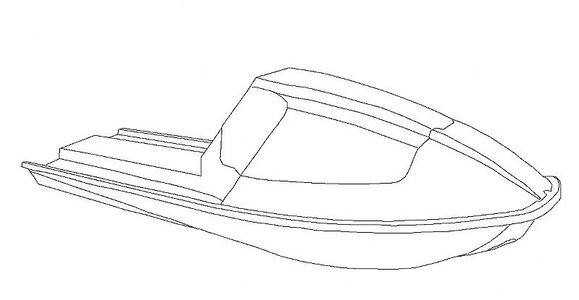
The attached picture shows the idea for the hood modification. The picture also shows the chopped tray, but it does not show the removeable parts of the tray yet. Fuel cap mod is not shown.

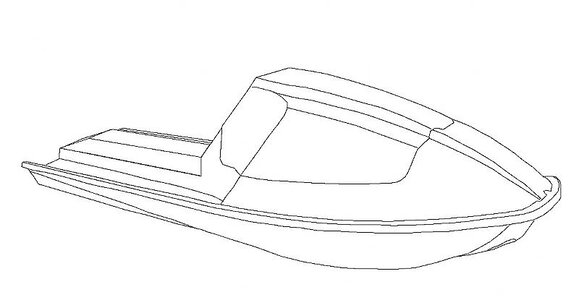
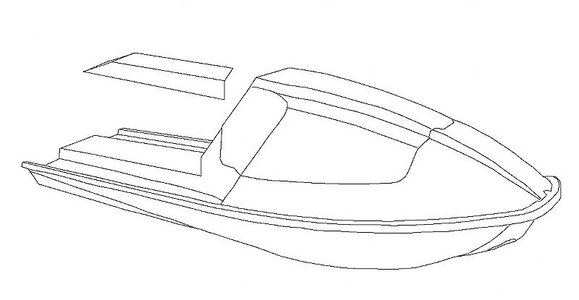
Edit: Added sketches of seat both attached and removed and a pic with the tray inserts. Clips not shown.

Input!!! What do you think?

Thanks

PS. Images are to scale. What scale? I dunno, but they are proportionate.
 

Attachments

  • X2 Modified.jpg
    X2 Modified.jpg
    30.5 KB · Views: 181
  • X2 modified Hood removed.jpg
    X2 modified Hood removed.jpg
    33.5 KB · Views: 1,344
  • X2 Modified with Seat.jpg
    X2 Modified with Seat.jpg
    30.6 KB · Views: 138
  • X2 Modified seat removed.jpg
    X2 Modified seat removed.jpg
    33 KB · Views: 168
  • X2 Modified with tray.jpg
    X2 Modified with tray.jpg
    29.8 KB · Views: 152
Last edited:

WFO Speedracer

A lifetime ban is like a lifetime warranty !
Location
Alabama
I think that is an awful lot of work,it looks good on paper but I am not sure it will work in the real world.
 

Vumad

Super Hero, with a cape!
Location
St. Pete, FL
I think that is an awful lot of work,it looks good on paper but I am not sure it will work in the real world.

Any particular reason you think it might not work?

I want to hear from you guys that you think it's not going to work, but let me know why you think it wont work and if you have any suggestions to make it better. I'm open to the constructive criticism.

It's two different projects btw. I want to modify the hood 1st and test the seals and strength. Then do the tray. If you don't think "it" will work, at least say what "it" is.

I think witht he modified tray and a hollow hood, boyancy is going to be a problem. Foam is going to have to be added somewhere. The tubbies and the hull bottom mod will add some.
 
Last edited:

WFO Speedracer

A lifetime ban is like a lifetime warranty !
Location
Alabama
My question is this ,do you have the necessary skills needed to do the FRP reconstruction that you are thinking of.I know whats involved in something like this,its not going to be an easy project for sure,especially the areas of the hood where the hood seal is going to be,that part must be damn near perfect to seal properly.I would also be worried about the hull strength after taking out the bracing inside,something will have to be done there for sure.I am in no way saying it can't be done because it can.I just want to make sure that you know just how big a hole that you are stepping off into.
 

dbrutherford

Parts Whore
Location
Fairmont, WV
I have to agree with wedo. I like the flat bed idea but I am afraid you will find that when you go cutting out the seat area and then the hull behind the motor it will severly weaken the hull. Any amount of reinforcing will just add extra weight.

I do really like you one piece hood idea! That would make engine work/swaps soooo much easier!

I know you have a lot of X2 hulls so I suggest you take two of them and chop them up. Take one, chop the top deck off of it keeping the lower hull intact. Take the second one and chop the bottom off and keep the top. Then you could work on making these two halfs in perfect shape. Eventually what I am getting at is that you would have a perfect top and bottom plugs to pull molds from. I feel just cuttign and reglassing a hull back together weakens its strength and adds a bunch of weight. But if you are only using it to make a mold then you can make your own top and bottom halfs with only enough glass as needed saving weight and increasing strength since it is made all at once.
 

Vumad

Super Hero, with a cape!
Location
St. Pete, FL
I was kind of counting on some of the duck pond guys being interested enough in the idea to help out. I can provide the materials but I can't pay for the labor. I've worked only a little bit with glass. Nothing near the scale of this project. One of my hulls is race hull that has lots of glass damage and has been repaired very poorly that I don't mind going to waste. I talked to Tom and #0 about this yesterday and they seemed interested in chopping up this hull to get ideas.

Oh, as far as adding the fire extinguisher holder and a dry compartment, the seat will be large enough (I think) to house these materials. It would keep the ski legal, but the seat (and these compartments) would be one solid removeable piece.
 

Vumad

Super Hero, with a cape!
Location
St. Pete, FL
I know you have a lot of X2 hulls so I suggest you take two of them and chop them up. Take one, chop the top deck off of it keeping the lower hull intact. Take the second one and chop the bottom off and keep the top. Then you could work on making these two halfs in perfect shape. Eventually what I am getting at is that you would have a perfect top and bottom plugs to pull molds from. I feel just cuttign and reglassing a hull back together weakens its strength and adds a bunch of weight. But if you are only using it to make a mold then you can make your own top and bottom halfs with only enough glass as needed saving weight and increasing strength since it is made all at once.

I don't think I'd change the bottom half. Just add tubbies and maybe the Crab special.

How much would it cost in materials to make the top half of a ski from scratch, assuming that I could use a current X2 hull to make a mold.
 

dbrutherford

Parts Whore
Location
Fairmont, WV
Beats me on mold cost. I read once that hey can be in the ten's of thousands... You have to have a good plug aka hull to make the mold off of. So if you want to redesign the hull in any way... you have to do it the to plug so the mold has the changes. It isn't best to make the mold, then change the mold. All I know is it would be way too much work for me and I am not qualified at all to do it. If I did several I could probably turn out a decent one. I have a spare hood I have been thinking of making a mold off of. Then make an all carbon hood from that mold. Problem is I need a new redesigned liner as well...

The bigges improvement i see in your design is the hood. If you could just open up the hull like that it would make working on an X2 a whole heck of a lot easier! That reminds me of the new wammer 4 banner race ski. What did you draw that on, AutoCAD?
 

Vumad

Super Hero, with a cape!
Location
St. Pete, FL
I drew it in photoshop. I imported a picture of an X2. I used the pen tool to trace the lines and then "stroked" the pen for me "stock" layer. I duplicated my "stock" path and modified the lines in a new layer/path. Once I had it all pened out, I stroked the new layer. I stroked the hood on a seperate layer, that's why I can move it.

Auto Cad would have taken much longer to do.
 

WaveDemon

Not Dead - Notable Member
Location
Hell, Florida
you love to stroke it don't you.

I dont' think making that hood would be that hard. getting the steering to work would be the hard part. I'd give you a hand with it. You'd be doint the majority of the work though.
 

Vumad

Super Hero, with a cape!
Location
St. Pete, FL
Beats me on mold cost. I read once that hey can be in the ten's of thousands... You have to have a good plug aka hull to make the mold off of. So if you want to redesign the hull in any way... you have to do it the to plug so the mold has the changes. It isn't best to make the mold, then change the mold.

That's way more than I was looking for. I was looking for a much simpler answer. How much $$ would it cost to purchase enough materials to make the top deck. Not the mold or the foam or anything else. Just the actual deck.

I dont' think making that hood would be that hard. getting the steering to work would be the hard part. I'd give you a hand with it. You'd be doint the majority of the work though.

I'll do all the work. The help I'd need is making sure I'm doing the work right. Stuff like... I haven't worked with poly resin or dyes so make sure I'm mixing and allowing proper drying times. Making sure the physical design will be functional. Simple stuff like that. I'll do all the sanding and everything.

I was thinking, if I am doing this much glass work, the best thing to do would be to make a top deck from scratch, using the stock deck as a template. I could take a stock deck and modify it with foam and glass, cover it in tin foil and then glass over that. It should give me exactly what I want with less weight and nearly the same cost as trying to modify a current deck.

As for the hood, using the method I just suggested, I could take a mold of hood seal area of a super jet and build arround that. It would be exactly the same seal as your hood, and since it's the same, no bracket will have to be fabed. I can buy a conversion ski bracket. I bet those cost a fortune.
 

WaveDemon

Not Dead - Notable Member
Location
Hell, Florida
That's way more than I was looking for. I was looking for a much simpler answer. How much $$ would it cost to purchase enough materials to make the top deck. Not the mold or the foam or anything else. Just the actual deck.


I'll do all the work. The help I'd need is making sure I'm doing the work right. Stuff like... I haven't worked with poly resin or dyes so make sure I'm mixing and allowing proper drying times. Making sure the physical design will be functional. Simple stuff like that. I'll do all the sanding and everything.

I was thinking, if I am doing this much glass work, the best thing to do would be to make a top deck from scratch, using the stock deck as a template. I could take a stock deck and modify it with foam and glass, cover it in tin foil and then glass over that. It should give me exactly what I want with less weight and nearly the same cost as trying to modify a current deck.

As for the hood, using the method I just suggested, I could take a mold of hood seal area of a super jet and build arround that. It would be exactly the same seal as your hood, and since it's the same, no bracket will have to be fabed. I can buy a conversion ski bracket. I bet those cost a fortune.

tin foil works for small stuff. it works well as a mold release but makes the mold look bad. just clean up the hull to look perfect and pull a mold. use wax and PVA as a release. do it right!

my conversion bracket is a normal lowered xmetal bracket.
 
Last edited:

Vumad

Super Hero, with a cape!
Location
St. Pete, FL
I just bought some poly resin, cloth and etc. I'm going to start laying up some ride plates and etc. I'm still discussing ideas for this project with people. I'm hoping to have the skills to complete the project by the time I'm done planing it.

I've heard some good ideas, some bad ideas and some completely worthless jibberish. Keep them comming.
 

Vumad

Super Hero, with a cape!
Location
St. Pete, FL
I have spent a lot more time thinking about this design since my 1st post. I've had a few thoughts...

- I think the best design for the hood would be similar to the SJ conversion hood. X2's have a problem with water ingestion, and I believe this is because of a poor hood seal. The bottom edge in the back of the hood doesn't seal very well, it's quite ********ty actually. Really, the whole hood seal sucks...

Instead of going with the origional design, I think it would be more functional if I went with a SJ/Blaster hood seal. I could make the seal area completely flat and use which ever seal is most appropiate. They wouldn't line up, so I'd have to cut them and carefully glue them down. This also would solve my air intake problem. instead of having vents in the hood... i could have a vent in the back infront of the seat, and use a hood liner and some tubing to allow the air to flow. If you ever took a close look at the SJ conversion hood where the air comes in over the gunwhales, you'd know exactly how the hood would work, except for the X2, it'd be in the center.

- I'd also like to have a completely flat tray. I would do this by cutting out the old tray, and making it completely level from bond line to bond line (which is the same height as the pump cavity. The entire seat would be removeable with hood latches, so you can ride it with a flat deck, or a traditional X2 style. It's have 4 foot straps. 2 in the traditional X2 stance, and 2 in a surf stance (since you could now ride surf).

My origional idea had removeable parts for the foot area on the X2, but after ride surf, I'd rather have a flat tray anyway so I could turn my foot sideways when the seat is on. With the current set up of the X2, it is very awkard to stand perpendicular to the tray because you foot is half in the tray and half in the bond line. I could get more leverage on the carve if I could turn my foot 90 degrees.

- Shorten the hull to the ride plate bolts, which is about 3inches.

- Add tubbies (perhaps custom made)

- I want to move the engine compartment arround. Now that I have a Factory 750 limited B-pipe, I no longer need the waterbox in the nose. The exhaust pipe/hoses will run down the front of the engine, instead of the left side of the hull to the front. I would like to move the water box to the front of the engine. taking the weight out of the nose.

I'd then like to have a cutom fuel tank made, so the fuel tank would either sit behind the carb, or behind the bulk head. It'd hold 2-3 gallons of fuel, and would both reduce the weight of fuel in the nose, and also add weight to the back, adding leverage on the nose and making it lighter.

These changes should modify the overall weight distribution of the ski back to a more centered location, it'd be balanced more like a stand up.

I also think it would be nice to have another custom fuel tank in the nose of the ski. It would be left empty when in the surf adding extra flotation (lighter and more functional than filling the nose with foam), but it would be functional for when I hang out with my coucher friends. Instead of having on/off/reserve, it'd be set up to be tank1/off/tank2

***Again, this is all in the idea phase. I do not have the fiberglass skills to make this project happen at this time. At some point I will have the skills, and I hope the have a functional design that suits my needs by then.
 
Last edited:

dbrutherford

Parts Whore
Location
Fairmont, WV
I am debating on buying the materials to make my own hood and ride plate. I want to do it right and use a vacuum pump/bags. The detail is in making the plug perfect before ever thinking of pulling a mold off of it. I am thinking of trying to make my own hood trim piece eventually too. As for mold cost, did you see where Highroller wanted around 5k for a complete super jett set of molds?

As for water box weight, Pete uses 94/95 water box foam to support the water box. Those years had foam that the box sat on instead of the rubber pedastools like all the 650 SX's and other X2's. I don't think an aftermkarket aluminum water box and 95 water box foam weighs all that much. I will have to weigh mine when I get a chance. I think it would be a good spot for a spare gas tank if you didn't mind the weight in the nose... Look up and see how much 2 gallons of gas weighs, probably around 10 pounds.

Also Pete moved his battery to under the seat. If you move yours and get a smaller battery, you can balance the weight really good with this mod.
 

WFO Speedracer

A lifetime ban is like a lifetime warranty !
Location
Alabama
Let us know when its done,lets say in five years or so,okay.
 
Top Bottom