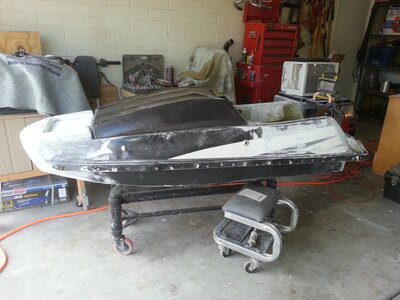
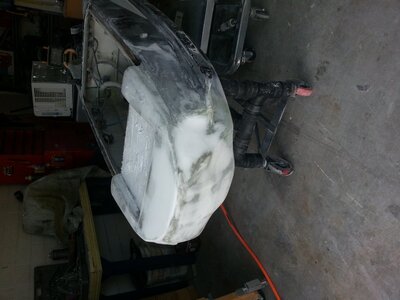
Super Jet My Attempt At A SN Rocker/Shorten

I like that lip on yours. Are those WDK footholds? That seems like a sweet deal on the carbon wrapped hood!

I am almost to the point of being sick of working on mine. It has taken way longer than I anticipated! I won't have time for at least 2 weeks with the holidays coming up... My wife really wants me to finsish the basement in our house, but I told her my ski has to get done first.

There should be enough room in the nose for a waterbox. I have an aftermarket (can't remember the brand) in my RN that is smaller and looks like it will fit. The mounting points are still there, just raised up slightly in the front. I wasn't really sure what I wanted to do with the nose, because I have no creative ability at all. Standing in the tray right now, the ski feels incredibly short!

The are Waterdawg footholds I ended up trading a carb for. Yes that was a great deal on the hoold.

Yes..I am tired of getting covered in dust ect and getting my fingers stuck with epoxy and I haven't even touched the nose. This type of thing takes forever and I am on a deadline to get mine finished. At least you have another ski to ride..where as I do not. I can't wait to stand in mine... but I haven't cut the nose off yet. I pulled 5 inches off the rear so I am wondering what I am going to end up pulling off the front.

Should be a fun ride. Looking good man.
 

iangdesign

Cats, lots of cats!
Location
United States
The are Waterdawg footholds I ended up trading a carb for. Yes that was a great deal on the hoold.

Yes..I am tired of getting covered in dust ect and getting my fingers stuck with epoxy and I haven't even touched the nose. This type of thing takes forever and I am on a deadline to get mine finished. At least you have another ski to ride..where as I do not. I can't wait to stand in mine... but I haven't cut the nose off yet. I pulled 5 inches off the rear so I am wondering what I am going to end up pulling off the front.

Should be a fun ride. Looking good man.

Cut as close to the pole bracket as possible and make sure there is clearance for the waterbox and it's mounts. I bet you remove at least 4-5 inches from the nose. Make sure you acquire a nose hoop to tie that sucker down to the trailer or when you need a tow in.

mOIOXpLRyp4WUEtu_ct8mQQ.jpg


The screwdriver isn't going to work anymore ;-)
 
Last edited:
I pulled 5 inches off the rear so I am wondering what I am going to end up pulling off the front.

I think I ended up taking about 8-9" off the front, which was really as far as I could go with leaving the stock pole location. It looks REALLY short, but that is probably because I ride my 02 RN all the time, or my brother-in-laws SXR which feels huge.
 
So how did you do the rocker on the bottom? Looks like you cut the bottom of the hull to flex it up? Or is that layers of foam? I cut mine off one inch in front of the waterbox mounts which is what I think you ddi. I plan to move the mount forward though as my hood is so low the current locations looks really dumb.
 
So how did you do the rocker on the bottom? Looks like you cut the bottom of the hull to flex it up? Or is that layers of foam? I cut mine off one inch in front of the waterbox mounts which is what I think you ddi. I plan to move the mount forward though as my hood is so low the current locations looks really dumb.
I did cut mine horizontally starting right in front of the waterbox mounts. It was more work than I thought it would be to get it to bend up properly, but I really didn't want to have to re-glass that whole section.

I just got back from hunting in Texas for a week, so hopefully I will get more done on the ski within the next week or so. I would really like to get it wrapped up soon.
 
Well a lot has changed on mine since my last post. I have started the glass work on the nose and am now onto reinforcing it from inside. I only have one thin layer on the bottom and will be moving to the biax cloth but to get the curvature I want I had to go thin in the beginning. full hull.jpg

I did move the pole location way forward and standing in the tray it feels like a whole new ski. Here is a pic before I glassed the nose. shape nose foam.jpg
 
I still have to do a ton more glass work to get it nice and strong..plus I need to butter up the nose with cabosil so I can get the proper shape but she is slowly coming around.

This project takes FOREVER!!!
 
I knew it would take a long time as I have stripped and repainted my hull once before which involved a lot of glass/body fill. But never did I EVER expect it to be this involved. Every time I complete one step it creates another that I didn't anticipate. I sure hope its worth it in the end.
 
^This! I think everyone starts off thinking it shouldn't take more then a couple weekends. :(

Agreed. I am going to work on my ski soon, and I plan on being down there for most of the afternoon, if not longer... Luckily it is still cold and snowing, so I don't want to go outside.
 
I have been putting in at least 2 hours per night and 4 -5 per day off for the last 10 days or so and I am still a ways out. Ugh...tired of chewing on fiberglass particles and having to shower after every single garage run .

And I just added winder bond flange to the docket of things to do....ugh.
 
5inches off the back is a lot what kin of pump are you putting in Silas or stock. Private message me thanks tanner
 
Got a little more work done tonight... I am at the tedious sanding point and I am getting really sick of it. At least I am fairly pleased with how the shape came out.
SN Side Sanding 2.jpgSN Side Sanding.jpg
 
I have been putting in at least 2 hours per night and 4 -5 per day off for the last 10 days or so and I am still a ways out. Ugh...tired of chewing on fiberglass particles and having to shower after every single garage run .

And I just added winder bond flange to the docket of things to do....ugh.

How is your ski coming Lamar311?
 
I started shaping a new hood liner. I am not sure how far forward/back to put the air holes... Any ideas? I have started cutting the holes in the back of my hood since I glassed over the front ones. I need to find a better saw blade first.
SN Hood Liner.JPG
 
I put in about 7 hours on it this weekend. It is getting really close to be ready for paint. I have a buddy that used to paint professionally so he is going to be taking it off my hands once I finish the rough sanding and shaping. I have just one section left to sand by the pole bracket area...I will shoot a pic shortly. Probably have about 90 minutes worth of work left before I can ship it off to paint. I did a little work on the hood as well this weekend.

Regarding the holes in the hood. I put mine in the back like an RN. You want them there as the nose goes under water many times from tricks but the tray area will not. So you can keep air flowing to the motor without water intrusion. I bought my hood already lowered and modified and the guy I bought it from was really smart with the design. He left the center liner of the hood pretty low so air could come through it but made large channels on either side for ease of fitment of pipe and carb. I'll post a pic tomorrow as I am not home and haven't taken any pics. I drilled three hols in the back area kinda by the latch and than added 2- 2 inch tubes into the liner up by the gas tank to allow air into the engine compartment without pouring water into the carb. One of the tubes is on the carb side to allow for maximum airflow to the carb but I left it long so if water is coming in on that side it pours into the bottom of the engine bay (not getting to the carb). The other is almost in the middle but higher cut to so more air to the carb but water will be hitting the flywheel cover if coming in from that tube. Really hard to explain but will make sense with a pic.

Looking good man. Your ski almost looks like a mini sxr. I'll post a pic of the nose on mine shortly. I wish I had done tubbies but at this point I need it done before my wife kills me.
 
As Promised Photos..you have to zoom in on the nose to see the shape as the colors of fill and glass make it hard to see the details.
 

Attachments

  • proile final sand.jpg
    proile final sand.jpg
    136.7 KB · Views: 125
  • Nose final.jpg
    Nose final.jpg
    103.9 KB · Views: 113
Top Bottom