smokeysevin
one man with a couch
- Location
- Houston
Hood Liner Installation Part 1 (Garbage Glass is a pain in the ass)
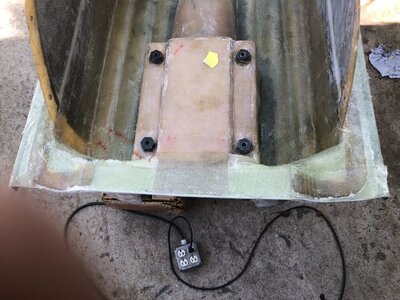
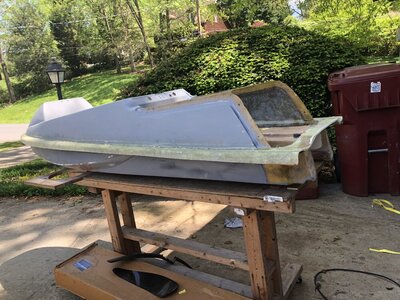
In the last post, I set about making a flat insert piece to install as a hood liner to keep water from raining into the carb intakes. I thought that by using a trash bag laid flat and slightly stretched I would get the surface flat enough for no one to ever see. That wasn't how it actually went down. Shortly after I did the layup on the glass, I decided it was a good idea to add another trash back on top so I could put some extra squeeze on the layup and keep bubbles from working into it (have I mentioned that I am not good at fiberglass layup?) On my previous project, I was fortunate enough to have a waxed melamine table or large sheet of glass that I used to do flat parts. I don't have that luxury right now since I have way too much crap in my garage at the moment. When I added the other trash bag to the glass stack, it apparently stuck and wrinkled the second layer before I put the weights on top which left bubbles that needed to be ground out. It also gave the glass a surface finish not unlike a spray on bedliner.
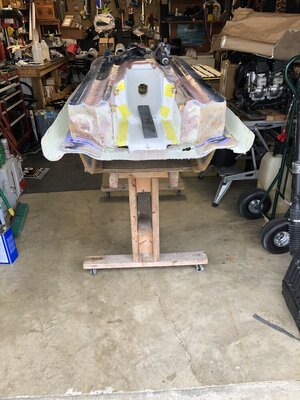
Given the above, I broke out the orbital sander and knocked back as much as I had the motivation for and called it adequate. That done, I laid out my cardboard template and traced out the shape, then cut it out with my scroll saw. I knocked back the rough edges and gave it a test fit. Reasonably happy with that, I mixed up 4oz of resin with some cabosil and I drilled several 1/4" holes in the hood and liner then used 1/4-20 bolts with washers and nuts to pinch the liner to the hood shape. Once the middle was secure, I mixed another 8oz of resin and cabosil up and went around the perimeter to smooth where the seam of the hood liner met the inside of the hood.
From there, I cut several strips of fiberglass cloth and reinforced the new joint and added another 2 layers and 8oz of straight to the corners where the hood seals with the ski.
Time Spent:
3 Hours (Learn from my mistakes, if you start with a garbage idea, you will get rubbish results.)
Tools Used:
Scroll Saw
Wiss Scissors
Orbital sander
Shop Vac
Drill
1/4" Drill Bit
Impact driver and 7/16' socket
7/16" wrench
Materials Used:
HF Bum-Hair Paint Brush
20oz Resin
1 Paint Brush
1 Stir Stick
36x12" Fiberglass Cloth
PPE Used:
GORILLA GLOVES
Organic Vapor Respirator
Number of times I cabosil'd myself to random objects in the garage after stepping on discarded gloves used to smear cabosil around:
12
Percentage of Garage Floor Epoxy Coated
11% (I almost slipped and died on the now loose trash bag that I left on the floor, planting my foot firmly on a blob of cabosil epoxy which I then tracked around like a roomba that ran over dog poop)
Percentage complete:
60% (I still need to figure out how I want to install vent hoses on the new liner, I think I will probably run them from the front of the hood to the area on either side of the fuel tank)
Sean

Garbo-Glass

Trash Layup

Rubbish Bubbles

Scrap Outline

Basura Surface Finish

Wasted Cabosil

Crappy Cloth

Cooper the Best Write-up Helper Ever (ignore the original and terrible 1980's carpet)
In the last post, I set about making a flat insert piece to install as a hood liner to keep water from raining into the carb intakes. I thought that by using a trash bag laid flat and slightly stretched I would get the surface flat enough for no one to ever see. That wasn't how it actually went down. Shortly after I did the layup on the glass, I decided it was a good idea to add another trash back on top so I could put some extra squeeze on the layup and keep bubbles from working into it (have I mentioned that I am not good at fiberglass layup?) On my previous project, I was fortunate enough to have a waxed melamine table or large sheet of glass that I used to do flat parts. I don't have that luxury right now since I have way too much crap in my garage at the moment. When I added the other trash bag to the glass stack, it apparently stuck and wrinkled the second layer before I put the weights on top which left bubbles that needed to be ground out. It also gave the glass a surface finish not unlike a spray on bedliner.
Given the above, I broke out the orbital sander and knocked back as much as I had the motivation for and called it adequate. That done, I laid out my cardboard template and traced out the shape, then cut it out with my scroll saw. I knocked back the rough edges and gave it a test fit. Reasonably happy with that, I mixed up 4oz of resin with some cabosil and I drilled several 1/4" holes in the hood and liner then used 1/4-20 bolts with washers and nuts to pinch the liner to the hood shape. Once the middle was secure, I mixed another 8oz of resin and cabosil up and went around the perimeter to smooth where the seam of the hood liner met the inside of the hood.
From there, I cut several strips of fiberglass cloth and reinforced the new joint and added another 2 layers and 8oz of straight to the corners where the hood seals with the ski.
Time Spent:
3 Hours (Learn from my mistakes, if you start with a garbage idea, you will get rubbish results.)
Tools Used:
Scroll Saw
Wiss Scissors
Orbital sander
Shop Vac
Drill
1/4" Drill Bit
Impact driver and 7/16' socket
7/16" wrench
Materials Used:
HF Bum-Hair Paint Brush
20oz Resin
1 Paint Brush
1 Stir Stick
36x12" Fiberglass Cloth
PPE Used:
GORILLA GLOVES
Organic Vapor Respirator
Number of times I cabosil'd myself to random objects in the garage after stepping on discarded gloves used to smear cabosil around:
12
Percentage of Garage Floor Epoxy Coated
11% (I almost slipped and died on the now loose trash bag that I left on the floor, planting my foot firmly on a blob of cabosil epoxy which I then tracked around like a roomba that ran over dog poop)
Percentage complete:
60% (I still need to figure out how I want to install vent hoses on the new liner, I think I will probably run them from the front of the hood to the area on either side of the fuel tank)
Sean

Garbo-Glass

Trash Layup

Rubbish Bubbles

Scrap Outline

Basura Surface Finish

Wasted Cabosil

Crappy Cloth

Cooper the Best Write-up Helper Ever (ignore the original and terrible 1980's carpet)
Last edited:


