xjet rebuild numero dos

DR3

Xscream Braaaap
Location
palm harbor, Fl
well as some as you know i have been out for about a year... last dec found out i had a little one on the way and just bought a house so i ended up selling everything to make things go my way.

this is now going to be my 2nd rebuild on my 2007 wdk xjet the right way...
this is not going to be a b!tching thread just a nice documentation on what i had to do to get it the way it should had been done the FIRST time

i originally had an exhaust failure last year mid-year and ended up cutting out the foothold and defoaming and repaired, refoamed, returfed and went with side exhaust (on a 6month old hull) ..

see here--http://www.x-h2o.com/threads/24027

NOTE!! the side exhaust was a horrible idea!! with it being midway like it was when i would side mount on the exhaust side it would do nothing but cavitate the pump (and never stopped blowin crap in you face)

so i ran that till dec and then parted everything out as you guys know....
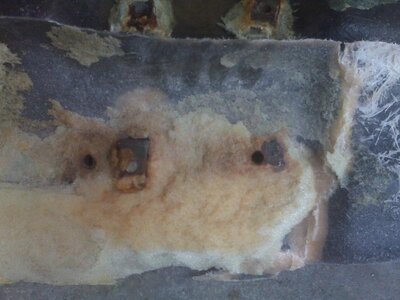
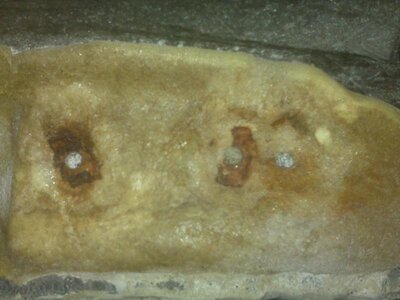
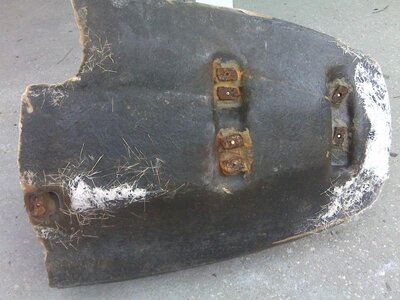
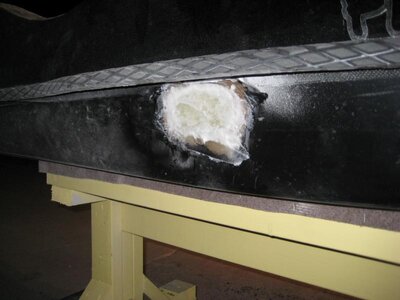
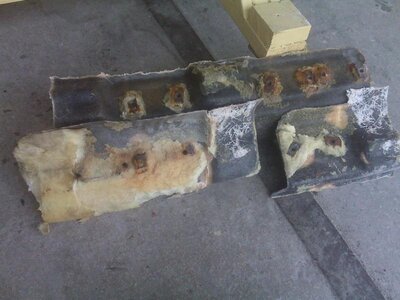
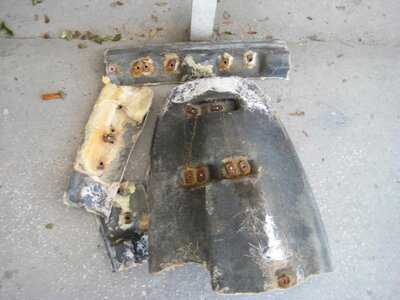
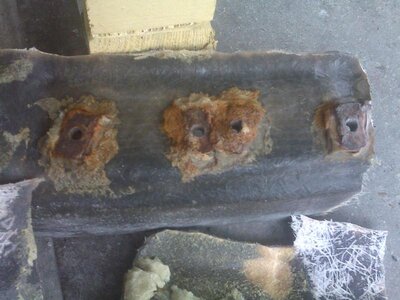
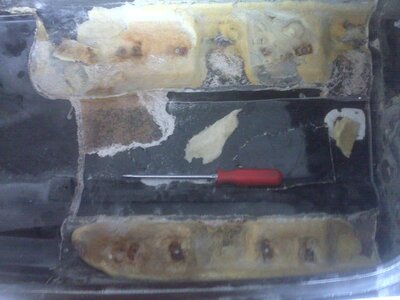
anyway the ski has been sitting for about 11months now and i have been real slow so i finally got the itch to do what needed to be done. the problem was that wonderful motor bed wdk makes that has the firewall attach all in one and runs the whole length of the hull and basically make it a 2 piece design.. as far as wdk states it is suppost to be "sealed" and "one with the bottom deck" and also suppost to have all stainless hardware (which i asked b4 i ordered the hull). well i had notice water being held under the motor mounts and when would tip my ski up in the back it actually had water run out the front up by the nose:rant: he also foams under the mounts which is kinda out there imo bc foam holds water as well.. so basically i had a brand new ski that i just paid big $ for that needed a completely new bed plate.. the ski sat for so long bc i knew what i had to do and it was going to suck big time..

so i got started on it last week and so far heres the progress:

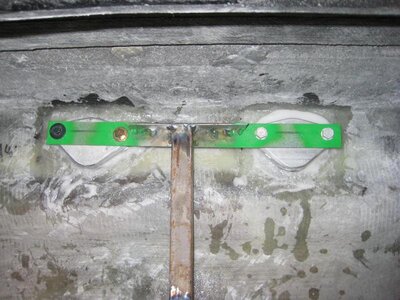
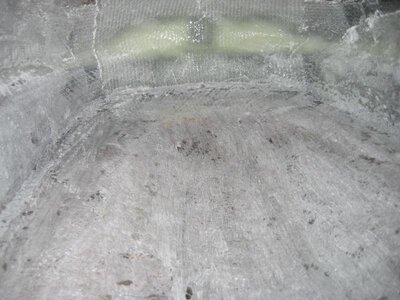
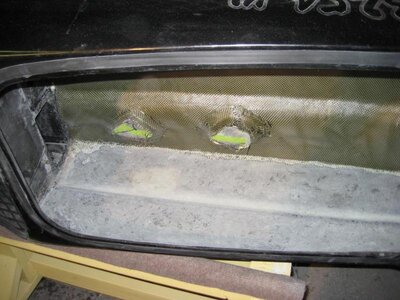
spent about 2 days cutting out the bedplate and grinding and prepping the bottom to start the reinforcement and repair of the delaminating bottom...

ill let the pictures speak for themselves
 

Attachments

  • b2.jpg
    b2.jpg
    49.4 KB · Views: 142
  • b3.jpg
    b3.jpg
    64.6 KB · Views: 136
  • b4.jpg
    b4.jpg
    65.2 KB · Views: 161
  • b5.jpg
    b5.jpg
    67.7 KB · Views: 128
  • b1.jpg
    b1.jpg
    57.1 KB · Views: 182
Last edited:

DR3

Xscream Braaaap
Location
palm harbor, Fl
more:laugh2::17:

wow this sucks
 

Attachments

  • b6.jpg
    b6.jpg
    57.3 KB · Views: 80
  • b7.jpg
    b7.jpg
    57.3 KB · Views: 68
  • b8.jpg
    b8.jpg
    52.2 KB · Views: 68
  • b9.jpg
    b9.jpg
    79.6 KB · Views: 102
  • b10.jpg
    b10.jpg
    72.6 KB · Views: 95

DR3

Xscream Braaaap
Location
palm harbor, Fl
more just b4 starting to grind.. last pic is what it did look like
 

Attachments

  • b11.jpg
    b11.jpg
    90.2 KB · Views: 115
  • b12.jpg
    b12.jpg
    97.3 KB · Views: 165
  • b1bedplate.jpg
    b1bedplate.jpg
    25.2 KB · Views: 234
Last edited:

DR3

Xscream Braaaap
Location
palm harbor, Fl
so i have a little problem takin pictures in progress lol i get in the zone and just work work work...

here is the bottom all ground and getting ready for repair...

i will be using all west systems epoxy with a biax and chop for strength and reinforcement and a carbor kevlar to finish it off

the next few are the bottom after repair and starting glassing the mounts..

i went ahead and layered the whole bottom (after repair and smoothing) with and woven biax and chopped mat and then one more layer over the motor area..

once that was dry i went ahead and ground the area around the mounts and the aluminum mounts were epoxied in with the west systems epoxy and a milled fiber to thicken it up like a paste with a jig i made b4 i ripped the old bedplate out...
 

Attachments

  • b13.jpg
    b13.jpg
    81.2 KB · Views: 108
  • b15.jpg
    b15.jpg
    78.9 KB · Views: 137
  • b16.jpg
    b16.jpg
    81.8 KB · Views: 112
  • b14.jpg
    b14.jpg
    76.2 KB · Views: 161

DR3

Xscream Braaaap
Location
palm harbor, Fl
next i went ahead and smoothed out the mounts area and flared them up so the glass can lay nice around them and finished grinding the bottom so i can hopefully finish laying that up..

i also got some nose reinforcement done and if you look i also got the sides with one layer of the biax and chop with the milled fiber along the bondline

i also chose to put one more layer of biax and chop under the gas tank area and where the ski gets beached all the time bc it was feelin pretty thin and two stips of chop along the crease on the bottom
 

Attachments

  • b18.jpg
    b18.jpg
    70.3 KB · Views: 87
  • b19.jpg
    b19.jpg
    50.8 KB · Views: 95
  • b21.jpg
    b21.jpg
    58.9 KB · Views: 118
  • b20.jpg
    b20.jpg
    47.6 KB · Views: 110

DR3

Xscream Braaaap
Location
palm harbor, Fl
heres the bottom with those strips and extra biax and the carbor kevlar laid

ill be finishing the sides and firewall shortly
 

Attachments

  • b22.jpg
    b22.jpg
    135.1 KB · Views: 175
  • b23.jpg
    b23.jpg
    155.7 KB · Views: 188
Last edited:

joe b

depth tester
Location
northfield, nj
Getting jiggy with it... That's how it should have been done in the first place:biggthumpup:

Nice work!!! I'm also digging the 914 in the backround of your avatar :biggthumpup:
 
That sucks. It took me a while to figure out why my hardware didn't want to thread into my REV. At least SAE stainless is easier to find and cheaper.


NOTE!! the side exhaust was a horrible idea!! with it being midway like it was when i would side mount on the exhaust side it would do nothing but cavitate the pump (and never stopped blowin crap in you face)
Mine sucked until I put a exhaust outlet off an X2 on it, way less cavitation. In retrospect I would have gone with front exhaust though.
 
Last edited:

DR3

Xscream Braaaap
Location
palm harbor, Fl
OK that absolutely sucks azz right there.
oo ya... kinda fried me for a while know this had to be done which is why i put it away for 11 months

Getting jiggy with it... That's how it should have been done in the first place:biggthumpup:

Nice work!!! I'm also digging the 914 in the backround of your avatar :biggthumpup:

for sure..... as for the 914 :sneaky: wish i had the time and $ to give that this a 350 small block swap :439:


hey are you gonna use that red stainless???? dibs.:dance:
its all urs! ill drop it this afternoon:smashfreakB:


That sucks. It took me a while to figure out why my hardware didn't want to thread into my REV. At least SAE stainless is easier to find and cheaper.


Mine sucked until I put a exhaust outlet off an X2 on it, way less cavitation. In retrospect I would have gone with front exhaust though.

yea... i decided to just do away with it... i originally wanted an easy out for exhaust and to not have to have an extra leak to worry about in the back but the side mod just sucked all around so i just went back with a factory rear only
 

DR3

Xscream Braaaap
Location
palm harbor, Fl
i forgot to mention im trying to keep this somewhat light as well... it was 97# b4 i started so we'll see where im at afterwards... keep in mind i did rip out that whole motor bed and the waterlogged foam underneath

heres a pic of the sides cleaned up and ready for the carbon kevlar.. this is micofiber and epoxy in the bondline and biax and chop across all and then ground smooth and im going to put one more 5" strip of just chop along the bondline and then all joined with kevlar..

i also tore into the firewall seeing as it was bonded with silicone and the carbon he did was delaminating :rolleyes:
 

Attachments

  • b24.jpg
    b24.jpg
    81.5 KB · Views: 134
  • b25.jpg
    b25.jpg
    74.7 KB · Views: 101
  • b26.jpg
    b26.jpg
    122.5 KB · Views: 131
  • b27.jpg
    b27.jpg
    108.8 KB · Views: 100

DR3

Xscream Braaaap
Location
palm harbor, Fl
heres some progress on the side exhaust repair... pretty much done here

ground and filled pits with micro fibers then ground and built with glass the filed, filled, blocked, and primed
 

Attachments

  • b28.jpg
    b28.jpg
    49.3 KB · Views: 126
  • b29.jpg
    b29.jpg
    37 KB · Views: 120
  • b30.jpg
    b30.jpg
    56.7 KB · Views: 119
  • b31.jpg
    b31.jpg
    51.1 KB · Views: 130

SuperJETT

So long and thanks for all the fish
Location
none
What did you use to cut the carbon/kevlar with?

Looks good, you're doing it right that's for sure.
 

DR3

Xscream Braaaap
Location
palm harbor, Fl
What did you use to cut the carbon/kevlar with?

Looks good, you're doing it right that's for sure.

thanks for the compliments guys... this is why it took me so long to buckle down and do.. its a poop job..

jett- went through 2pairs of scissors so far... def a difficult product to work with and towards the top where the you have to flair the edges sucks but i made it work pretty well... very time consuming trying not to snag and get it to cut without pulling diff directions
 

SuperJETT

So long and thanks for all the fish
Location
none
thanks for the compliments guys... this is why it took me so long to buckle down and do.. its a poop job..

jett- went through 2pairs of scissors so far... def a difficult product to work with and towards the top where the you have to flair the edges sucks but i made it work pretty well... very time consuming trying not to snag and get it to cut without pulling diff directions


For mine I'm going to pick up several pairs of utility scissors for $1.90/pair

Amazon.com: (BLACK) EMS PARAMEDIC FIRST AID UTILITY Trauma Shears/Scissors 7.25": Health & Personal Care

41rFfeLJtNL._SL500_AA280_.jpg
 

DR3

Xscream Braaaap
Location
palm harbor, Fl
you know... never even though about using something like that or even my trauma sheers lol a lil late now but the two fresh pairs of scissors didnt do too bad ... im just about done.. i was mainly worried about the big long areas and took care of those first
 
Top Bottom