Freestylegeek's squarenose conversion

F

Freestyleriverrat

Guest
I look at it more as centering the bulk of the weight. IMO the more centralized the weight the more nimble the ski, meaning the nose should come up faster and the ski should more respond quickly to your body position
 

freestylegeek

waiting...
Location
Grand Rapids, MI
I look at it more as centering the bulk of the weight. IMO the more centralized the weight the more nimble the ski, meaning the nose should come up faster and the ski should more respond quickly to your body position

I want the tail to come up faster for rolls...

A good comparison is a waterlogged ski and a re-foamed ski.
The waterlogged ski almost always lands tail first on a roll.
The re-foamed ski is able to land flat, or slightly nose first - making a double trouble more fluid.
 
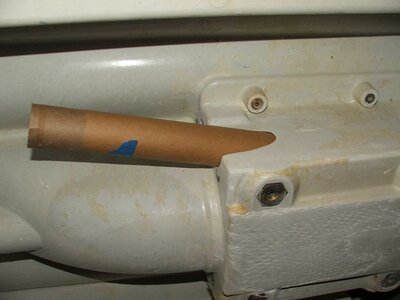
The exhaust side has now been cut, and I've included some shots of the steering relocation hole.
That's gonna be a fun one to glass.

Geek, I had a similar outlet to glass and I made a tube out of glass close to the diameter of the hole as I could get and then sliced it on a bandsaw to get the proper angle to mate to the opening, "tacked" it with 5200 and then glassed it in permanently. Just a thought.
 

djkorn1

kidkornfilms
Site Supporter
Location
Cleveland Ohio
Doesn't cutting the back of the ride plate off raise the nose up too? If you want to lower your nose maybe keep the plate stock or get a longer one...but maybe thats defeating the point of cutting the back of the hull off... IDK.. too confusing for me.

:banghead:

ps...I think you have a lock on the silver rainbow metal flake look... no one else has done it sinse.
 
F

Freestyleriverrat

Guest
Geek, I see that it says "Squarenoser" under you sig.......but you ski is going to be a conversion? really slapping the old school squarenose guys in the face :slap: :haha: Hence forth I dub you the "Squarenoser Poser" :Banane26: :haha: :Banane01:
 

freestylegeek

waiting...
Location
Grand Rapids, MI
Geek, I had a similar outlet to glass and I made a tube out of glass close to the diameter of the hole as I could get and then sliced it on a bandsaw to get the proper angle to mate to the opening, "tacked" it with 5200 and then glassed it in permanently. Just a thought.

That's not a bad way to do it, I'll have to consider that.
Right now I'm planning on using a cardboard tube wrapped in wax paper, and just glassing over top of it to get the shape. Then I'll remove the tube, and glass from the pump side to finish it off.
 

freestylegeek

waiting...
Location
Grand Rapids, MI
Doesn't cutting the back of the ride plate off raise the nose up too? If you want to lower your nose maybe keep the plate stock or get a longer one...but maybe thats defeating the point of cutting the back of the hull off... IDK.. too confusing for me.

:banghead:

ps...I think you have a lock on the silver rainbow metal flake look... no one else has done it sinse.

The rideplate length thing will be a tough one to get just right.
I'll have to do some experimenting.

I still have all of my materials from my first paint job, so the metalflake is not out of the question. :sneaky:
 
freestylegeek
i moved the steering on mine right where you have yours, what i did was shape a piece of pvc pipe to fit then epoxied that in place as a mold to glass over, yours should be easier having it apart i did mine after the hull was together and i had to glue the pvc in holding it through my scupper hole. i didnt have to worry about a leak on mine becuase the pvc piece was actually inside of my huge xft scupper tubes

are you planning on using the same type of foam in this one as you did in the other one, i was thinking of doing that to mine, one of my footholds leaked on me and my ski is now leaning to the right, so i have to refoam mine :(
 
also get one of sergios steering cables, they are priced right and actually have more threads on the pump end you will need that for moving the cable, i actually had to grind a little off one of the cooling bosses on my pump also with it in that location
 
also get one of sergios steering cables, they are priced right and actually have more threads on the pump end you will need that for moving the cable, i actually had to grind a little off one of the cooling bosses on my pump also with it in that location
flip the center section of your pump around. That moves that huge boss out of the way of your cable. You'll have to remove the dowel pin but it will work fine.
 

freestylegeek

waiting...
Location
Grand Rapids, MI
freestylegeek
i moved the steering on mine right where you have yours, what i did was shape a piece of pvc pipe to fit then epoxied that in place as a mold to glass over, yours should be easier having it apart i did mine after the hull was together and i had to glue the pvc in holding it through my scupper hole. i didnt have to worry about a leak on mine becuase the pvc piece was actually inside of my huge xft scupper tubes

are you planning on using the same type of foam in this one as you did in the other one, i was thinking of doing that to mine, one of my footholds leaked on me and my ski is now leaning to the right, so i have to refoam mine :(

Thanks for chiming in on this one Raven!
You've done your fair share of these conversions.:arms:

I've got a perfect size cardboard tube I was going to wrap in wax paper for a mold. Would you recomend the PVC tube instead?

I haven't decided if I will use the 'batting' style solid cell foam or not.
I think if I seal it up right, I shouldn't have to worry about the foam getting waterlogged.
 

freestylegeek

waiting...
Location
Grand Rapids, MI
also get one of sergios steering cables, they are priced right and actually have more threads on the pump end you will need that for moving the cable, i actually had to grind a little off one of the cooling bosses on my pump also with it in that location

Where was this advice before I had my order shipped? :banghead:
With my CATS and Xmetal pole, I have a feeling I will be OK with the stock cable. BUT, if it is a problem, I now know where to find the solution.

One thing I wanted to ask you Raven is, what kind of adheasive did you use for bonding the top deck to the hull?
 

freestylegeek

waiting...
Location
Grand Rapids, MI
flip the center section of your pump around. That moves that huge boss out of the way of your cable. You'll have to remove the dowel pin but it will work fine.

I've thought about that Tom, but I'm concerned about spinning the stator section. I only use 3 of the 4 long bolts that hold the pump assembly together, so without a dowel pin, there is nothing other than those bolts preventing the stator from spinning.
Now I realize my motor isn't making a TON of power, but there has got to be a reason the factory designed the pump that way, right?
 

Mark44

Katie's Boss
Location
100% one place
d

Thanks for chiming in on this one Raven!
You've done your fair share of these conversions.:arms:

I've got a perfect size cardboard tube I was going to wrap in wax paper for a mold. Would you recomend the PVC tube instead?

I haven't decided if I will use the 'batting' style solid cell foam or not.
I think if I seal it up right, I shouldn't have to worry about the foam getting waterlogged.

I thought the same thing but the water still gets in. Do yourself a favor and install drains and voids. They work great!:biggthumpup:

Mark44
 
GEEK

i think your idea will work well also since you access to both sides, i used the pvc simply becuase i needed somthing rigid that i could slip in through the scupper tube since my hull was already together.
i actually flipped my pump and my mounting position is so much higher and has to go down to the streering nozzle so i just had to take a little off.
you might be able to get away with the stock cable, if not xft;s has around 1/2 in more thread for you and its less than half what a stocker cost .
i ended up with one little leak around the back of my right foothold, you can hold it under the water and actually see little bubbles come from the hole.
i am going to be replacing the footholds though they are just too big (take up too much tray room) they look great and they work well, but i like being able to move around the tray easier, so i will go with some that are flush to the sides. and see just how much water i did get in there. and i want to put mine a little further forward like you had yours !!
one trick on your side exhaust once you seal it in dont cut the outlet hole through the hull and you can then stand the ski up and fill it with water to check for leaks, i did this with my scupper tubes as well, then i went back cut the holes.
one thing i will tell you is keep your front exhaust with the side rear, i find that when you are going slow it tends to put back pressure on the exhaust because you rear is under the water more and the water is always covering the side, where as when its in the back you have that area behind the ski with no water to put back pressure on it, something to think about, if i go through a no wake zone you really have to clear it good afterwards , and this wasnt necessary when i had the rear and front side, so i just ordered a x metal box so i can add the front exhaust back on.
i used an epoxy resin that came pre thickened with glass fibers in it, it was supposedly used for the aerpospace industry they would only keep it on the shelf for 6 months and get rid of it, i bought it from a seller on ebay who would then pick it up and sell it for half price, it was a 2:1 mix and would take around 10 hours to cure at 70 degrees, i dont see him selling it anymore, i bought 2 gallons of resin and 1 gallon hardner for 100 dollars and did 2 hulls already and i have about 1/2 enough to do another so i will be curious as to what you will be using, becuase i cant get this stuff anymore, like steve said though you dont need as much as you think.
dont forget to make sure you glass over the pump and ride plate bosses so you dont get any leaks there, i ran the bolts in them then put a small round piece of duct tape just big enough to cover the bolts and then glassed over those. after ssanding the brass inserts real good with 36 grit.

sounds like an awesome build, cant wait to see the topdeck.
i will starting on my 8mil stroker lamey real soon, i have been playing with different parts on my 701 and i am ready for the lamey, i have the cylinder already bored and ported and the crankcase is ported and ready to go, i just need head, pistons, intake and carbs.

anything else i can help with please let me know
 

freestylegeek

waiting...
Location
Grand Rapids, MI
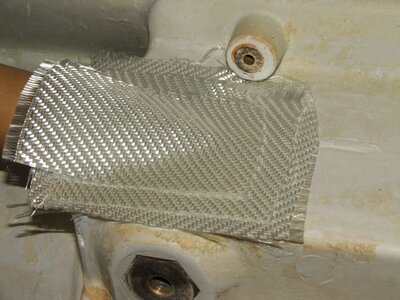
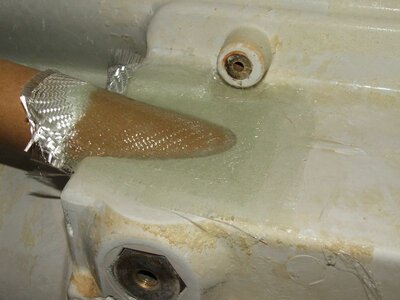
I started glassing in the steering cable relocation area.
I used a cardboard tube wrapped in wax paper for the mold.
I layed three sheets of 12 oz twill weave bi-axial cloth on top of it.
After this area sets-up, I will lay the front section.
Then I will lay two layers on the pump cavity side.

Man, I wish it wasn't getting cold up here.... :banghead:
 

Attachments

  • smaller5.jpg
    smaller5.jpg
    50.6 KB · Views: 162
  • smaller3.jpg
    smaller3.jpg
    84.3 KB · Views: 150
  • smaller6.jpg
    smaller6.jpg
    61.6 KB · Views: 243
Top Bottom