FX-1 build

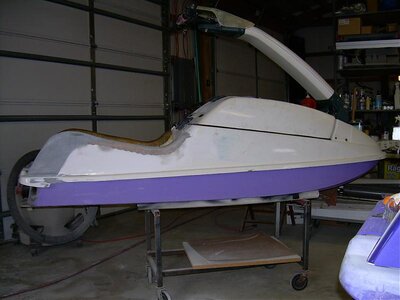
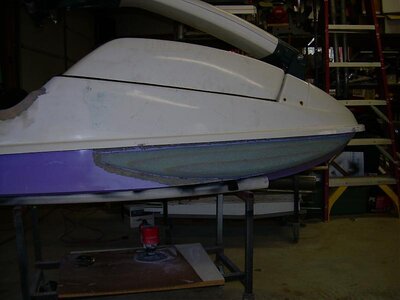
I've been playing with a spare FX-1 to figure out a Kawi 650 pump mod and now that I have the pump figured out, I'm working on putting it together for a test ride.

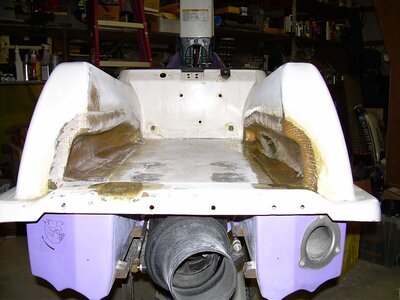
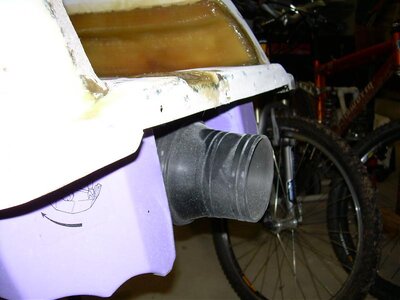
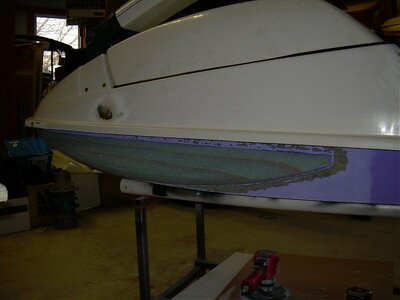
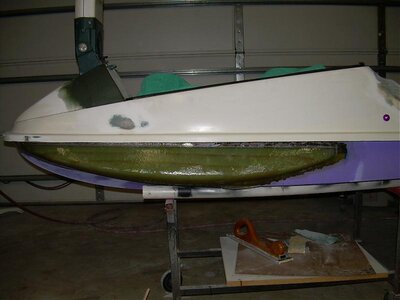
Ok, so I'm a hyprocrite! Since we had a week of sh*t weather further delaying a test ride, I decided to carve out some "home grown" footwells. I've been critical of riders who have become so dependent on the foot holds that it's become their style. I've been riding for 24 years and never felt I needed anything to hold my feet in. I've done stabs, rolls, etc and never had an issue without them. That said, I thought I'd try a variant to see if I liked them. I wanted something less restrictive than a couple of holes I stick my feet into though. I move around alot and am very much "goofy foot" so I made some full length recesses to try out.
 

Attachments

  • kawipumpmod 037.jpg
    kawipumpmod 037.jpg
    53.2 KB · Views: 144
  • kawipumpmod 038.jpg
    kawipumpmod 038.jpg
    68.8 KB · Views: 220
  • kawipumpmod 036.jpg
    kawipumpmod 036.jpg
    42.7 KB · Views: 126
Also played around with a trim system. With the Kawasaki 650 pump conversion I worked out I use an X2 tilt nozzle. The X2 nozzle does two things for me, first it puts the turn nozzle pivot in a perfect position to use the stock FX steering cable by setting it back an inch and second, it gives a tilt capability. I originally was going to simply make something to set the trim nozzle permanently and not bother with a trim system, but I figure what the hell.....I'll try trim.

I used a stock Yami steering cable bulkhead fitting, 1/2" pvc tube and a 900 zxi reverse cable. Then I got an alloy bmx lever and stainless cable and housing and made a linkage to connect the two. It gives me a decent amount of up trim and I can use the cable adjuster at the lever to fine tune the trim.
 

Attachments

  • kawipumpmod 041.jpg
    kawipumpmod 041.jpg
    58.4 KB · Views: 83
  • kawipumpmod 039.jpg
    kawipumpmod 039.jpg
    60.1 KB · Views: 93
  • kawipumpmod 040.jpg
    kawipumpmod 040.jpg
    46.8 KB · Views: 84

onesojourner

I use a thumb throttle.
Location
springfield, mo
thats a pretty cool idea for holds. I would like to know how it works. I have thought about putting a 3rd hold up front since I ride that way a lot. you should lay some more glass on the bottom of the tray though. you have lost a lot of support there. I lay about 3 extra layers of glass just for holds and you have a lot less support than I do.
 
PJS nozzle didn't work with the tilt ring, it's too large on the outside diameter. I wanted the PJS nozzle because it had pivot mounting bosses perpendicular to the stock ones and that would allow me to rotate the nozzle 90 deg to align the bilge pump fitting. Then I found out that the X2 exit nozzle is different than the 650 nozzle in that it has the bilge fitting relocated to handle the 90 deg rotation of the pivots.....so that's what I'm running.

Never did find that FX prop, somehow things vaporize in my shop!
 

Attachments

  • x2 nozzle.jpg
    x2 nozzle.jpg
    68.5 KB · Views: 325
Since the weather was sucking a$$ this weekend I decided to do some more fiberglass work on my FX project. I stole an idea from Slug and re-shaped my tray bolsters. I liked the way it works with the FX lines.

I found a great way to cut fibergalss too. I used a Roto-zip with a tile cutting bit and it cut through my hull like a hot knife through butter. A little more sanding and it's time for paint and turf!

These pics show one side almost done and the other has just been glassed.
 

Attachments

  • DSCN0028.jpg
    DSCN0028.jpg
    51.7 KB · Views: 226
  • DSCN0030.jpg
    DSCN0030.jpg
    53.8 KB · Views: 177
  • DSCN0031.jpg
    DSCN0031.jpg
    47.5 KB · Views: 247
Tubby time!

The next thing I wanted to try was Tubbies. I laminated some foam and hand shaped some tubbies using a template to make sure they're the same. Once shaped, I used contact cement to bond the foam to the hull and I'll be glassing them to the hull tomorrow. I maainly want to keep the nose more bouyant to allow it to go steeper down a face without sub'n, I think these will do the trick!


Pics:
 

Attachments

  • DSCN0035.jpg
    DSCN0035.jpg
    41.6 KB · Views: 225
  • DSCN0034.jpg
    DSCN0034.jpg
    44.6 KB · Views: 155
  • DSCN0036.jpg
    DSCN0036.jpg
    39.1 KB · Views: 129
  • DSCN0037.jpg
    DSCN0037.jpg
    41.3 KB · Views: 154
Weather sucked, so made a little progress. The tubbies are glassed on and one side is almost done with one coat of filler. I need to get a coat of filler on the other side and do a little sanding and finis'!
 

Attachments

  • DSCN0040.jpg
    DSCN0040.jpg
    58.4 KB · Views: 123
  • DSCN0047.jpg
    DSCN0047.jpg
    49.3 KB · Views: 159
  • DSCN0042.jpg
    DSCN0042.jpg
    47.3 KB · Views: 192
While waiting for coats of glass to set, I decided to create some "factory like" finished edges to hide/protect the edge of the hydroturf. I was staring at the rear of the ski and it just seemed unfinished without this edge. I blended it into the the factory edge at the front of the tray to make it look stockish.

I used a piece of 1/4" weather stripping to create a crisp edge and then added marine filler up to the weather stripping. When it sets, you remove the weather stripping and it gave it a perfect 1/4" profile and made it easy to do. The pictures kinda suck due to flash and it's hard to see, but you get the idea........
 

Attachments

  • DSCN0044.jpg
    DSCN0044.jpg
    43.9 KB · Views: 174
  • DSCN0043.jpg
    DSCN0043.jpg
    50.3 KB · Views: 204
  • DSCN0045.jpg
    DSCN0045.jpg
    49.7 KB · Views: 165
Thanks, but it's really just hackery! It'll look OK when it's done though.

I also filled the area where the ghey factory plastic trim thingy went and flared it into the hood line. I used weather stripping here to set the clearence between the filler and the pole bracket. It gave it a clean edge and I made sure I had clearance for my UMI billet bracket to be added later (it's and inch wider than stock). One more coat of filler and this part is done.
 

Attachments

  • DSCN0039.jpg
    DSCN0039.jpg
    49.3 KB · Views: 129
  • DSCN0038.jpg
    DSCN0038.jpg
    59 KB · Views: 131

adet16v

No like winter
Looking very nice. Any ideas for paint yet?

I hate the plastic nose piece as well and really wanted to get rid of it. I didnt want to go through the trouble of using filler and repainting at this point so I just pulled it and turfed over it. I stripped and painted the bracket then as well.

Here is what it looks like.
 

Attachments

  • ebay 009.jpg
    ebay 009.jpg
    97.5 KB · Views: 141
  • ebay 012.jpg
    ebay 012.jpg
    72.4 KB · Views: 102
  • ebay 005.jpg
    ebay 005.jpg
    103.5 KB · Views: 169
  • ebay 004.jpg
    ebay 004.jpg
    75.9 KB · Views: 246
Tubbie Report!

I went out today and tested the tubbies in the surf and doing some flat water bouy carving and I only have two words to describe Tubbies.......Frickin' Awesome!!!

In the surf (which is all I really care about) they are incredible for playing in the white water. You can get so far inside the lip, through a hard cutback and shoot down the face at an unbelievable angle without pearlin' the nose.

On flat water, it feels more like it's on rails. This will take some getting used to for me 'cause I'm very accustomed the squirley nature of the FX. I found if I get down low on a turn it will simply hold the line and pull g through the turn. You have to push it pretty hard to make it slide out on you.

Adet....Your ski is lookin' good. A friend of mine turfed his where the plastic thingy used to go and it looks good. I just figured since I was getting ready to paint I'd fill it in.
 

Flash-FX

No Square..No Round..FX-1
Spy Photo.


If Yamaha built a ski that ran and handled like this "back int the day", the Squarenose may never had evolved into a Roundnose . :hail:
 

Attachments

  • jdtubfx1.jpg
    jdtubfx1.jpg
    50.1 KB · Views: 318

joe b

depth tester
Location
northfield, nj
Awesome:arms: I was out front @ 3 with the kids. I saw your jet blast & airs over the jetty but by the time we walked down you were gone:frown:

You guys ridding today?? I'll bring video camera:biggthumpup:
 
Paint time!

With all the itchy scratchy work done, it's time for paint. Since the ski is made up of parts of many different chunks of Yamaha and Kawi parts, and will be getting a big bore "franky" motor, I went with the "Frankenstein" theme.

These photos are a progression of the paint scheme. I hope to have it completed this weekend and be riding it next weekend.
 

Attachments

  • DSCN0066.jpg
    DSCN0066.jpg
    39 KB · Views: 104
  • DSCN0064.jpg
    DSCN0064.jpg
    37.4 KB · Views: 93
Top Bottom