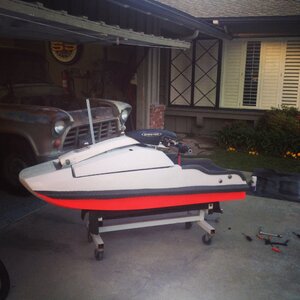
Making of the SNX Hull

Made a little progress on the nose. Used a 1/8" steel rod to make the bow line. Screws and washers to hold the rod in place and adjust the angle. Foam blocks on top of the exposed screws. Safety first... more like a safety afterthought since I probably stabbed myself 5 or 6 times first.

za4yqy4a.jpg

zarurazu.jpg

2a9evata.jpg


Total length of the hull will be 76" nose to rear bond line. I could take another 2" off the rear bond line if I really wanted to. This makes it -12" from stock (current year model).

ajuhymer.jpg


Created a foam block from XPS sheets. Used 3m super 80 to adhere the panels. Stuffed it down in the nose. Using the steel rod as a guide I cut the block down with a sawzall.

7emu2ary.jpg


Sanded the foam and SMC down to a rough idea of what I want, then layered on some body filler.

a2u2enur.jpg

ahy7ehud.jpg

eze3y3ug.jpg

9uze9yhu.jpg


That's where she sits for now. I want to reduce the nose angle so it transitions better. Also want to reduce the center in the rockered area a bit so it isn't quite so far below the sides of the hull. You can see that little "bubble" like section in last picture right above the 90* elbows on the PVC stand.


Sent from my iPhone using Tapatalk
 
The plan is to have a .5" bond line across the nose and down the sides transitioning into 1.75"-2" in the rear.


Sent from my iPhone using Tapatalk
 
I just did the exact same thing to my 91sn. The build thread is on pwctoday. I absolutely love how the ski rides, rotates super easy. Feels like many aftermarket hulls
 

Attachments

  • image.jpg
    image.jpg
    150.7 KB · Views: 212
Nice work! Did you weigh It before and after? I would go check your build thread out, but I don't get in PWC today. You should post it here. Or atleast PM a link and I'll go check it out.


Sent from my iPhone using Tapatalk
 
Looks really good. I like the flatter lines across the nose and hood. And your lowered gunwales look really good.

Sent from my iPhone using Tapatalk
 
More progress on the nose. A lot of time spent looking at it, measuring everything, sanding a little more, measuring again, more sanding... It's *almost* symmetrical. A couple of the angles are off by a few degrees.

The nose stops where the bondo ends. The extra foam will be removed after I tweak the lines to make it symmetrical (or as close as possible) and lay glass over it.

The plan is for the lines to continue up the top deck. The front bond line will probably be closer to 1" and at a downward angle. The top deck will overhang the bottom deck somewhat giving the appearance of no bond line.

nany5e4a.jpg

4u2u9yre.jpg

yre9udeq.jpg

paryre3a.jpg

zuduvupe.jpg

eba2y8e9.jpg

ateguzer.jpg

june9uga.jpg


Some of the lines are hard to see in the pictures due to the lighting and different shades of bondo, SMC, and epoxy.

So what do you guys think? Like it? Hate it? Don't feel strongly one way or the other?


Sent from my iPhone using Tapatalk
 
I did. I did all of the measuring with a tape and straight edge so far to get everything pretty closely lined up. Friday I am going to go through with the profile gauge and dial it in. The very front of the nose is flat, but it isn't square to the sides of the hull, so that needs to be adjusted. Then there's a couple of lines that are off by a 1/8-1/4" causing some angles to be different.There's a few pictures where it looks more off than it actually is. The iPhone camera skews everything for some reason. I can take a picture of a perfect right angle and it will look + or - 90 slightly if it's in the wrong spot.


Sent from my iPhone using Tapatalk
 
The idea with widening the center of the very front of the rocker was to help the nose transition up/down a wave without "punching" through the wave. It might have little to no effect or a negative effect, I don't know yet. Just a thought I had while working on the nose.


Sent from my iPhone using Tapatalk
 
Slow and steady progress. Nothing really new or cool to report. Lots of sanding, lots of bondo. Tubbies are in progress. Next week I have a long overdue vacation that I will spend working night and day on this. Hopefully should have the bottom deck done, Tubbies molded and pulled, and the top deck in progresss by the end of the vacation.

Also placed an order for some carbon and bagging materials so I'll probably work in a Vac bagged carbon/glass plate. First plate served its purpose to be a bondo mold, but there's way too many air bubble around the chines and too much flex. I wouldn't run it.

Progress pics
meny7u9u.jpg

runeqe6y.jpg

pa7e5y3a.jpg

nusu4y4e.jpg

ave5u2uz.jpg


Pump tunnel was slightly asymmetrical in those pics. I went back and adjusted that. Filled the nose with poly urethane. Going to go back and Lower the center of the nose a little more.


Sent from my iPhone using Tapatalk
 
Last edited:
I lost count on the hours somewhere north of 250. Let's call it ~275. But bottom deck is finally finished.

I believe this is where I left off..

zu9e8u8e.jpg


Cut up some XPS and attached it to the nose with masking tape while the gorilla glue sets.

ebapuha3.jpg


Once the glue set, I sanded down the XPS to ~30* on the nose that transitions to 0 at the sides. Foil tape over the XPS and some clay to fill in the the gaps. Waxed the tape and then laid several layers of 8oz glass tape to form the new bond rail.

yjerage6.jpg


Rail angles weren't exactly what I wanted in some areas, so I had to go back and cut them out and repeat the XPS/foil tape and lay more glass

uduhaqyq.jpg


Sanded down the center and prepped the sides and the new bond rail for primer.

nuzuqasy.jpg

9e5aqa4y.jpg

ape7uzen.jpg

ety8umu9.jpg


What do you guys think about the bottom deck?

Tubby plugs are ready to be molded. Should have that done next week. The transformation from 4 2'x2'x1" pieces of XPS into a part has been one of the coolest process to me. I'll post a full write up once I have the first parts out of the mold.


Sent from my iPhone using Tapatalk
 
Top Bottom