FX-1 Purple Madness

E350

Site Supporter
Location
Sacramento Delta
Interesting thing you guys are doing with the rails. Can I assume that it is to make the ski hold a carve better when on its side?

The thing I notice about the FX-1 vs the SN SJ or even the 550sx is that while the latter skis seem to somewhat want to roll upright out of a turn, the FX-1 will stay on its side unless steering and body weight shift are directed to the outside of the turn.

Do you guys notice this too?

Do tubbies help the front roll up easier out of a turn?
 

Sanoman

AbouttoKrash
Location
NE Tenn
Hopefully l can get the other rail done today.Work has been crazy busy,which l am thankful.But need to spend a lot of time this weekend doing several areas:
1.Glass topside other rail
2.Grind and start glassing inside of front tow eye delete.Along with this,l need to fill in the 2 holes that were done to accept the h/pole bracket because l’m only using a one hole bracket.And also grinding down the inside of the gas fill delete.Thickened epoxy was used but no glass used to reinforce the area.

lf l can get all this done,l feel like l’m kind of back on track...
 

Sanoman

AbouttoKrash
Location
NE Tenn
From my previous post,l got halfway on saturday in what l wanted to get done.

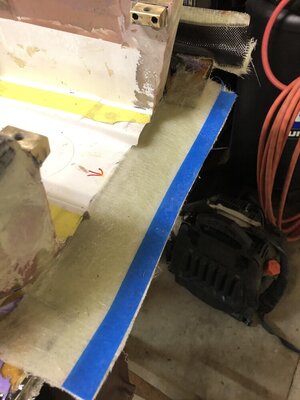
Got the other rail (top side) glassed.Also sanded and glassed the last two layers (12 oz biax) tying the end cap to the sides of the pump box on the inside.Laid a couple of layers across the rear bond rail voids tying it to the top of the end caps.l’ll have to build up the bottom side of the rail.But that can come later.ls it feeling like “Req” build yet,lol

Probably will flip it over and start hand sanding on the inside of the new extended side rails,being that it Easter.Didn’t want to run the compressor today.

And the cardboard l used with shipping tape over them (bond rail) for some stupid reason are completely stuck to the glass.More sanding..

And Happy Easter to all!
 

Attachments

  • E50C5E87-2363-4D46-A899-36FB654F3FFD.jpeg
    E50C5E87-2363-4D46-A899-36FB654F3FFD.jpeg
    215.1 KB · Views: 107
  • CDA4696C-0673-4BD0-84B1-04F3EEE3A104.jpeg
    CDA4696C-0673-4BD0-84B1-04F3EEE3A104.jpeg
    143.6 KB · Views: 110
Last edited:

Sanoman

AbouttoKrash
Location
NE Tenn
Another weekend is coming up.Things that should get done on the build:
(hopefully my sweet wife’s “honey do list” will be small..)

1.Sand the underside of the new rails.Lay up glass and finish.Probably will do multiple layers to make that happen.
2.As well as sanding mentioned above,sand and work on the inside of the nose.And lay some carbon when done.
3.Lay up with several layers of carbon on the rear bondrail,As well as wrapping the end caps with carbon.

Got the cardboard off the rear bond rail,it was not as hard as l thought.l found a perfect piece of carbon that is about 3/16” thick to incorporate into the rear rail.Going to use it for strength and a quick buildup.

Writing all the things l “need” to get done on this build has been a great help.Keeping focused in order to finish.Let’s see what happens this weekend.Will be posting up some pics as l move along.
 
Location
US
I like the build and seeing it come to life, keep it up! I ran out of resin because I wasn't keeping track of how much I was using and how long it takes to come in! Lol uhhhggf

Sent from my SM-G975U1 using Tapatalk
 

Sanoman

AbouttoKrash
Location
NE Tenn
Wait a minute. I never once bullied him about the weight........................
Hell,l did!! You know that ski was heavy Jon. Still wonder how much it weighed:eek:.But you’re right,he did do nice work for not knowing much.

l’m trying to finish with more carbon and have been squeegeeing out any excess resin,cause l know it can become a factor.
 
Last edited:

Sanoman

AbouttoKrash
Location
NE Tenn
Just got a little of my list done.Never got time yesterday,so did what l could today.
l’ll start by saying that l have a lot of respect to anyone who has done this to their ski.Holy crap,it’s a bunch of work from getting everything sanded to laying the wetted out glass on inside and outside of the rails.Decided to to do both sides today to keep the process moving along.Looking back it probably wasn’t the best idea.All the glass (12 oz biax) you see on my table went on the ski today,along with some 5 oz carbon tape.Plus 6 layers of the biax on the rear bond rail.You know you are working against the clock the whole time so l went ahead and spread the resin out everything except the carbon tape.Getting the wet glass to butt up against the rail and then pushing it into the void between the existing cut off rail and the top layers that l added last week was a time consuming process.Being that you want to be sure that it makes contact with as much of the new top layers as possible.Seemed like that took forever.Then with what resin l had left l laid the carbon tape another top.
As soon as l got that done,l brought it out into the direct sunlight having to continue pushing it all down till it finally tacked up enough to stay down.l’ll let it set up for the next couple days and then cut off the excess.

l tried sanding down the inside under the pole mount in the nose with a small grinder,but that proved to be difficult.So looks like some hand sanding is what will have to be done.
 

Attachments

  • C9BB050B-EF45-4160-A9E4-B567175DB4CD.jpeg
    C9BB050B-EF45-4160-A9E4-B567175DB4CD.jpeg
    157.9 KB · Views: 83
  • 535E5F9E-6593-48E6-846F-5CC8E93DCCD3.jpeg
    535E5F9E-6593-48E6-846F-5CC8E93DCCD3.jpeg
    168.4 KB · Views: 86
  • 02822216-ACE8-4F3E-871A-CB98BEB11FE5.jpeg
    02822216-ACE8-4F3E-871A-CB98BEB11FE5.jpeg
    228.2 KB · Views: 84
  • 5135FE44-A5F6-4837-BAE9-2E7AD721508C.jpeg
    5135FE44-A5F6-4837-BAE9-2E7AD721508C.jpeg
    184 KB · Views: 78
  • D6B47F3D-9477-4031-8225-993F7D6679DC.jpeg
    D6B47F3D-9477-4031-8225-993F7D6679DC.jpeg
    146.7 KB · Views: 75
  • FB6F27AC-1E73-43C4-AEDC-1368D1326FE6.jpeg
    FB6F27AC-1E73-43C4-AEDC-1368D1326FE6.jpeg
    211.8 KB · Views: 75
  • 06249789-955B-4C4A-8714-4B3ECD27F84F.jpeg
    06249789-955B-4C4A-8714-4B3ECD27F84F.jpeg
    105.5 KB · Views: 87

Sanoman

AbouttoKrash
Location
NE Tenn
Pics later tonight,but have got some more hand sanding to do on the inside of the nose.Then l can lay some carbon in it.l also cut one side of the rail off to start finish work on it.

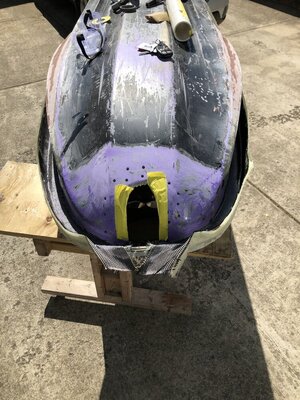
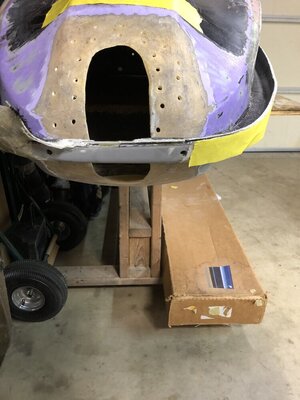
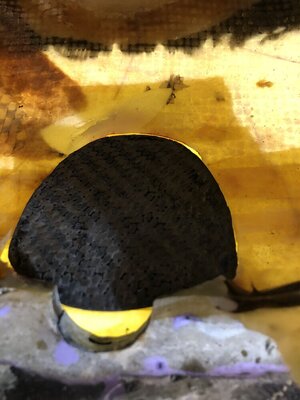
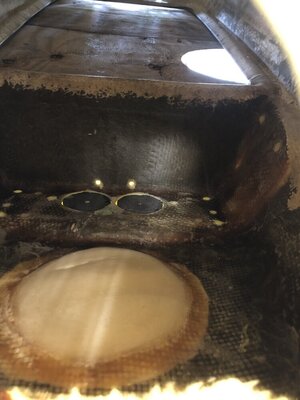
Yesterday l ground most of the inside (the nose) from the two hole bracket area to the tow eye delete on the top and bottom.l cut two thick discs of carbon (2.5”) to sandwich between inside and out for the h/pole bracket area.Also made 2 thin pieces of carbon shaped to fit in the tow eye area.I used a die grinder to cut some channels into the pieces to get them to form into a curved shape to match the curvature of the nose.Also “V’ed” the pieces and holes to get maximum contact (on the edges) inside and out between the layers of carbon.
Today l will start lay some carbon on the inside in steps,going a little larger on each till l lay one large piece over the inside whole area.Most of the reinforcement will be inside.Already had several holes drilled to let the resin run through inside and out.May be later tonight (about 4 hours later) but plan on laying some carbon on the outside to make a good chemical bond between.This should wrap up the nose area and l can start back on the tray area installing water lines,exhaust,driveshaft,and steering cable tubes.As well as some inserts for the front of the scoop grate.The previous owner kept all those pieces,thank goodness.
 
Location
US
Are you laminating the entire inside, or just pieces of the inside? I'm using some carbon kevlar and laminating inside and out... then I will go thru and build the tray walls, firewall, and run exhaust and water lines... I also really like the nose your doing I think its going to turn out really good... keep it up... im waiting on more hardener

Sent from my SM-G975U1 using Tapatalk
 

Sanoman

AbouttoKrash
Location
NE Tenn
Are you laminating the entire inside, or just pieces of the inside? I'm using some carbon kevlar and laminating inside and out... then I will go thru and build the tray walls, firewall, and run exhaust and water lines... I also really like the nose your doing I think its going to turn out really good... keep it up... im waiting on more hardener

Sent from my SM-G975U1 using Tapatalk
Not laminating the entire inside.Weight is a big factor.As much as l did in the tray to graft in the 144 pump tunnel is already a lot of weight.On the 3 areas l glassed in yesterday with carbon,l use small pieces to start than add a larger piece over.Then finished with one large piece tying them all together.Three layers of carbon is enough in my mind.All of that will give strength to the bond.l had to leave the one hole on the bottom side to allow access for everything else.Plan on sanding and finishing it today.

l was able to use some thickened epoxy to fill in the existing holes on the h/pole area and also the top of the tow eye.Looks like a mess right now,but want a good bond between inside and out.l’ll sand down the nose and fix it later.
 

Attachments

  • 3BA5775E-021A-4AC6-BA56-CA964DF9018D.jpeg
    3BA5775E-021A-4AC6-BA56-CA964DF9018D.jpeg
    315.2 KB · Views: 67
  • F7C2F221-8BBD-4906-99C4-81A1E9202060.jpeg
    F7C2F221-8BBD-4906-99C4-81A1E9202060.jpeg
    110.5 KB · Views: 62
  • 609F2C01-8E06-43A5-BAF0-F849A7DC51D2.jpeg
    609F2C01-8E06-43A5-BAF0-F849A7DC51D2.jpeg
    103.1 KB · Views: 61
  • 973E0E4D-04C1-4290-93F6-DCA885BB0AD8.jpeg
    973E0E4D-04C1-4290-93F6-DCA885BB0AD8.jpeg
    101.4 KB · Views: 63
  • C5DA8005-2371-4DB0-B2B2-0CAF41B5C884.jpeg
    C5DA8005-2371-4DB0-B2B2-0CAF41B5C884.jpeg
    165.7 KB · Views: 70
Location
Michigan
Do you happen to know a rough stock hull weight, and about what you're shooting for?

I'd like to keep an eye on the weight of mine once I get a bit more time to dive into it.
 
No and l wish l did! Maybe someone knows around here what the stock hull weight is?

I have a Yamaha brochure from 1994, these numbers might help get a close Idea... The good news is, I have a virtually stock FX-1 that will be built up very similar to Purple Madness. I will absolutely weigh the hull and keep track of the numbers as we go along. This question will be answered eventually haha :)


IMG_7940.jpeg
IMG_7939.jpeg
IMG_7941.jpeg
IMG_7942.jpeg
 
Last edited:
I bet I could come up with a pretty close number for stock hull weight based on mine... I'll throw it on a scale before I hack anything else away.

@brapperdoodle, what driveshaft are you planning to run?
Good question, I haven't gotten that far but im planning on using the driveshaft from my Skat-Trak 144 set-back mag. It is slightly too short for my Superjet but im talking 1/8" too short or so. I also have a Tom21 pump tunnel that I will be installing. One day that is haha
 
Top Bottom