Custom/Hybrid The making of my "Feral" hull...

Waternut

Customizing addict
Location
Macon, GA
Mcdog and Pabloescobar helped lay up the bottom deck yesterday. My wisdom teeth gets pulled Wed morning so I may or may not be able to pull it out of the mold before then. We'll see...

Here's the 2.5 hour process to lay it up with a little special surprise around 1:45 that you need to turn the volume up on. Everything was precut and all bagging material was laid out to fit just right.

[video=vimeo;38759376]https://vimeo.com/38759376[/video]
 

Schmidty721

someone turf my rails
Location
WI
Awesome work. That appeared to go down nice and smooth. Do you have any tricks to keep the carbon from fraying on the ends?
When I work with the heavier weave in larger pieces it seems like I always get long strings that want to come out of the weave.
 

McDog

Other Administrator
Staff member
Location
South Florida
The vacuum bagging smashes it all together. We were not going for visual perfection, just a strong lightweight hull.
 

Waternut

Customizing addict
Location
Macon, GA
Awesome work. That appeared to go down nice and smooth. Do you have any tricks to keep the carbon from fraying on the ends?
When I work with the heavier weave in larger pieces it seems like I always get long strings that want to come out of the weave.

Many hours of prep work to make it go smooth and even with all of that, not everything lays up the way you thought it would.

One thing that helps a lot when initially cutting the carbon is to pull one of the tow's out of the fabric in each direction where you want to cut. When you do that, it gives a clear cut line between tow's and you don't end up with the angled cuts that have 4-5 tow's cut in the middle of your piece that want to split, fray, and otherwise cause a mess. Then just dab the edges instead of pulling/brushing and you'll be good.
 

tokarzl

itching my arms
The first part out of the mold is always a pain!! be ready to rip on that thing for a while, as it gets used more, it seasons the mold and is much easier release parts from the mold.
 

Waternut

Customizing addict
Location
Macon, GA
My molds don't make it to round two...lol. My whole plan was to pop one part out of them so they were made cheaper than a production mold to cut costs and save time. I should be able to fix them up and pull another part out if necessary but it would take time for sure.

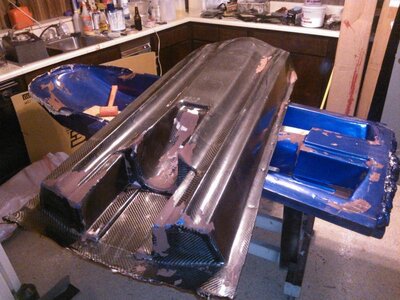
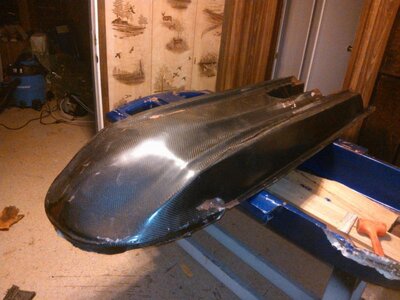
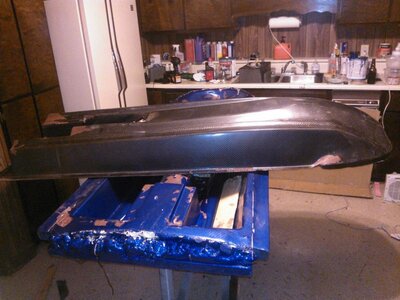
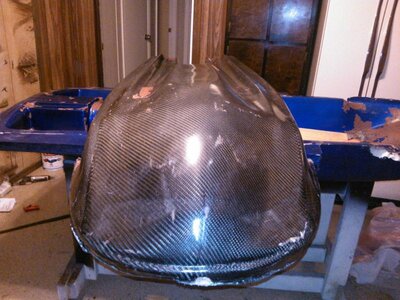
Anyway, here is the bottom deck popped out of the mold. It took A LOT of work! I wailed on 2 fence boards down the nose trying to pop the back end up. I'm starting to wonder if this mold release just sucks because both decks have pulled away at the primer in multiple places instead of the smooth, glossy, waxed, surface with mold release.
 

Attachments

  • WP_000038.jpg
    WP_000038.jpg
    87.9 KB · Views: 368
  • WP_000039.jpg
    WP_000039.jpg
    67.1 KB · Views: 351
  • WP_000040.jpg
    WP_000040.jpg
    71.9 KB · Views: 337
  • WP_000041.jpg
    WP_000041.jpg
    82.8 KB · Views: 342

Roo

it's all good
Site Supporter
good work - but i am wondering why you made your mold THEN coated the inside of it with the blue paint?

why didn't you use tooling gelcoat, then pile on the glass over that?

that would have given you a nice, durable finish for the inside of the mold for future parts.


either way - made props on a project like this.

i have made 2 attempts at it and lost the drive to complete it...
 

Waternut

Customizing addict
Location
Macon, GA
I didn't do the tooling gelcoat mostly because I was cheap and knew that I may destroy the mold anyway. Also because I was cheap and didn't see a need to make a super beefy mold for something I wasn't planning take into production. The paint was free since I already had it so that's what I used.

I can understand the lack of motivation to complete the molds. I suffered from that quite a bit myself this winter. If you're shooting for perfection and a sturdy mold, that motivation loss is even greater. Even though the molds looks smooth and the hulls came out pretty good, I could've easily spent another 100 hours and hundreds of dollars extra on each of the molds trying to make them better and more durable. At some point I had to draw the line between perfect, bulletproof, and functional.
 

Waternut

Customizing addict
Location
Macon, GA
LOL Yes but it is the downstairs kitchen. It's basically my workshop and a couple times a year, I'll clean all the paint off the floor and counters so I can use it. haha
 

Waternut

Customizing addict
Location
Macon, GA
Not from epoxy resin. Even when I started cooking the resin, it would really only smell in that room despite having the doors open. If I use polyester resin in the garage, it'll stink up the downstairs and upstairs though.
 

tokarzl

itching my arms
It is the chemicals still stuck in the mold are released as the part cures, Tooling gel coat is usually better for releasing a part because of heat and chemicals in the mold, I usually just do like 2layers of chop mat for the first part to draw out the chemicals. Looks great tho man keep up the good work!! You can also build up a little wax in problem areas if u know where it's going to lock up
 

Waternut

Customizing addict
Location
Macon, GA
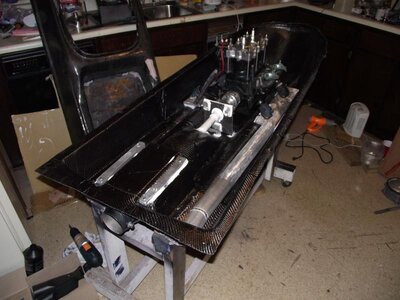
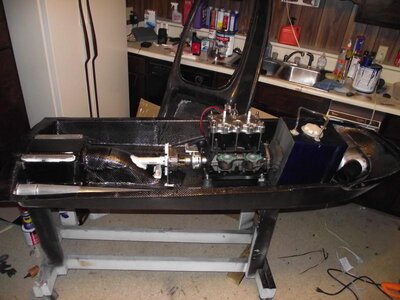
Everything is lined up and put in place temporarily with 5200. Will add some carbon over the fittings to make sure they stay. Also need to install the versiplugs, tank and waterbox fittings, and water and steering lines. Maybe sometime next week, I can put the two halves together.


oh yeah...and make the hood and rideplate. lol Have the molds for those at least.
 

Attachments

  • DSCF1006.jpg
    DSCF1006.jpg
    67.6 KB · Views: 381
  • DSCF1007.jpg
    DSCF1007.jpg
    72 KB · Views: 380
Last edited:

Waternut

Customizing addict
Location
Macon, GA
Sticking with that little square for the midshaft and that's it. Not having that bulkhead makes a lot of wrenching a lot easier and you never have any waterlogged foam or trapped water that needs to be drained. The downside is obviously the danger of sinking if the stars align in your disfavor...
 
Top Bottom